Making it easier for shoppers to find the products they want to buy can help ensure sales and boost your profits. This is what tags are for. As such, if you’re operating a WooCommerce multi-vendor platform, it makes sense to use WooCommerce tags.
Tags are descriptive keywords or labels that serve as invaluable tools for anyone running an e-commerce venture. Think of them as virtual signposts guiding customers to the exact products they’re searching for.
For this reason, today’s article will explore tags. In addition, we’ll show you how to use WC Vendors, a powerful WooCommerce marketplace solution, to implement WooCommerce product tags in your own enterprise. This way, you can enjoy the benefits they offer.
So let’s get right into it!
I. WooCommerce Tags: Definition And Benefits
What are tags in the context of a WooCommerce marketplace? Basically, they’re descriptive keywords or labels that marketplace operators or online store owners attach to products to help organize and categorize said products. These tags provide additional information about the product beyond its basic attributes and specifications.
Here’s how tags are typically used in an online store:
- Organization: Marketplace operators and vendors use tags to organize products into specific categories or groups. For example, a clothing store might use tags like “wool,” “cotton, “retro,” etc.
- Searchability: Tags make items in the marketplace easier to find via the website’s search functions. Basically, customers can do this by inputting relevant tags into the search bar or clicking tags. The website then looks for and presents products using the same tag to the customer.
- Filtering: Usually, tags are used as filtering options on category pages or search results pages. Customers can filter products based on specific tags to narrow down their search results.
- Cross-selling and recommendations: Tags can also be used to identify related or complementary products. This allows the online store to suggest additional products to customers based on the tags associated with the products they are viewing.
Overall, tags play a crucial role in improving the organization, searchability, and discoverability of specific products in an online store. Thus, they enhance the browsing and shopping experience for customers.
II. How To Implement WooCommerce Tags In Your Multi-Vendor Marketplace (In 3 Easy Steps)
Creating tags is something WordPress allows you to do from the get-go. As such, it’s a great idea to take advantage of this feature whether you’re running a multi-vendor marketplace, traditional online store, or blog.
Of course, for these tags to work in an online marketplace, you’ll first need a traditional online store powered by WordPress and WooCommerce. Then, you’ll need to use WC Vendors to convert said store into a marketplace.
If you need step-by-step instructions on implementing this conversion process, check out the following comprehensive guides:
- How To Create An Online Marketplace: A Beginner’s Guide
- How To Build Your First Multi-Vendor Ecommerce Website (Full Guide)
With that in mind, here’s how you can use tags to help customers find products in your marketplace!
Step 1: Navigate to the Product tags page
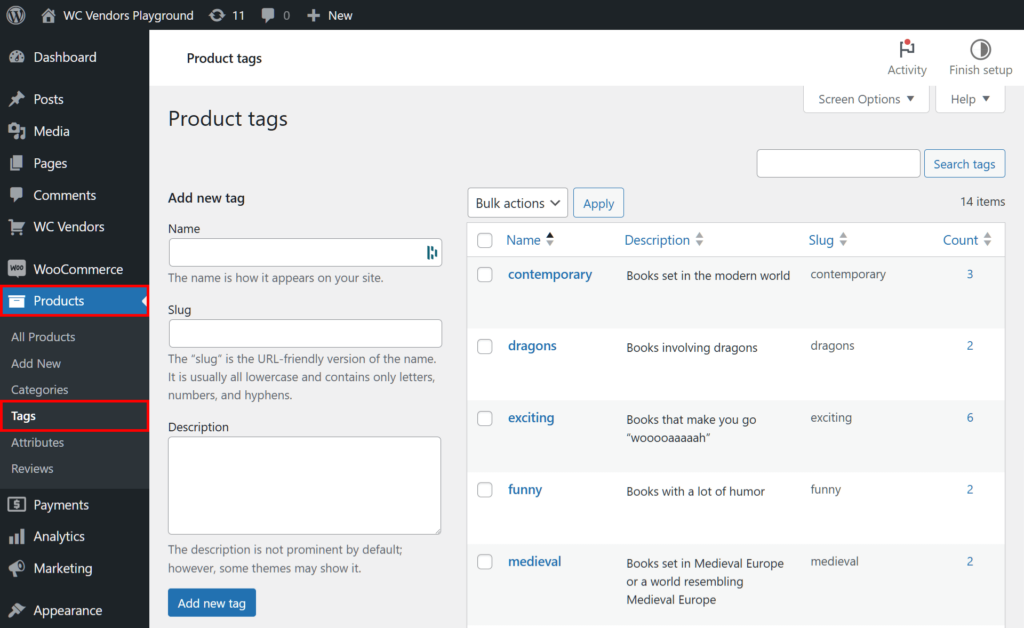
Head to your WordPress dashboard and click Products > Tags. This takes you to the Product tags page, where you can view your list of tags.
By default, this page should be empty of tags. However, every time you create a tag, it’ll appear on the box on the right side. And if you use this feature generously, you’ll eventually have a long list of tags.
Now, let’s learn how to create tags for your marketplace!
Step 2: Create a new tag
On the left side of the page is the Add new tag area, which comes with three options. To create a tag, simply fill each option’s entry field with information.
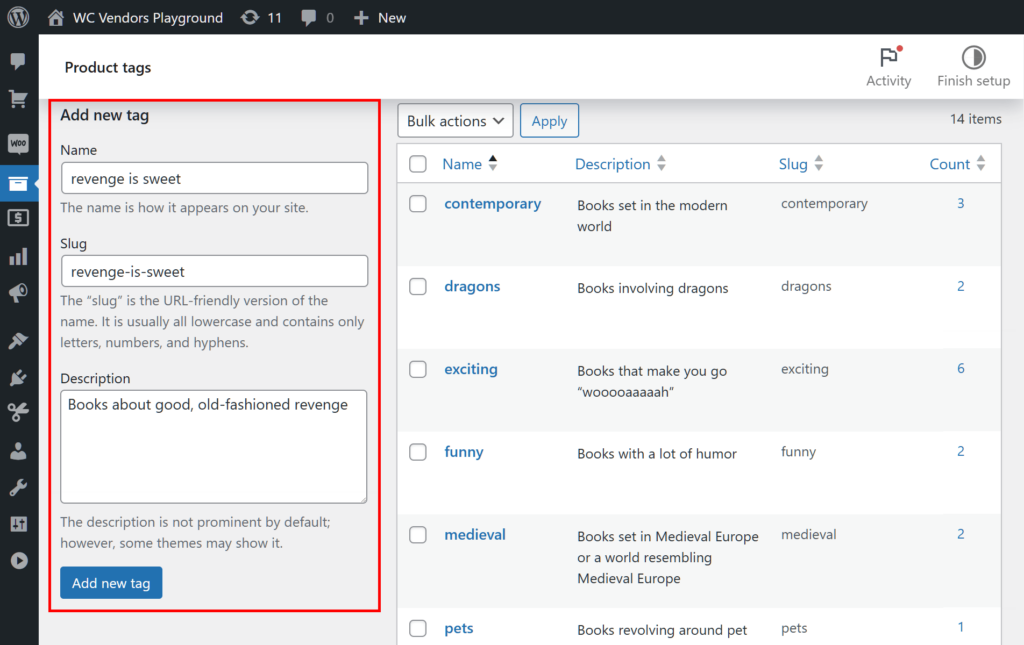
For example, let’s say we’re operating an online bookstore, and we want to make it easy for customers to find books centered around the theme of vengeance. Thus, we can create a new tag named “revenge is sweet”:
Using this scenario, let’s discuss the different options in the Add new tag area.
The first option is Name. Simply type the name of your new tag into the provided field. This name is how the tag appears on your site.
We’ll name our tag “revenge is sweet.”
Next, there’s the Slug option. Basically, a “slug” is the URL-friendly version of your tag’s name. In other words, it appears in the tag’s URL. As such, all of its characters should be lowercase. In addition, it should only contain letters, numbers, and hyphens.
Let’s write “revenge-is-sweet” in the Slug entry field.
Finally, there’s the Description option. Here, you can describe what your tag is for. The description doesn’t appear in every theme, so it’s not as important as the first two options. In most cases, writing the description is for your benefit, as it reminds you about the tag’s relevance.
Now, for the last step…
Step 3: Save your work!
Once you’re happy with your new tag, click the Add new tag button. This creates your tag, adding it to the list on the right side of the page. More importantly, you can now use this tag in your marketplace to help customers find desired products.
For more information on how to add and manage tags, check out the WooCommerce documentation.
III. How To Attach WooCommerce Tags To The Products On Your Platform
So, as the marketplace operator, how do you attach a tag to a product?
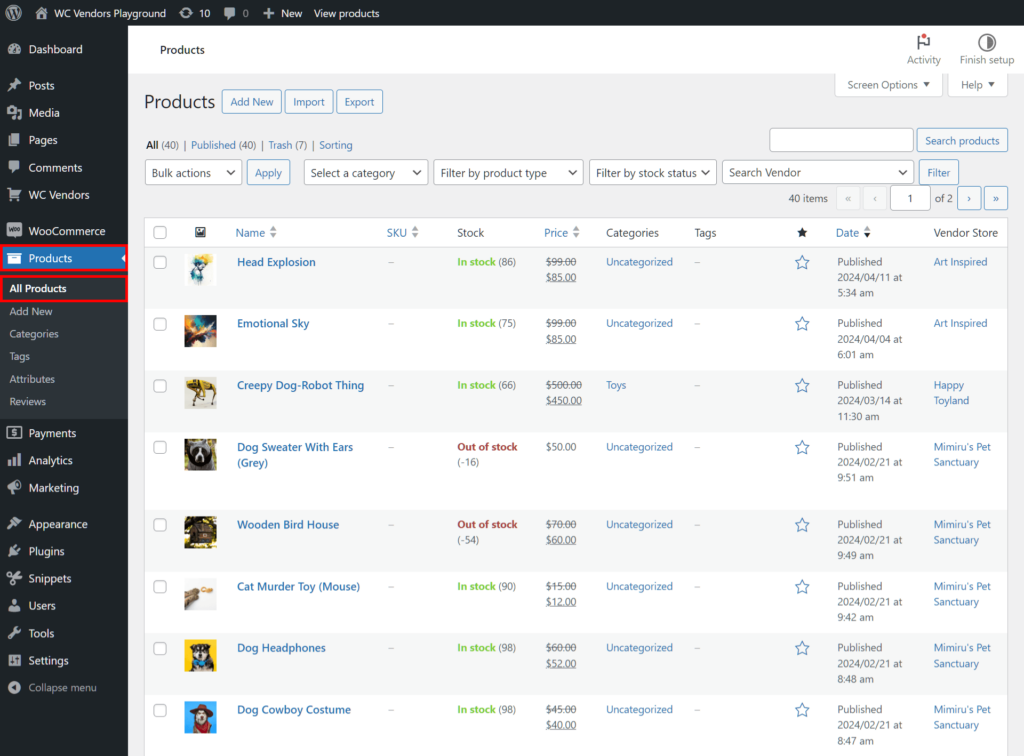
Again, head to your WordPress dashboard. This time, however, click Products > All Products. This redirects you to your Products page, which lists all the products in your marketplace.
Next, locate the product you want to attach WooCommerce tags to. In our example, we’ll attach the “revenge is sweet” tag to the product, “A Dog’s Bloody Purpose – Paperback.”
There are two ways to attach WooCommerce tags to a product:
Method 1
Click the product’s name or Edit button. This takes you to the product’s Edit Product page.
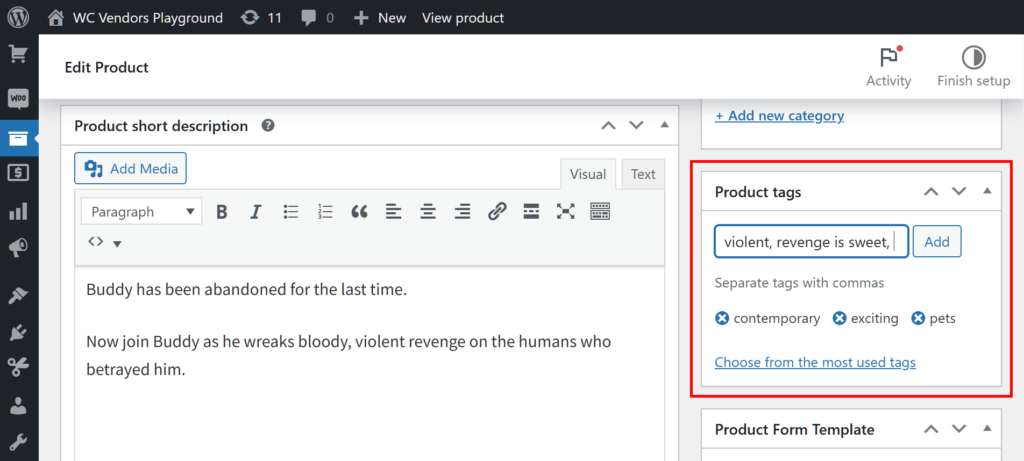
Find the Product tags box. Typically, this is on the right side of the page. Then, type the names of the WooCommerce product tags into the entry field. Once you’re done, click the Add button.
Before leaving the page, head to the Publish box and click to Update button to save the changes you’ve made.
Method 2
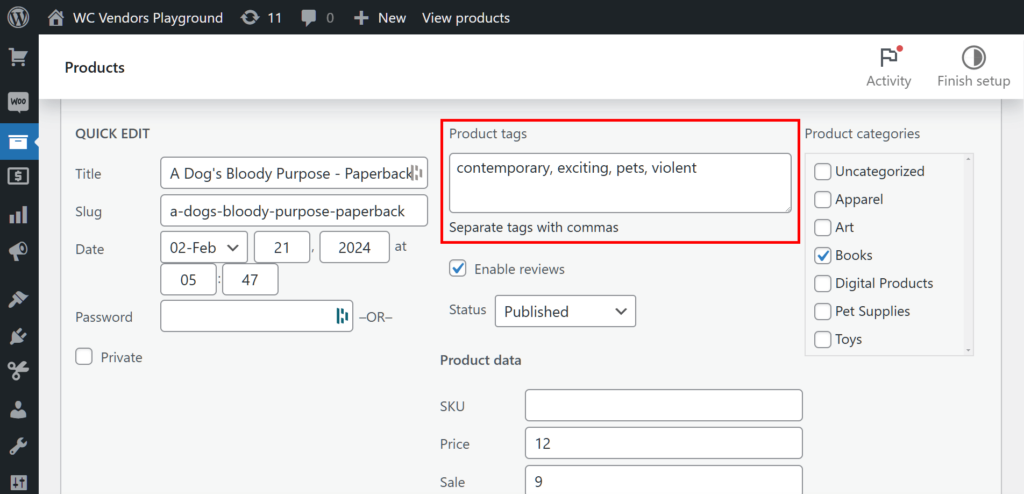
Hover your mouse cursor over the product’s name, then click Quick Edit. This grants you access to new options.
Find the Product tags entry field. Then, enter the WooCommerce product tags you wish to attach to the product.
When you’re finished, scroll down and click the Update button to save the changes you’ve made to the product.
IV. How Vendors Can Attach WooCommerce Tags To Their Products
Did you know that your vendors can also attach tags to the products they’re selling?
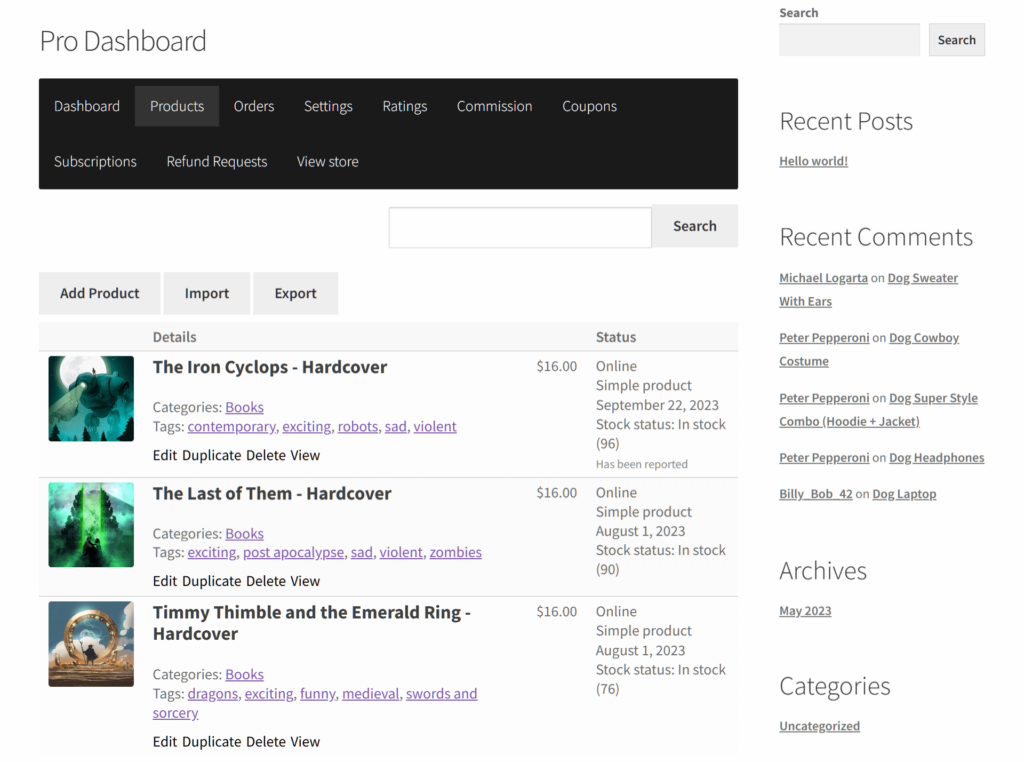
To do this, a vendor must first head to their frontend dashboard and click the Products panel.
Then, they must choose the product they wish to attach tags to and click its Edit button.
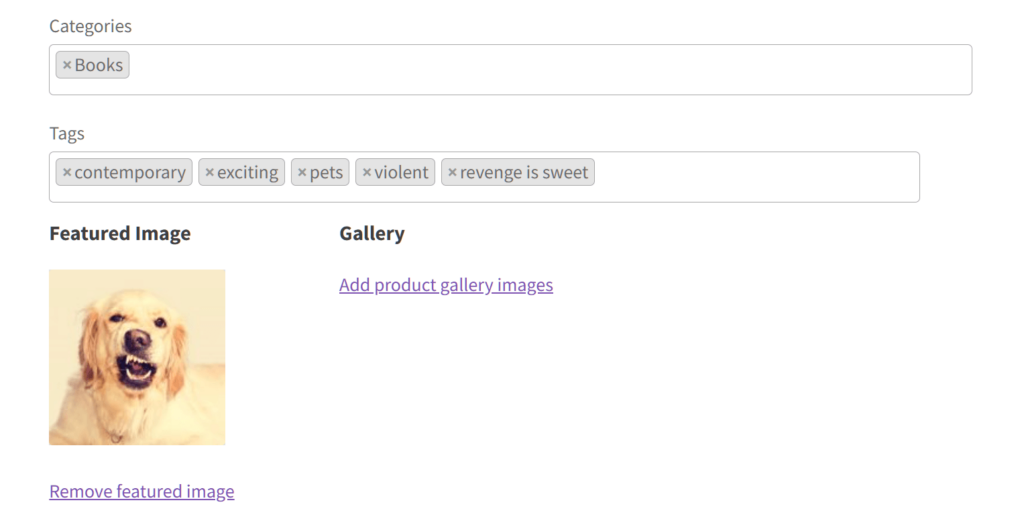
This brings them to the item’s Edit Product page. Here, they must scroll down and find the Tags option. Then, all they have to do is enter the name of the tag into the entry field.
Lastly, the vendor must click the Save Changes button.
V. How Customers Can Use WooCommerce Product Tags To Find Products
Are you wondering how customers can use WooCommerce product tags on an online store?
Basically, the easiest way to use tags to find specific items is to enter the tag into the search field. This prompts the website to give the customer a list of products to which the tag is attached. The customer can then find the desired product from the list.
However, customers can also click on tags to find related products.
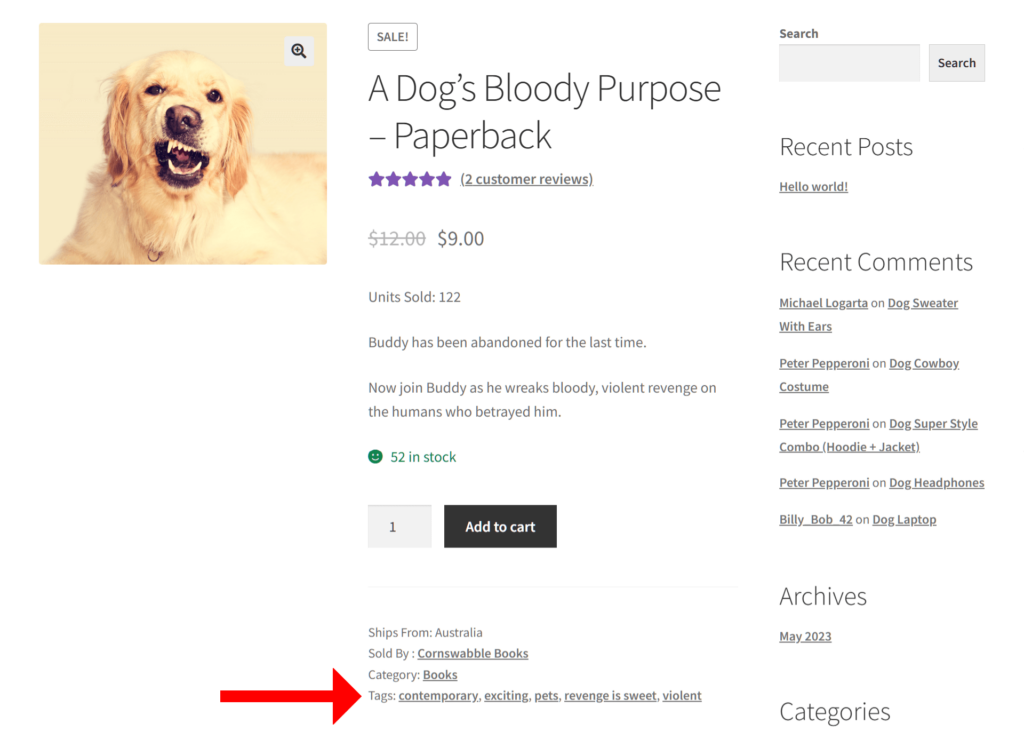
Let’s consider our example, “A Dog’s Bloody Purpose – Paperback.” First, the customer must visit the online store and then find and click this product.
This takes the customer to the product listing. Here, they’ll find the WooCommerce product tags below the “Add to cart” button.
Clicking any of these WooCommerce product tags redirects them to a page revealing other books using the same tag. For our example, let’s click the tag “revenge is sweet.”
Now, the customer can see all the products with the tag “revenge is sweet.” This helps them find the products they’re looking for.
Conclusion
Implementing WooCommerce tags effectively allows both marketplace operators and vendors to enhance the browsing and shopping experience for customers. After all, these tags serve as navigational aids, ensuring that shoppers can easily discover products amidst the vast array of offerings in the online marketplace.
To create WooCommerce tags, implement the following steps:
Do you have any questions about creating and using WooCommerce product tags? Reach out to us and let us know; we’d be happy to hear from you!

