Offering WooCommerce customizable products is a great way to attract customers looking for something unique. Whether it’s personalized jewelry, clothing, or other items, giving buyers the option to customize what they purchase boosts engagement. Shoppers love being able to tailor their products, which leads to more sales and a better shopping experience!
In this guide, we’ll show you how to add customizable products to your multivendor marketplace using WC Vendors and Product Addons for WooCommerce. These tools make it easy to offer personalized product options, allowing vendors to provide customers with the ultimate shopping experience.
So, let’s get started!
Benefits Of Offering Personalized WooCommerce Products
Offering personalized products in your WooCommerce marketplace isn’t just about adding fun options—it’s a proven way to elevate your business. Personalization makes shopping more interactive, giving customers that special experience they love!
Offering personalized WooCommerce products has several key benefits:
- Boosted sales: Personalized items often appeal more to customers, making them more likely to make a purchase.
- Higher conversions: When customers can tailor products to their preferences, they are more likely to buy.
- Customer loyalty: Personalization can lead to higher satisfaction, encouraging repeat purchases and building customer loyalty.
- Stand out from competitors: Adding custom product options makes your marketplace unique and offers a shopping experience that sets you apart from others.
WooCommerce Product Personalization – A Step-by-Step Guide
In this tutorial, we’ll walk you through how to offer WooCommerce Customizable Products in your marketplace. To make it fun and relatable, we’ll be creating a Personalized Pet Accessories Store as an example.
Customers will be able to personalize items like collars, leashes, and pet tags by adding their pets’ names, choosing colors, and selecting materials!
This step-by-step guide will show you how to add custom options to your products using WC Vendors and the Product Addons for WooCommerce plugin.
💡Note: We assume that you have already installed WC Vendors. If you haven’t done so yet, download the plugin here or follow our getting started guide. We will also use the Product Addons for WooCommerce plugin to create customizable options. You can download the plugin here.
Step 1: Install WC Vendors

- Go to your WordPress dashboard, navigate to Plugins > Add New, and search for WC Vendors.
- Install and activate the plugin. Configure the basic settings following the setup wizard.
Step 2: Install Product Addons for WooCommerce Plugin

- Search for WooCommerce Custom Product Addons in the Plugins section.
- Install and activate this plugin.
This plugin provides advanced customization options, allowing you to create product fields tailored to specific items. Vendors can offer extras like personalized engravings, gift wrapping, or custom sizes.
Step 3: Add a new product
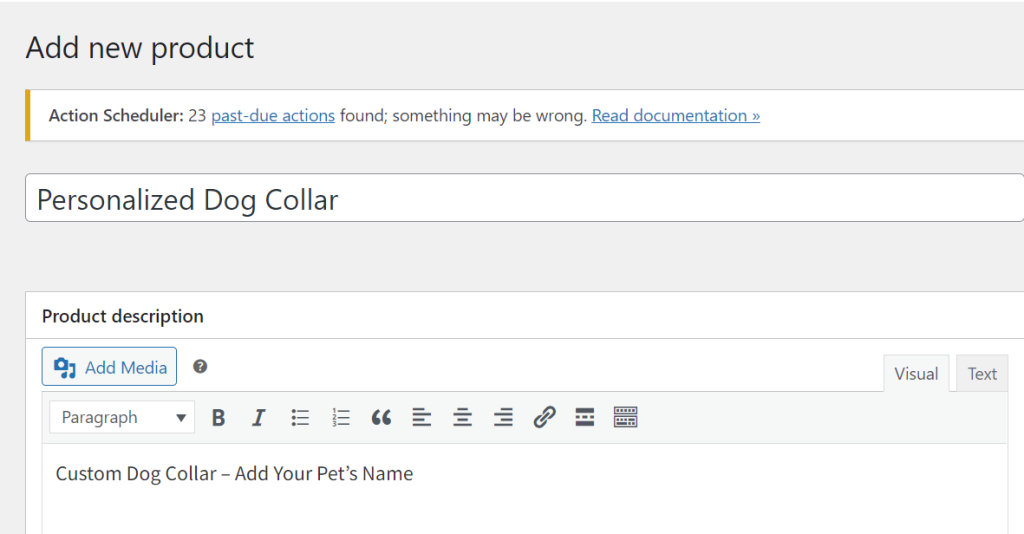
Let’s start by creating a customizable pet accessory, like a Personalized Dog Collar.
- From the vendor dashboard, go to Products > Add New.
- Fill in the product name, description, price, and any other basic product details. In our case, we’ll enter “Custom Dog Collar Options.”
- Add images of the product, ensuring you highlight how the customization will look.
Step 4: Create a custom product form
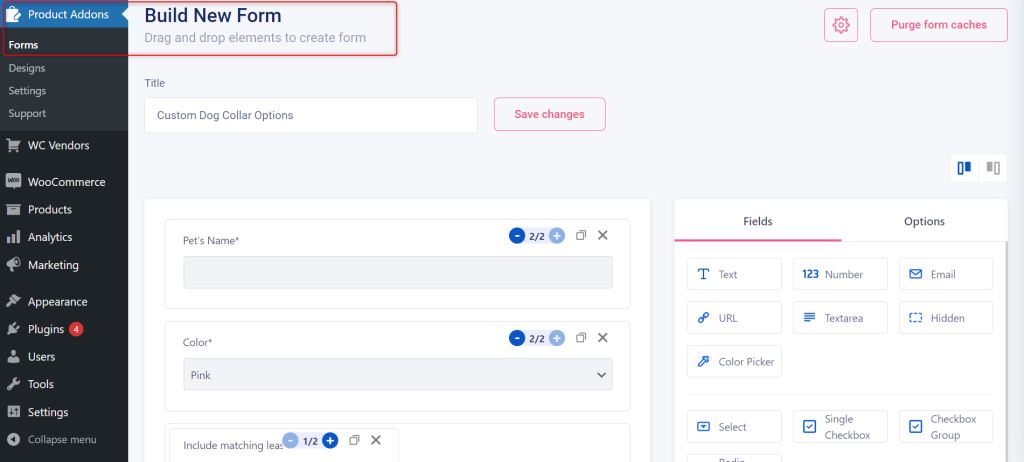
Now that the Product Addons plugin is activated, follow these steps to create a customizable product form:
- Navigate to Product Addons > Forms in your WordPress dashboard.
- Click Create New Form to begin building your form.
- Enter a Title for your form (e.g., “Custom Dog Collar Options”).
- Drag & Drop the fields you need for product customization from the right-hand panel.
For example:- Text Field: Allow customers to input their pet’s name for engraving.
- Dropdown: Offer options for selecting colors (e.g., red, blue, green).
- Checkbox: Provide add-on options like “Include Matching Leash.”
- Radio Buttons: Let customers choose between different sizes (e.g., small, medium, large).
Step 5: Assign the form to products
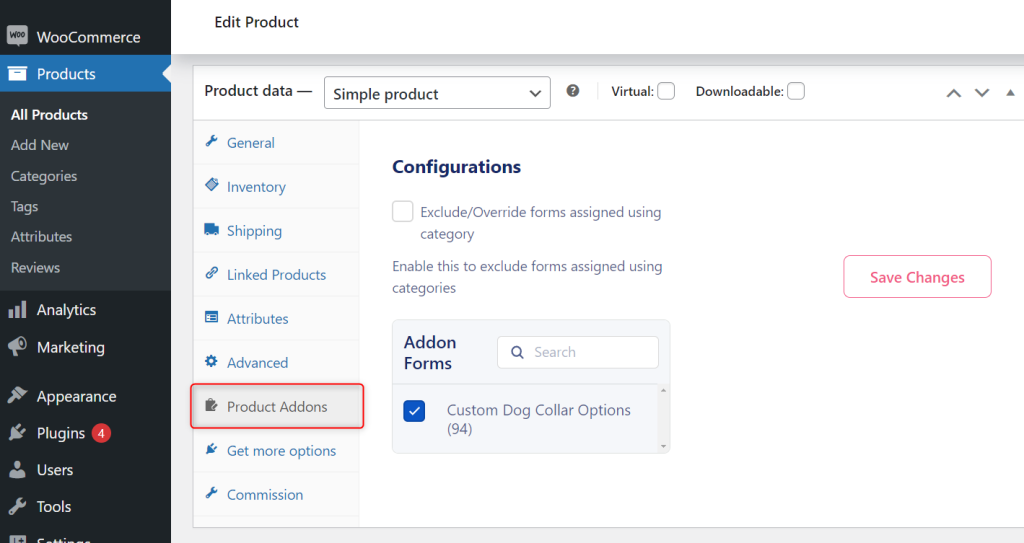
- Go to Products > All Products.
- Select the product you want to edit.
- Scroll down to the Product Addons section and select the form from the dropdown.
- Save changes.
Step 6: Set custom pricing
For each custom field, you can set custom pricing to charge extra for certain product customizations, such as engraving or gift wrapping. However, note that the pricing option is available only in the premium version of the Product Addons for WooCommerce plugin.
- In the Form tab, click on the custom field you want to modify.
- Set an additional price for the field (e.g., $5 for engraving).
- Save the form.
For further details and instructions on configuring form settings, you can refer to the official documentation.
Step 7: Preview and publish the product
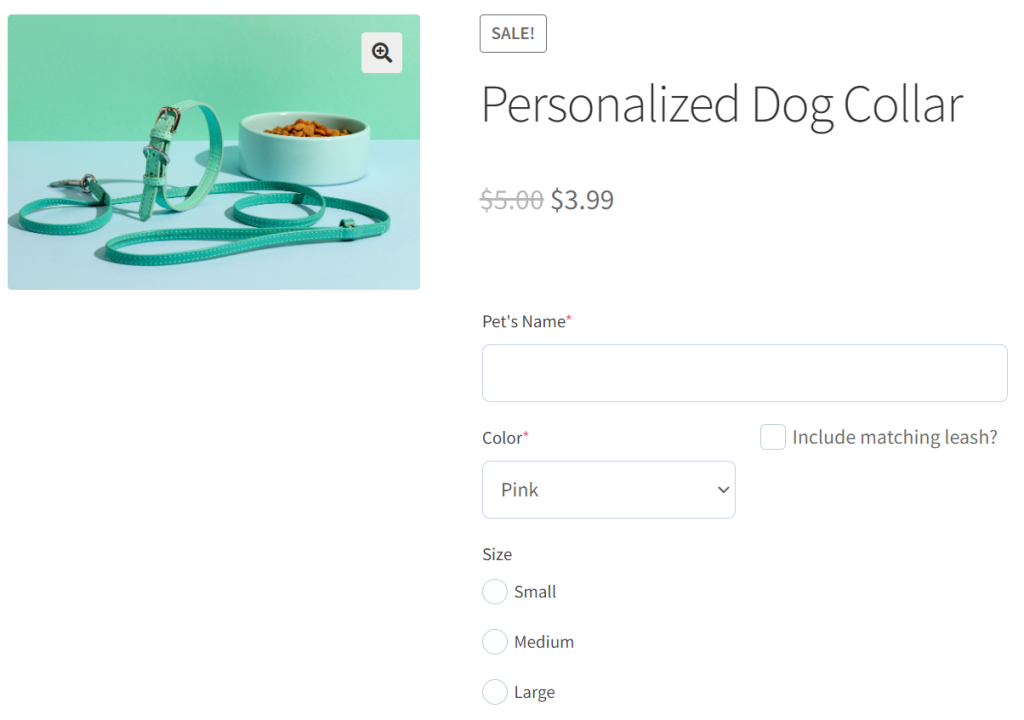
Once all custom fields and pricing are set, vendors can preview the product to ensure everything looks correct:
- Use the Preview button to view how the customizable options will display on the product page.
- Once satisfied, click Publish to make the product live on your marketplace.
And there you go!
You now have your customizable product ready and available for your customers! This adds a personal touch that enhances the shopping experience and sets your marketplace apart.
Maximizing Customizable Products In Your Marketplace
Customizations play a crucial role in enhancing your marketplace. It also increases customer engagement and drives revenue. Allowing customization gives vendors the flexibility to set up custom fields and adjust prices. This makes it easier to offer tailored options for different products. Whether it’s engraving jewelry or adding custom messages to apparel, Product Addons makes this process simple.
Even with the free version, vendors can provide personalized options. For more advanced needs, Product Addons allows vendors to assign custom prices to each add-on, further increasing their revenue potential while offering customers that personalized touch.
Conclusion
Offering WooCommerce customizable products in your marketplace is a smart way to grab your customers’ attention. It gives them the chance to personalize their purchases, making shopping more fun and personal. Plus, it keeps them engaged with your store, leading to more sales and returning buyers.
With WC Vendors and Product Addons for WooCommerce, vendors can easily set up custom products that fit what customers want.
To add customizable products into your WooCommerce marketplace, here’s what you need to know:
- Benefits of Offering Personalized WooCommerce Products
- WooCommerce Product Personalization
- Maximizing Customizable Products In Your Marketplace
By focusing on these areas, your marketplace is set for success in delivering a one-of-a-kind shopping experience. If you need any further help, feel free to reach out!
