Have you ever wanted to give your marketplace vendors the flexibility to offer more than just physical products? Whether it’s booking a consultation, scheduling a class, or reserving a rental, adding booking services can take your marketplace to the next level. With WooCommerce Bookings and Appointments, you can easily set this up and provide a seamless experience for both vendors and customers.
In this guide, we’ll walk you through the exact steps to enable booking options for your vendors, making it easy to manage appointments and reservations right from your WooCommerce store.
Let’s jump in!
What Are WooCommerce Bookings And Appointments?
WooCommerce Bookings and Appointments let you sell time-based services. Customers can easily book appointments or reserve resources through your online store. Unlike regular products that are shipped, bookings are set for specific dates or time slots.
Key features include scheduling options, managing availability, setting pricing rules, and defining service durations. This flexibility makes it easy for businesses to manage reservations, whether it’s for one-on-one appointments, group sessions, or rentals.
Industries like salons, consultants, car rentals, and fitness studios love using booking services. It helps them organize appointments, run things smoothly, and give customers a super easy experience. It’s a great way to keep everything on track and hassle-free!
WC Vendors WooCommerce Bookings
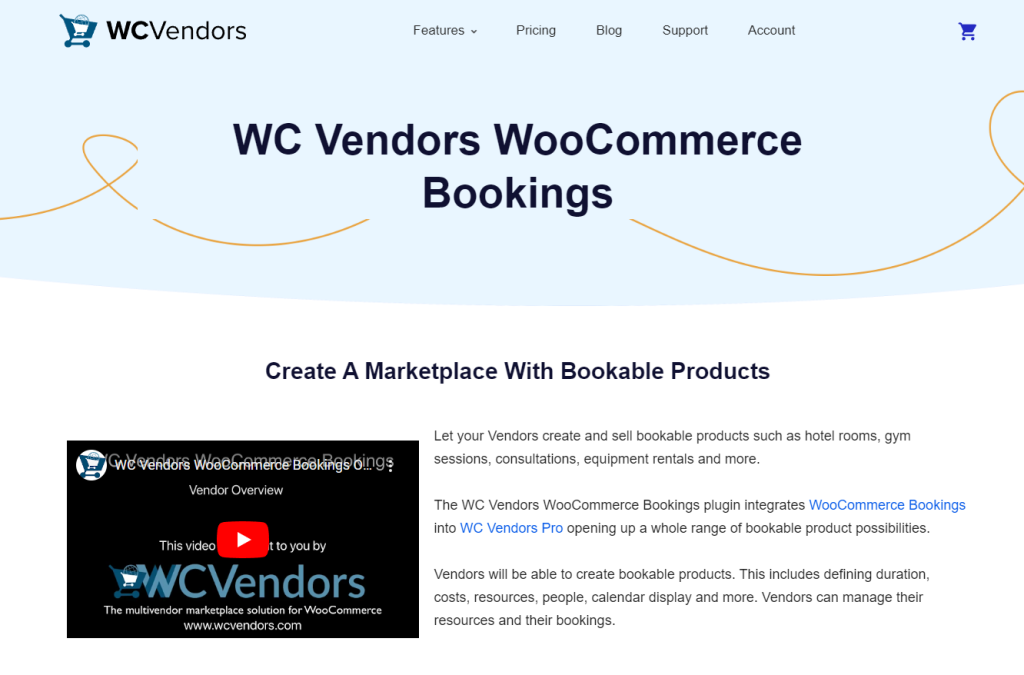
WC Vendors WooCommerce Bookings takes this convenience a step further by allowing marketplace vendors to offer their own time-based services directly through your marketplace.
Vendors can create and manage their own bookings, set their availability, pricing, and service durations. It’s perfect for multi-vendor stores offering services like rentals, appointments, and lessons.
With this integration, vendors have full control over their bookings, making it easier to streamline their operations while enhancing customer satisfaction.
Why Use WooCommerce Bookings And Appointments In A Marketplace?
Adding booking features to your marketplace can be a game changer. It lets vendors go beyond selling just physical products. They can offer services, rent out equipment, or schedule appointments, all within your marketplace.
For vendors, this means more ways to generate income. Vendors can set their own schedules, prices, and service lengths, giving them full control over what they offer. Whether it’s a fitness coach booking classes or a shop renting out equipment, they get the freedom to run things their way. The flexibility is awesome!
For marketplace owners, offering booking options gives you an edge. You’re not just selling products. It adds variety to your marketplace, attracts more vendors, and gives customers more reasons to keep coming back.
Setting Up WooCommerce Bookings For Your Marketplace
This guide will help you set up WooCommerce Bookings for your marketplace, providing vendors with the ability to offer services, rentals, and appointments.
Let’s walk through each step carefully, ensuring a smooth integration of booking functionalities within your WC Vendors marketplace.
💡Note: For this guide, we assume you have already downloaded WC Vendors and WooCommerce Bookings. If you haven’t done so, follow the WC Vendors WooCommerce Bookings Getting Started Guide to install and configure these tools.
a. Install WooCommerce Bookings plugin
To get started with bookings, you need the WooCommerce Bookings Plugin. This plugin adds booking capabilities to your WooCommerce store and works seamlessly with WC Vendors.

- Download and Install the Plugin:
- Go to the WooCommerce Bookings plugin page and purchase the plugin.
- Download the plugin’s .zip file after purchase.
- In your WordPress dashboard, go to Plugins > Add New and click Upload Plugin.
- Upload the .zip file, then click Install Now and Activate the plugin.

- Link WooCommerce Bookings with WC Vendors:
- To enable vendors to offer booking services, ensure that WC Vendors Marketplace (free or pro version) is installed and activated.
- Once WooCommerce Bookings is activated, it automatically integrates with WC Vendors. Vendors will have access to the booking options when they create a new product in their dashboard.
b. Configure global booking settings
Before vendors can create their own bookings, you’ll need to configure the global settings to ensure that bookings operate smoothly across your marketplace.
- General settings:
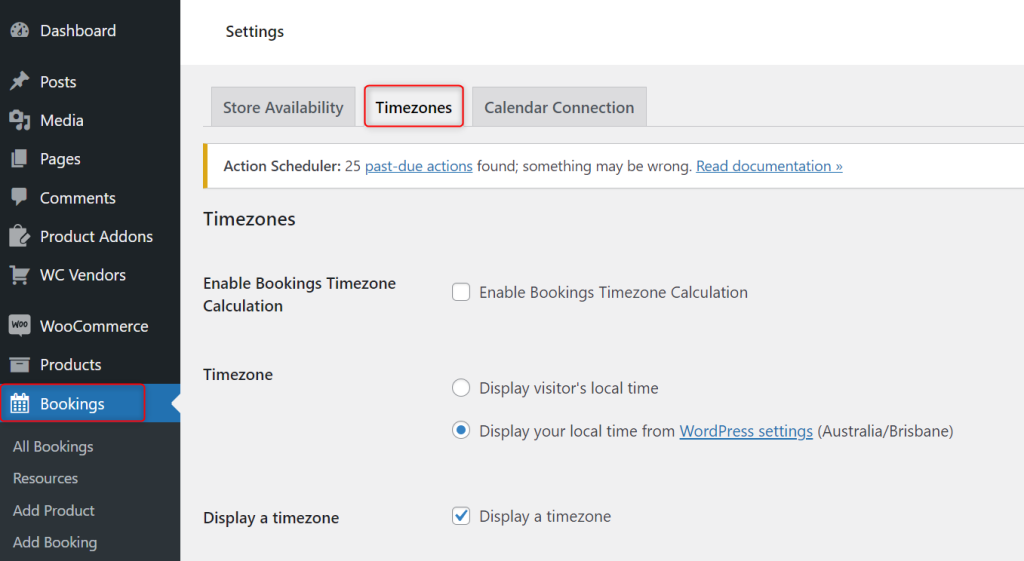
- Go to Bookings > Settings > Timezones in your WordPress dashboard.
- Set your time zone to ensure bookings are aligned with your region’s timing.
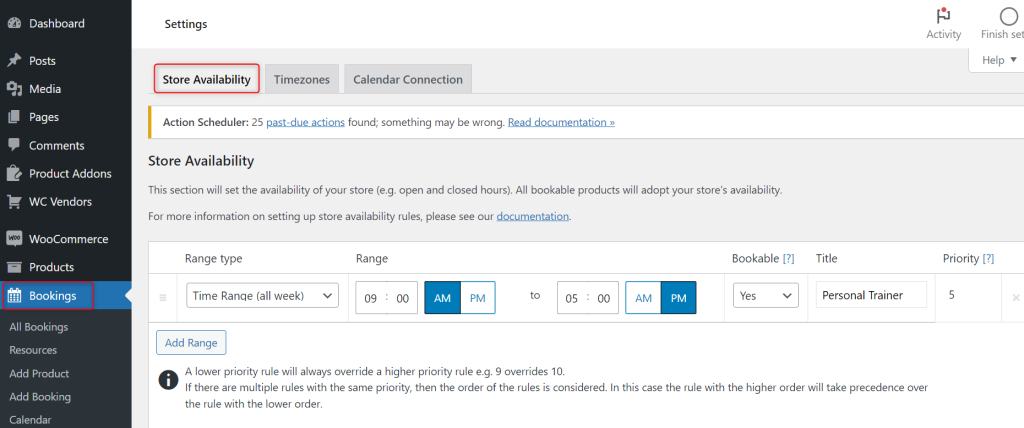
- Availability Settings:
- In the Bookings settings, you can define global availability for bookings. For instance, if your marketplace operates only on certain days of the week or excludes holidays, you can set these parameters here. Vendors will have the ability to customize availability further on their products, but setting up a global structure ensures consistency across your platform.
- For example, you might configure marketplace-wide settings to disable bookings during public holidays or weekends.
- For more information on setting up store availability rules, check this documentation.
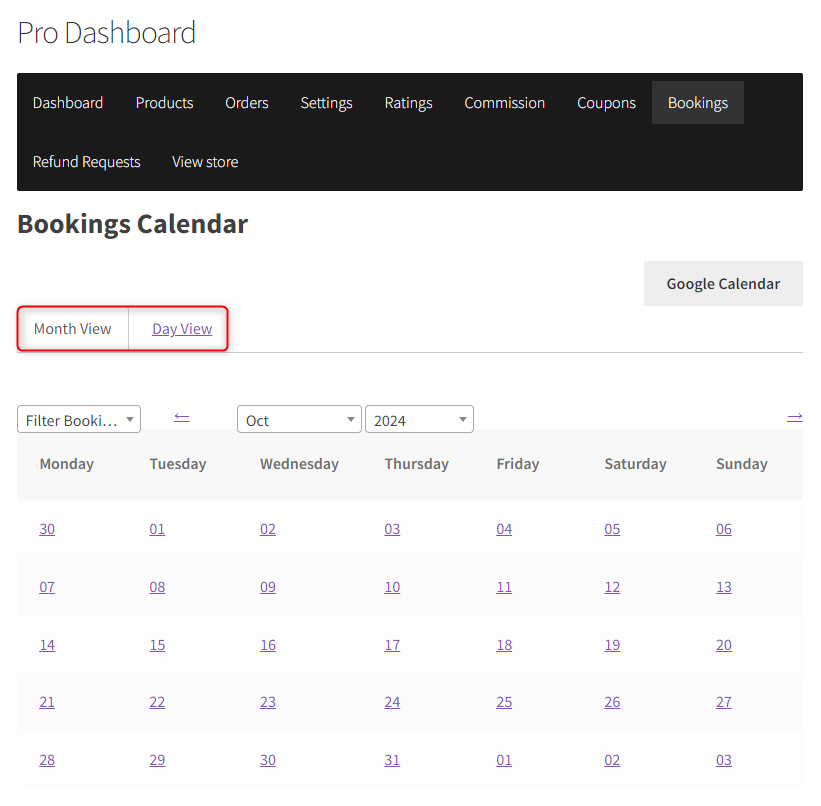
- Customizing the Booking Calendar View for Vendors:
- Vendors can customize their booking calendars to match their operating hours. In Pro Dashboard > Bookings, adjust how bookings are displayed to vendors. Vendors can select their preferred view, such as daily or monthly bookings.
- A vendor running a yoga studio might set the calendar to display hourly time slots, while a car rental service may prefer daily bookings.
By following these steps, you can ensure your marketplace is ready for bookings, providing a smooth and user-friendly experience for both vendors and customers.
How To Set Up A Bookable Service
In this example, we’ll walk through the process of setting up a personal training service using WooCommerce Bookings and WC Vendors. Whether you offer individual fitness sessions or group classes, this guide will show how to configure everything step-by-step.
To get started, your vendor will need to create a new booking product. They can do this by following these steps:
Step 1: Adding the Personal Training Service as a Booking Product
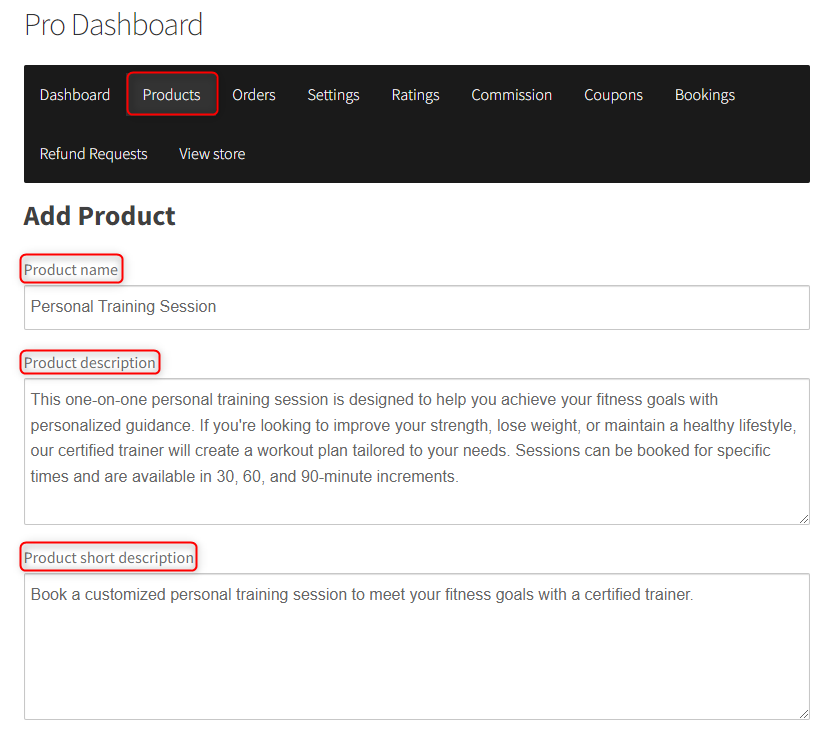
First, the vendor needs to create the personal training service as a booking product.
- Go to the Vendor Dashboard: After logging in, the vendor should navigate to Products > Add New.
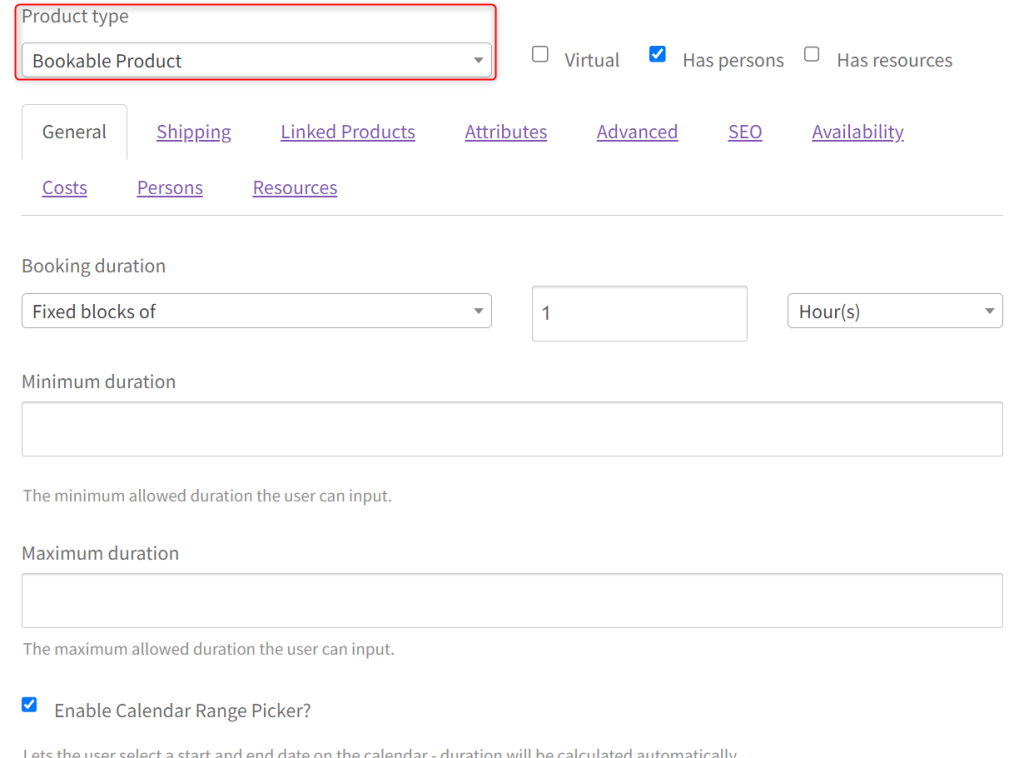
- Set the Product Type: In the Product Type dropdown, select Bookable Product. This will open up all the options for booking configurations.
- The vendor should then fill in the product name (e.g., “Personal Training Session”), description, and other general product details like category and tags. This ensures customers understand what they are booking.
- Under the Booking Duration section, the vendor can set the duration of each training session. For example, select 1 hour as the length of each session.
Step 2: Configuring time slots for Personal Training
Now the vendor will set the available time slots for customers to book.
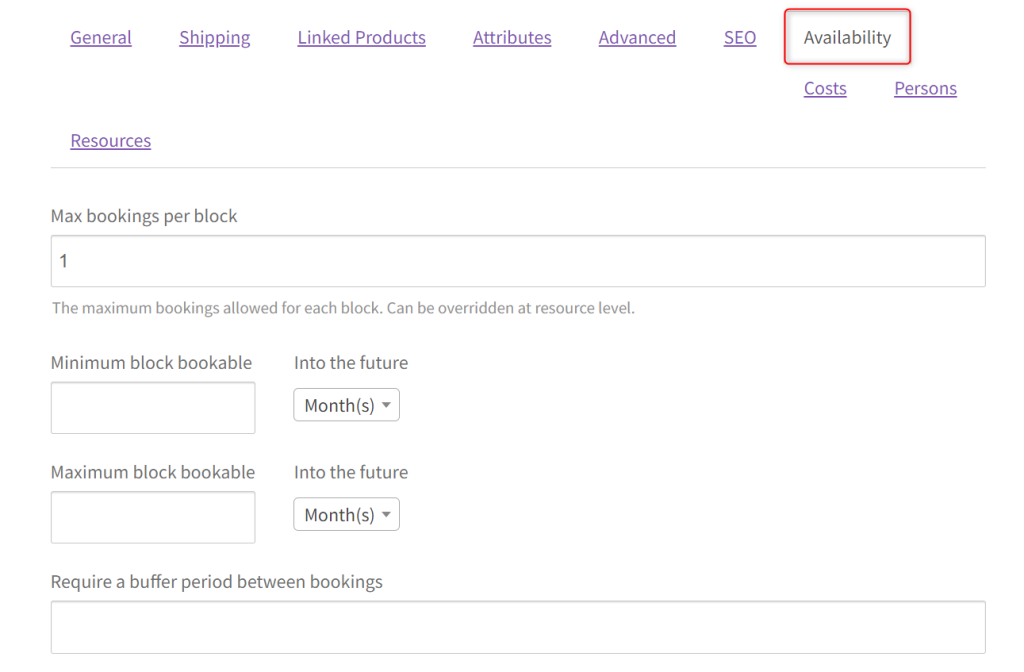
- In the availability settings, choose which days and times are open for booking. For example:
- Available Days: Monday to Friday
- Available Hours: 9 AM to 5 PM
- Configure Time Slots: Choose the time interval between each booking. In this case, select 1-hour intervals to allow customers to book one session per hour.
- If there are any special breaks, the vendor can block off specific times (e.g., no bookings during lunch from 12 PM to 1 PM).
- Set Blackout Dates: If the vendor won’t be available on certain days (e.g., holidays or vacation), they can mark these dates as unavailable.
Step 3: Setting pricing per session
The next step is to define the pricing for each personal training session.
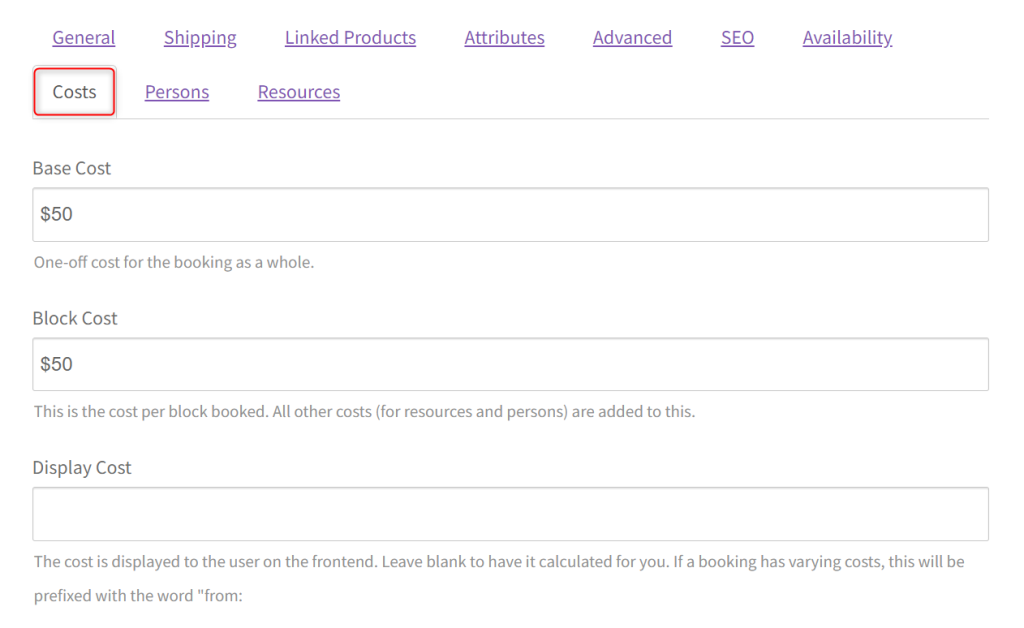
- Set Base Price: Under the Cost section, enter the base price for a single training session. For example, a 1-hour session might cost $50.
Example Booking Scenario: Offer A 5-Session Training Package
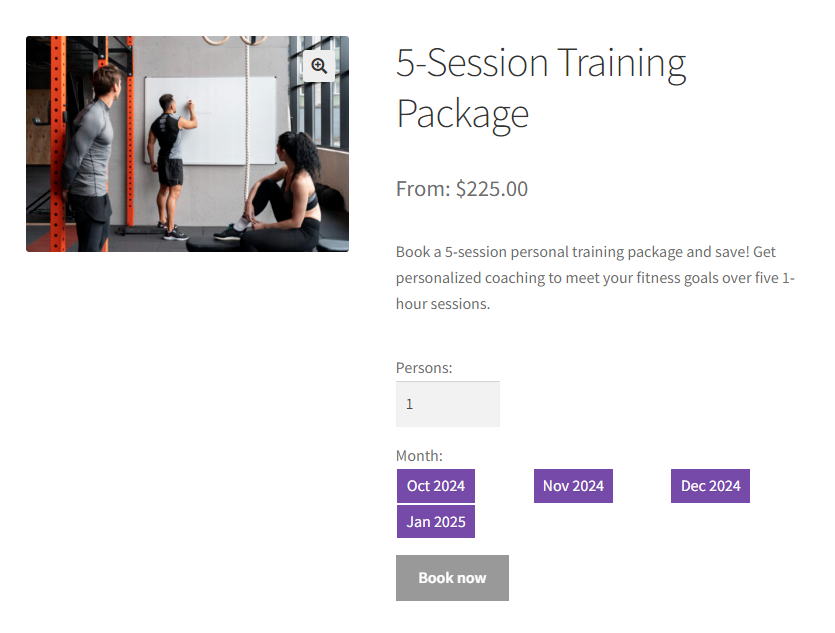
Here’s an example of how a personal trainer can offer a “5-Session Training Package” for booking all sessions at once. Instead of the full price of $250, clients pay just $225 for five sessions—a great deal for anyone looking to commit to their fitness goals!
The trainer sets up availability from Monday to Friday, between 9 AM and 5 PM, making it convenient for clients to choose their preferred time slots. Customers can book all five sessions in one go, locking in their discount and securing their spots.
As bookings start coming in, the trainer can easily manage appointments from their dashboard. If rescheduling is needed or a client cancels, the trainer can handle it right there.
And there you have it!
This is how easy and flexible it is for vendors to offer discounted training packages and manage everything in one place!
How To Manage Bookings As A Vendor
Once bookings start coming in, it’s crucial for vendors to have an easy way to manage them. WooCommerce Bookings and WC Vendors make it simple for vendors to track, confirm, reschedule, or cancel appointments.
This section will guide you through the steps vendors can take to efficiently manage their bookings, ensuring smooth operations and excellent customer service.
Let’s walk through the key actions vendors can take to manage their bookings effectively.
Step 1: Viewing Bookings in the Vendor Dashboard
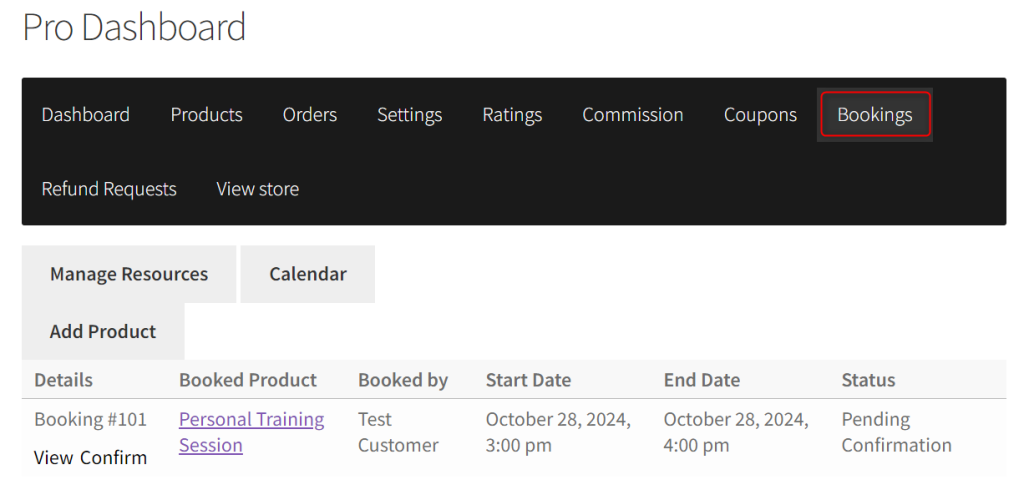
- Log in to the Vendor Dashboard:
- Once logged in, go to the Vendor Dashboard, where you will find a dedicated section for managing your bookings.
- In the sidebar, navigate to Bookings. This is where all incoming, completed, and pending bookings will be displayed.
- Access the Bookings List:
- Once you click on Bookings, you will see a comprehensive list of all bookings made for your products.
- Each booking will show relevant details, such as:
- Customer name
- Date and time of the booking
- Booking status (Confirmed, Pending, or Completed)
- Booking details (such as the product or service booked)
- You can use the filters to sort bookings by status (e.g., upcoming or completed), date, or customer name to quickly find specific bookings.

- View Booking Details:
- To get more information about a particular booking, click on the booking ID or View. This will open the detailed view for the selected booking, where you can see:
- Customer contact information (email, phone number, etc.)
- Service duration and specific timeslot
- Special notes left by the customer
- Payment status
- Next to the View button, you’ll find the Confirm button. You can easily confirm the appointment from there as well.
- To get more information about a particular booking, click on the booking ID or View. This will open the detailed view for the selected booking, where you can see:
Step 2: Confirming, Rescheduling or Canceling Bookings
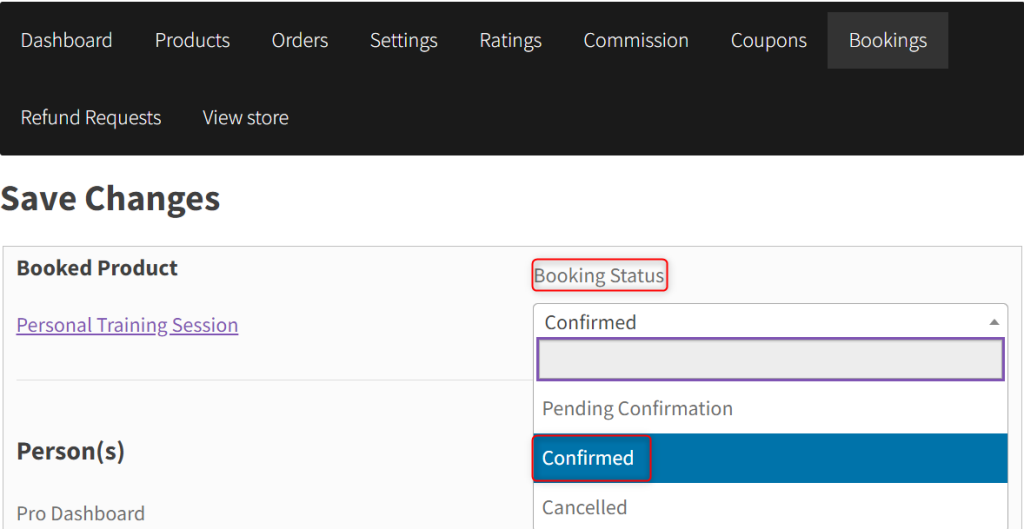
- Confirming a Booking:
- From the Bookings page, click Confirm next to the booking you want to confirm.
- Alternatively, you can click View from the Bookings page.
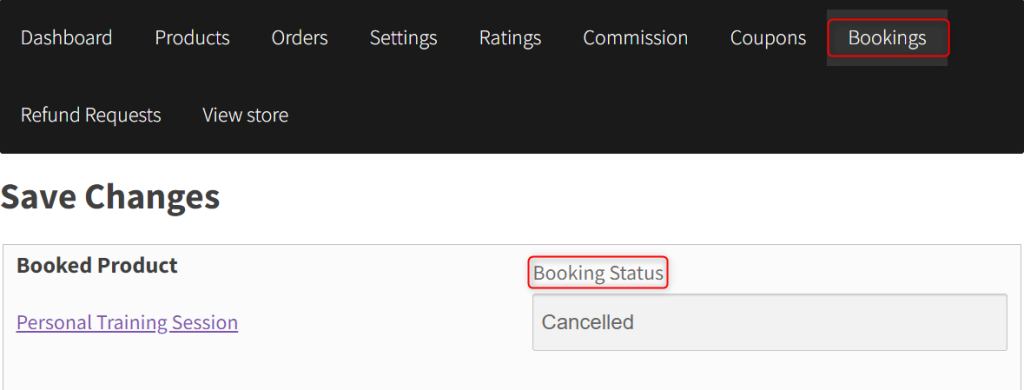
- On the Booking Details page, locate the Booking Status dropdown.
- Select Confirmed from the dropdown menu. Click Save to update the booking status.
- Rescheduling a Booking:
- If a customer requests a change in the booking time, you can easily reschedule the booking:
- From the Bookings page, click View next to the booking you want to reschedule.
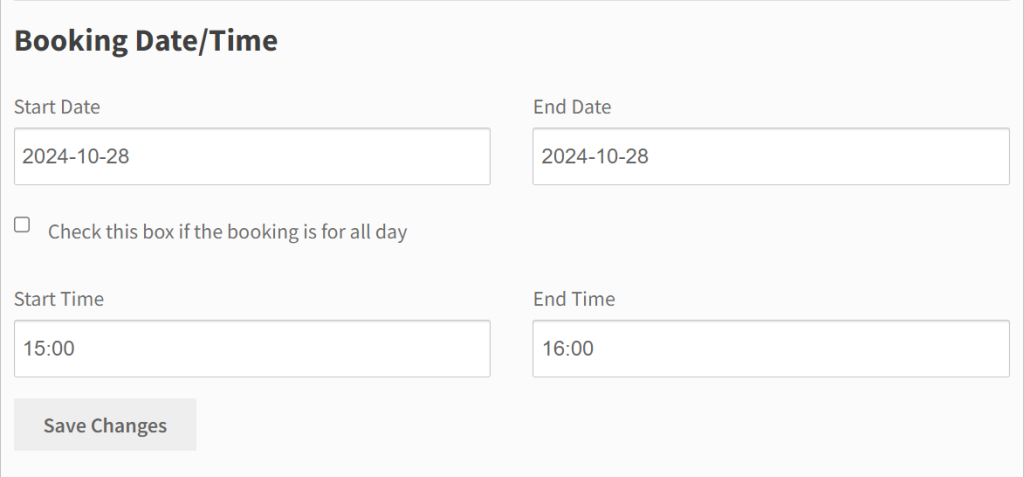
- On the Booking Details page, you’ll see the Booking Date/Time fields you can easily edit.
- After editing the details, click Save to update the booking.
- It’s a good idea to follow up with the customer personally through email or phone to ensure clear communication beyond the automated notification.
- If a customer requests a change in the booking time, you can easily reschedule the booking:
- Canceling a Booking:
- If you need to cancel a booking due to unforeseen circumstances, this can also be done easily:
- Go to the Booking Details page and choose Canceled from the Booking Status dropdown.
- The booking status will be updated to Canceled, and the customer will be refunded if your cancellation policy allows it.
- Ensure to follow up with the customer directly to apologize or explain the reason for the cancellation.
- If you need to cancel a booking due to unforeseen circumstances, this can also be done easily:
Step 3: Communicating with Customers
Effective communication is key to ensuring a smooth booking experience. WC Vendors allows vendors to communicate with customers directly from the dashboard.
- Contacting Customers:
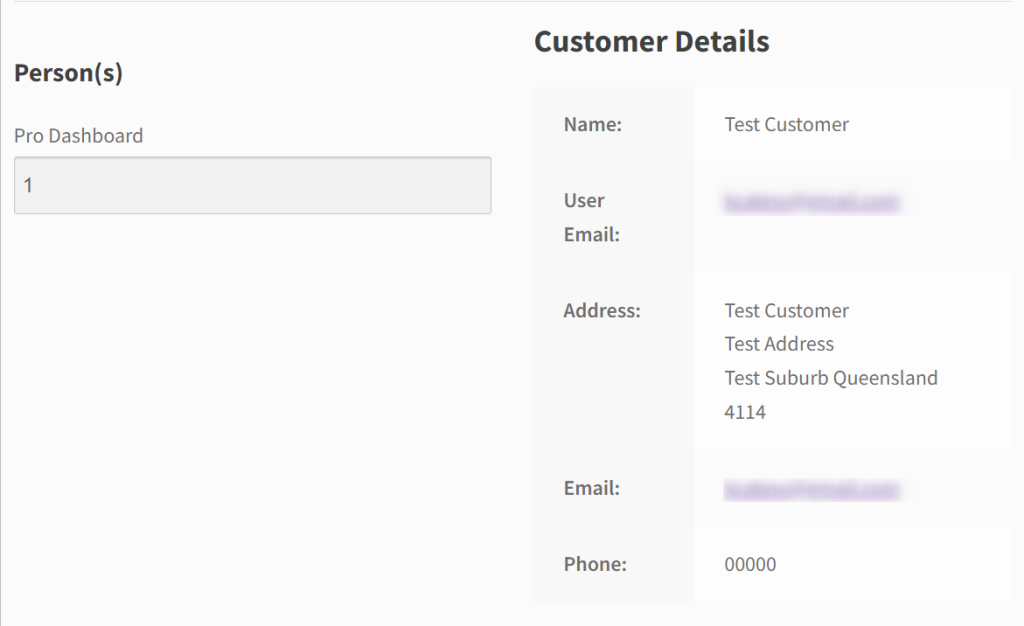
- On the Booking Details page, you can find the Customer Details, including their email address and phone number.
- Vendors can either send an email directly or call the customer for any clarification regarding their booking.
- It’s a good practice to confirm bookings or follow up with customers to ensure everything is clear.
- Sending Email Reminders:
- Automated email reminders can be set up to notify both vendors and customers about upcoming bookings. These reminders can be customized based on your preferences.
- For instance, a reminder can be sent out 24 hours before the booking time, giving the customer and vendor enough time to prepare.
Step 4: Manually Adding a Booking
If your marketplace allows vendors to create bookings manually, this feature can be useful for walk-in customers or bookings made over the phone.
- Enable Manual Booking
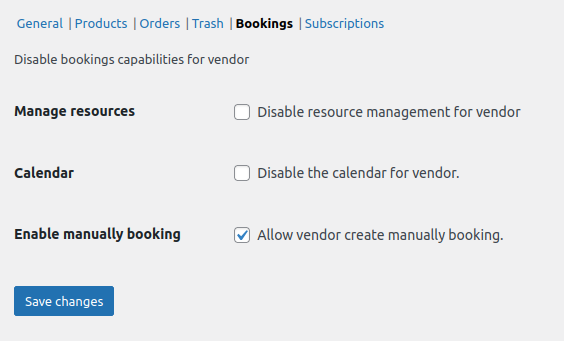
- Go to WC Vendors > Settings > Capabilities > Booking and select Enable manual booking.
- Once enabled, vendors will see an Add Booking button in their Pro Dashboard > Bookings screen.
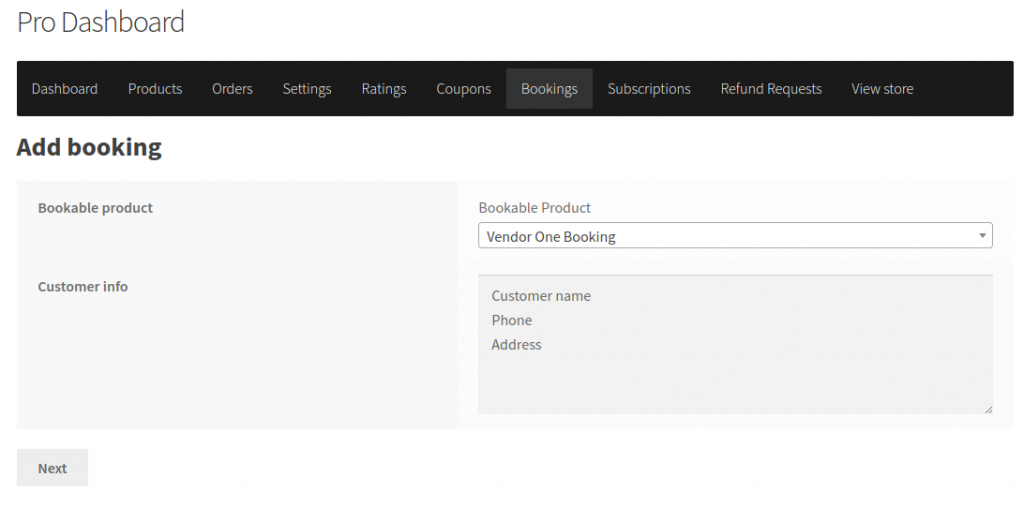
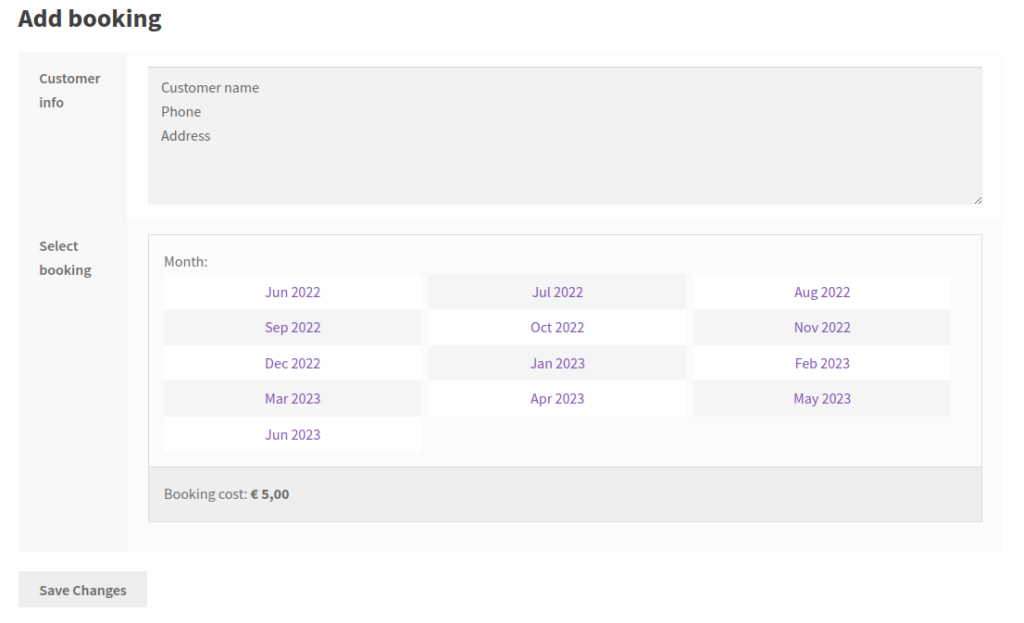
- Creating a Manual Booking
To manually add a booking, vendors can click on the Add Booking button and follow these steps:- Step 1: Select the bookable product and enter the customer’s information, such as name and contact details.
- Step 2: Choose the booking time, then save. Vendors can also edit customer information at this step if needed.
- Step 3: Preview and edit the booking information. Here, vendors can adjust details like the booking status and time.
- Save the Booking
- After reviewing, vendors can save the booking. The system will automatically update the availability on the website, preventing any double bookings.
💡BONUS TIP: Integrate Google Calendar With Your Bookings
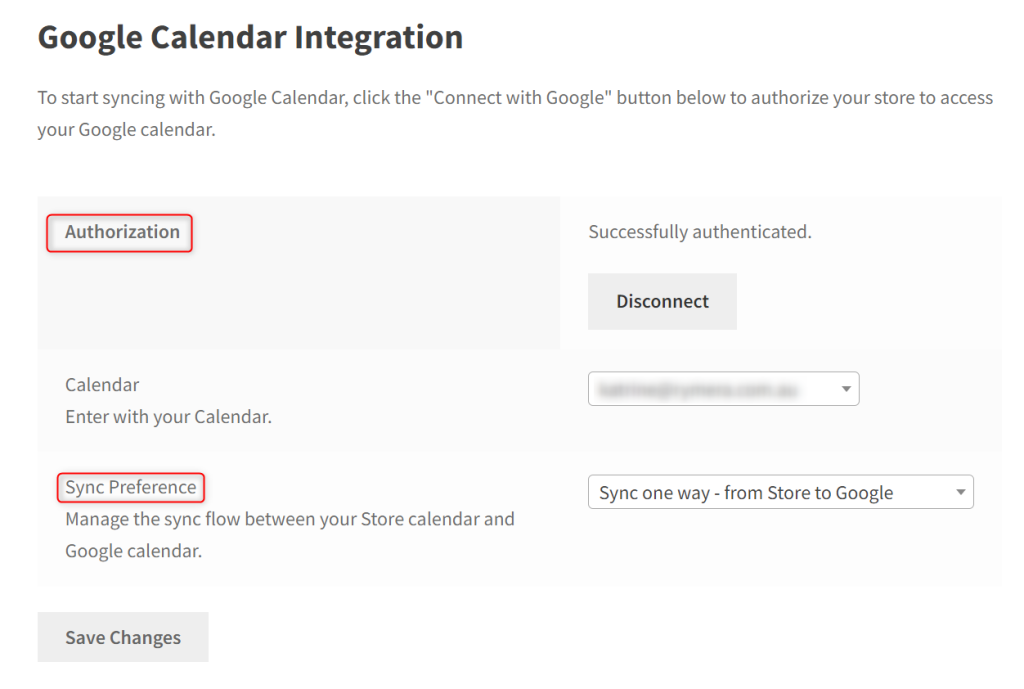
Keeping track of appointments can be a challenge, especially when you’re managing multiple bookings. To make things easier, you can sync your WooCommerce bookings with Google Calendar.
This ensures that all your appointments are in one place, making it simpler to stay organized. Here’s how you can set up Google Calendar integration:
- Go to Bookings > Calendar from the vendor dashboard.
- Click on the Google Calendar option.
- Link your Google account by following the prompts to sign in and grant permissions.
- Choose whether you want to sync bookings one-way (store to Google) or both ways (Google and store).
Once linked, your bookings will automatically sync with your Google Calendar, ensuring you never miss an appointment!
Managing bookings as a vendor using WC Vendors and WooCommerce Bookings is simple and intuitive. With easy-to-use features for rescheduling, canceling, and communicating with customers, vendors can ensure a smooth and efficient booking experience.
When you stay organized and proactive, you’ll help your customers enjoy a seamless process, resulting in better customer satisfaction and loyalty!
Conclusion
To ensure your marketplace thrives, it’s essential to take advantage of the flexibility and features that WooCommerce Bookings and Appointments offer. When you enable vendors to provide time-based services, rentals, or appointments, you can diversify the offerings in your marketplace and attract a wider customer base.
To make the most of this powerful tool, here’s what you should focus on:
- What Are WooCommerce Bookings and Appointments?
- WC Vendors WooCommerce Bookings
- Why Use WooCommerce Bookings and Appointments In A Marketplace?
- Setting Up WooCommerce Bookings For Your Marketplace
- How To Set Up A Bookable Service
- Example Booking Scenario: Offer a 5-Session Training Package
- How To Manage Bookings As A Vendor
- Integrate Google Calendar with Your Bookings
By empowering your vendors to offer flexible booking options, you give them more control, enhance the customer experience, and open up new opportunities for growth in your marketplace.
If you need further guidance or help setting up WooCommerce Bookings, feel free to reach out – we’re always here to assist!
