Within your online marketplace, how do you ensure smooth transactions between vendors and their customers? Simple: you grant your vendors the ability to view extensive information about their marketplace orders.
Having access to transaction details is crucial for vendors. For one thing, it allows them to manage customer orders effectively and with ease. For another, it enhances transparency between vendors and customers, boosting the latter’s trust in the former and your marketplace as a whole.
Today, we’ll discuss important factors you need to know about transaction information. Furthermore, this article provides a three-step guide to enabling vendors to view marketplace orders using the WC Vendors plugin.
So let’s dive in!
Understanding Transaction Details
Transaction details encompass vital information about each purchase made within an online multi-vendor marketplace. Serving as the lifeblood of efficient order management, these details include specifics such as customer names, shipping addresses, contact information, and the like.
When vendors are granted access to transaction details, they enjoy a myriad of benefits:
1. Enhanced transparency
- Provides vendors with a clear overview of their sales and customer interactions
- Fosters trust between vendors and customers, vital for building long-term business relationships
2. Streamlined Order Management
- Facilitates efficient tracking of orders, communication with customers, and inventory management
- Leads to improved operational efficiency by reducing errors and delays in order processing
3. Personalized Customer Experiences
- Empowers vendors to understand customer preferences and purchase history
- Enables vendors to tailor offerings and communication strategies accordingly
- Improves customer satisfaction and retention through personalized interactions

How To Let Vendors View Marketplace Orders (In 3 Simple Steps)
So, we’ve established that it’s essential to allow vendors to access transaction information. But how do we give them this ability?
Simple: we use the versatile marketplace solution, WC Vendors.
However, as WC Vendors is a WooCommerce plugin, you must first create a traditional online store powered by:
Then, you must convert said store into a multi-vendor marketplace using WC Vendors. For details on how to accomplish this, check out the following guides:
- How To Create An Online Marketplace: A Beginner’s Guide
- How To Build Your First Multi-Vendor Ecommerce Website (Full Guide)
With that in mind, let’s start the tutorial!
Step 1: Enable the View Orders option
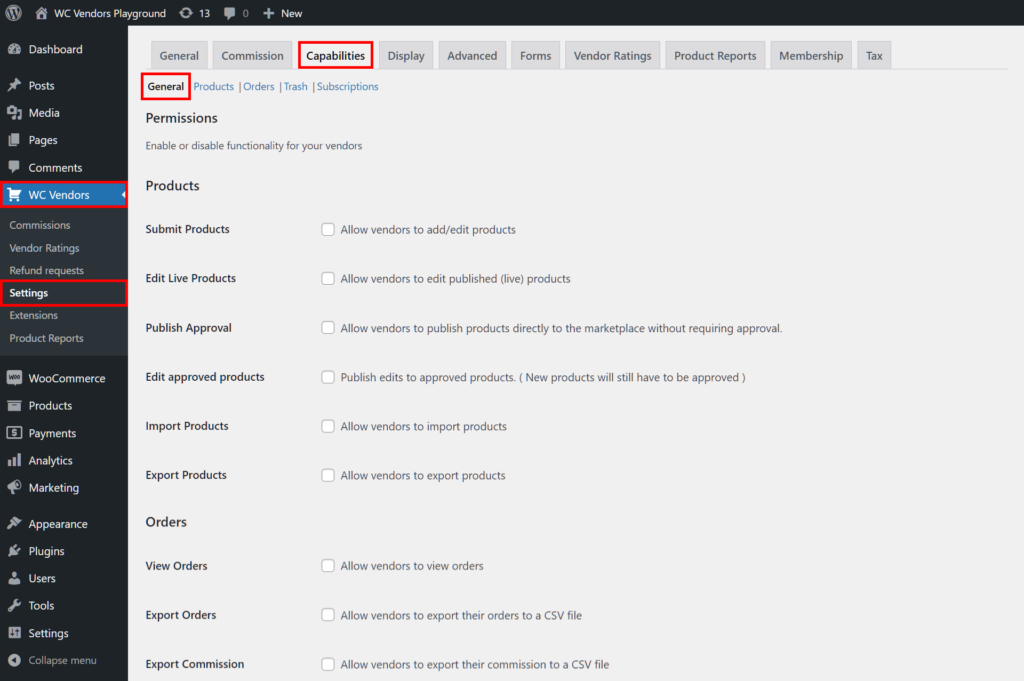
First things first: you must go to the Permissions page and allow vendors to view marketplace orders.
Thus, head to your WordPress dashboard and click WC Vendors > Settings. Then, click the Capabilities tab followed by the General subtab to access the Permissions page.
Next, scroll down to the View Orders option and enable it by ticking its checkbox.
Now, every vendor should be able to see a list of orders their customers have made. All they have to do is go to their vendor dashboard and click Order, which redirects them to a page with an order table featuring said list.
This vendor dashboard order table is also where most of the transaction details discussed in the following step are located. Moreover, vendors can manage product orders from this table.
Our job isn’t done quite yet, however.
Step 2: Enable options for marketplace orders
It helps vendors to have access to as much information as possible about marketplace orders. After all, the more information they’re privy to, the more efficiently they can manage such orders.
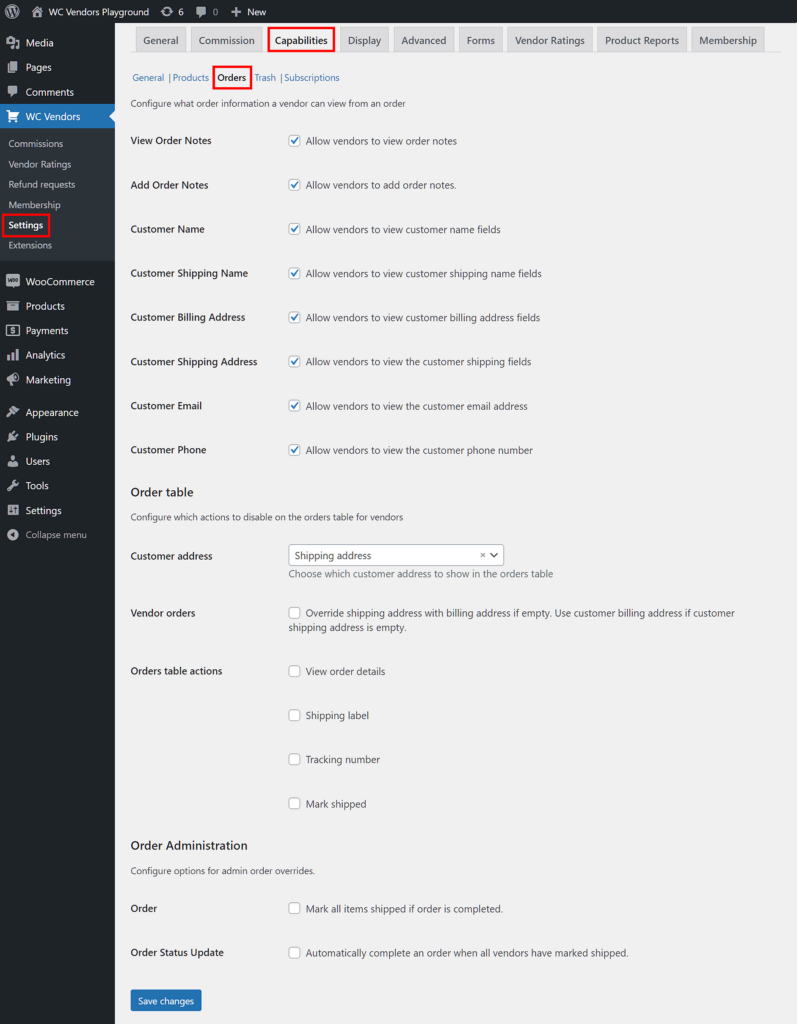
Therefore, your next step is to locate the Orders subsection page. This boasts the options you can use to let vendors learn various details about the orders their customers have made.
Head to your WordPress dashboard and click WC Vendors > Settings, then the Capabilities tab and Orders subtab. This brings you to the Orders subsection page as illustrated below:
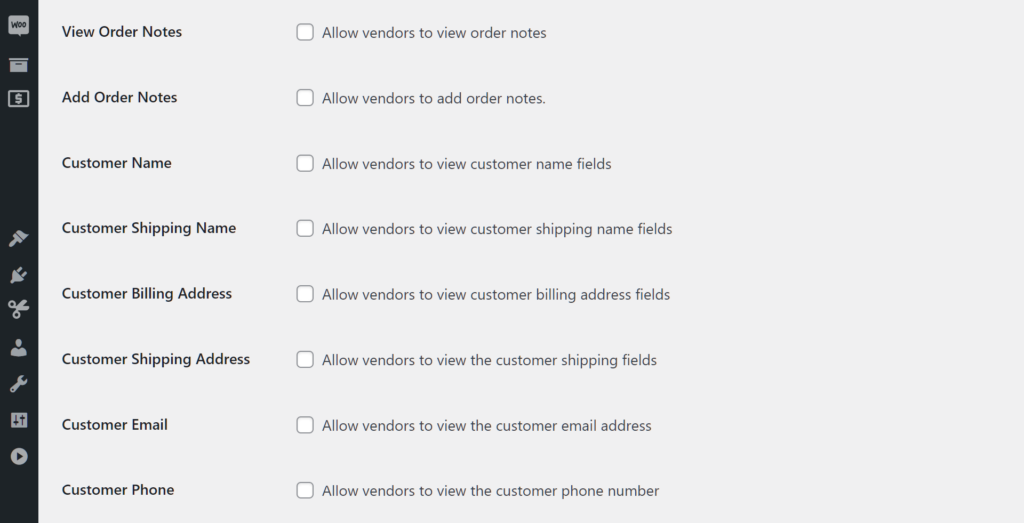
The page is subdivided into three main areas. Let’s explore the range of options available in the first area.
View Order Notes
When enabled, the View Order Notes option lets vendors view any messages they’ve sent to customers. Simply tick the option’s checkbox to enable it.
Add Order Notes
Enable the Add Order Notes option if you want to let vendors send messages to their customers via the vendor dashboard order table. Once again, enabling the option is as easy as ticking its checkbox.
Customer Name
Enable the Customer Name option if you want the vendor dashboard order table to include the name of every customer who has ever purchased from the vendor’s store.
Customer Shipping Name
Enable this option to let vendors see the name of the shipping the customer has used.
Customer Billing Address
Do you want vendors to view the billing address of every customer who’s made an order via their store? Then tick the Customer Billing Address checkbox!
Customer Shipping Address
When enabled, this option reveals the customer’s shipping address on the frontend of the vendor dashboard.
Customer Email
This option reveals the customer’s email on the vendor dashboard order table.
Customer Phone
This option displays the customer’s phone number on the vendor dashboard order table.
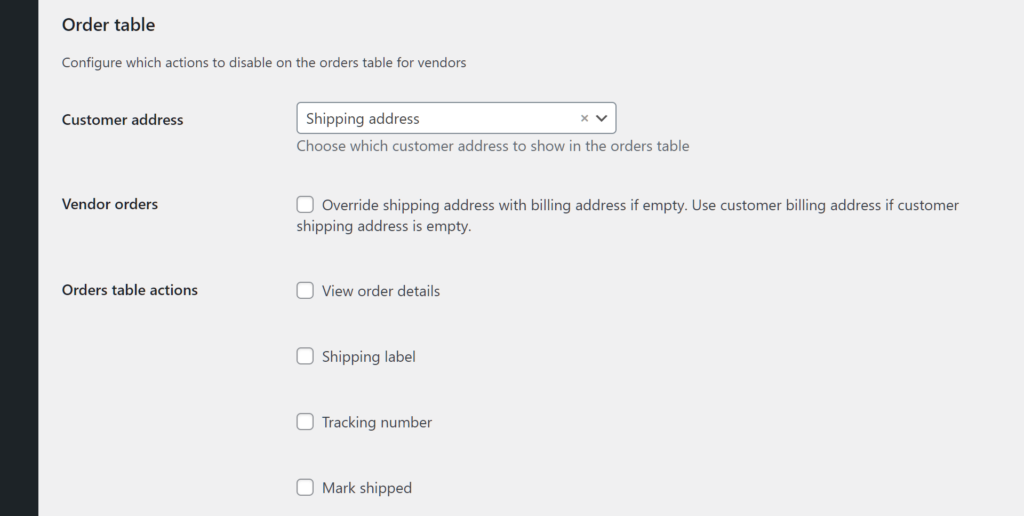
The second area of the Orders subsection page is called Order Table.
As shown above, this area contains options allowing you to enable specific actions on the vendor dashboard order table. Take note that these options are only available to WC Vendors Pro users.
The Order Table options are as follows:
Customer Address
This option comes with a dropdown menu that lets you choose whether the vendor dashboard order table displays the customer’s shipping or billing address.
Vendor Orders
When enabled, this option displays the customer shipping address if the customer billing address is empty, and vice versa.
Orders Table Actions
Orders Table Actions consists of four options that, when enabled, allow vendors to click buttons to view specific details via the vendor dashboard order table.
When enabled, the View Order Details option lets vendors click View Order Details buttons to view customer order details on the order table.
Enabling the Shipping Label option creates Shipping Label buttons on the order table. Clicking these reveals the shipping labels used in transactions.
Tracking Number creates buttons that let vendors view information associated with orders’ tracking numbers.
Mark Shipped creates buttons that let vendors mark orders as shipped.
The third and last area of the Orders subsection page is known as Order Administration. This lets you configure options for admin order overrides.
This area comes with two options only:
Order
When enabled, the Order option allows the marketplace administrator to mark all items on the vendor dashboard order table as shipped upon the completion of orders.
Order Status Update
Enabling Order Status Update instructs WC Vendors to automatically complete any order that a vendor has marked as shipped.
Step 3: Save your work!
Once you’re happy with your Orders subsection settings, scroll down to the bottom of the page and click the Save Changes button. This activates your options, allowing your chosen transaction details to appear on the vendor dashboard for vendors to see.
Take note: If you want more information on how to configure the Orders subsection page, check out the Capabilities documentation.
The Vendor’s Perspective: Viewing Marketplace Orders
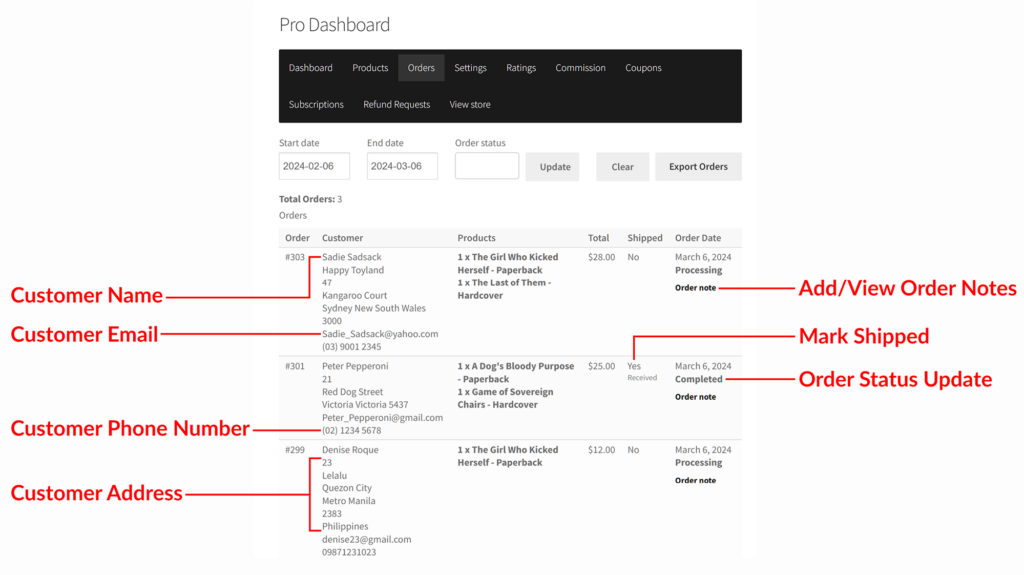
Now that you’ve decided what transaction details appear to your vendors, all they have to do to access this information is to go to their vendor dashboard and click the Orders section. This will take them to a page showing the Order Table with a list of customer orders.
As you can see above, the Order Table features the transaction details you picked in Step 2.
With such crucial information on display, vendors can seamlessly navigate their marketplace orders, armed with the insights needed to thrive in the competitive e-commerce landscape.
Conclusion
Empowering vendors with access to transaction details is paramount for fostering transparency, enhancing customer experiences, and optimizing operational efficiency. And by using WC Vendors to grant your sellers access to information about their marketplace orders, your marketplace can enjoy such benefits.
To recap, we outlined three simple steps to allow your vendors to access transaction details:
Do you have any questions about how to let your vendors view marketplace orders? Reach out to us and let us know; we’d be happy to help you out!

