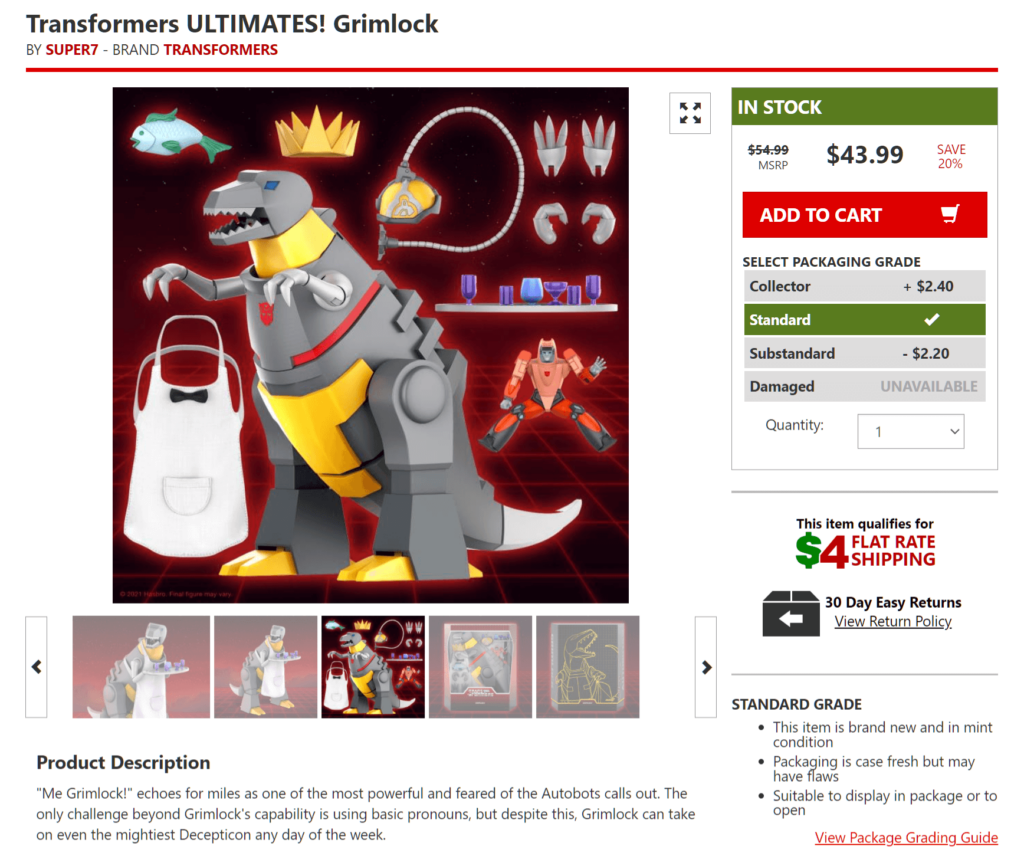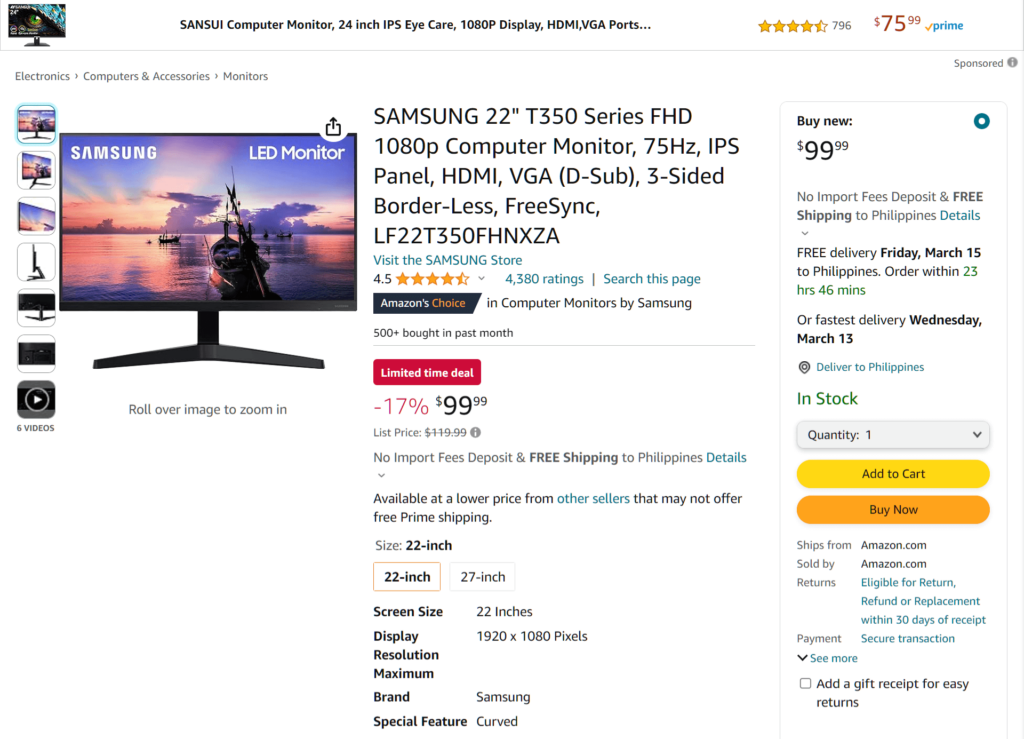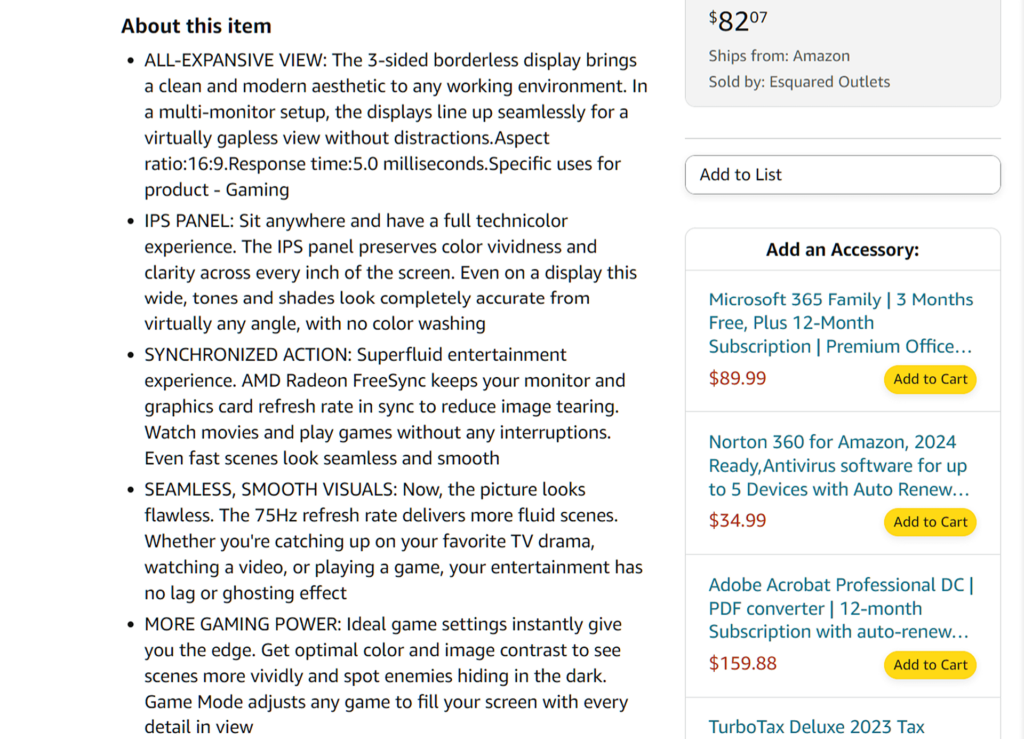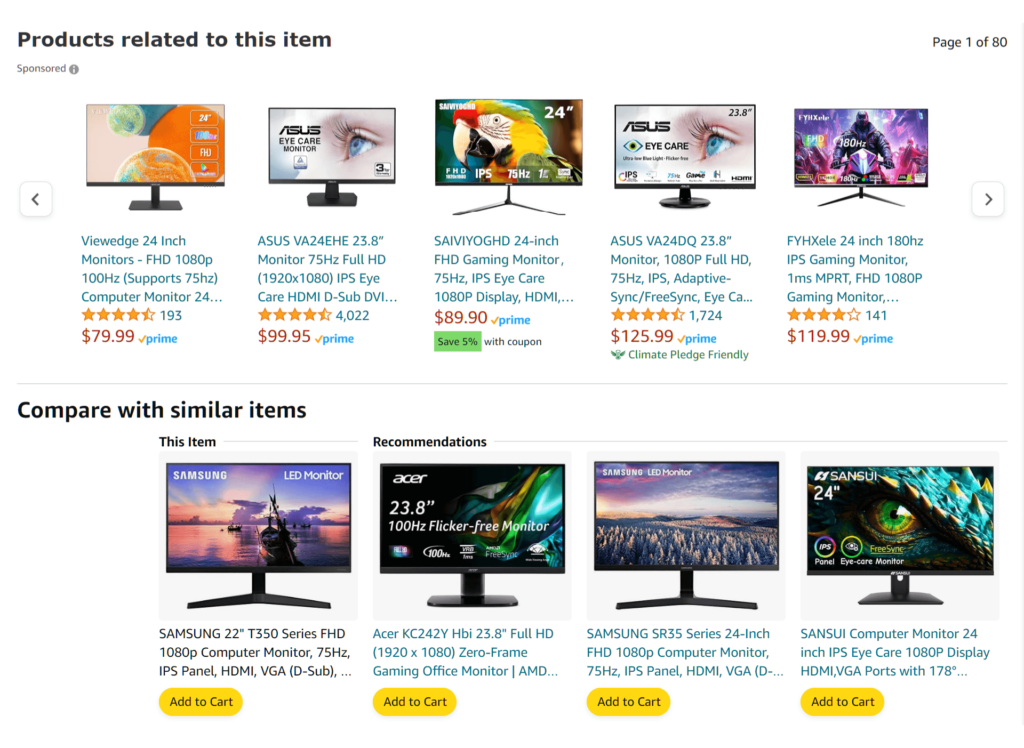
The very purpose of an online multi-vendor platform is to sell other people’s goods. But if you want every vendor product to sell well, you must create marketplace product listings of the highest caliber.
Product listings are how you exhibit the items you’re selling online. As such, they’re necessary for letting consumers know you have items they can buy. Extremely well-crafted listings can do much more, however. For example, they can turn website visitors into customers, promote your brand globally, and save you time and resources to focus on other vital business tasks.
Because every marketplace must get product listings right, today’s article will focus on mastering your marketplace product listings. We’ll delve into what goes into these listings and the many benefits they provide. Furthermore, we’ll give you a step-by-step tutorial on using the premier marketplace solution, WC Vendors, to implement product listings on your multi-vendor platform.
And so, without further ado, let’s get right to it!
I. What Are Product Listings In The Context Of Multi-Vendor Marketplaces?
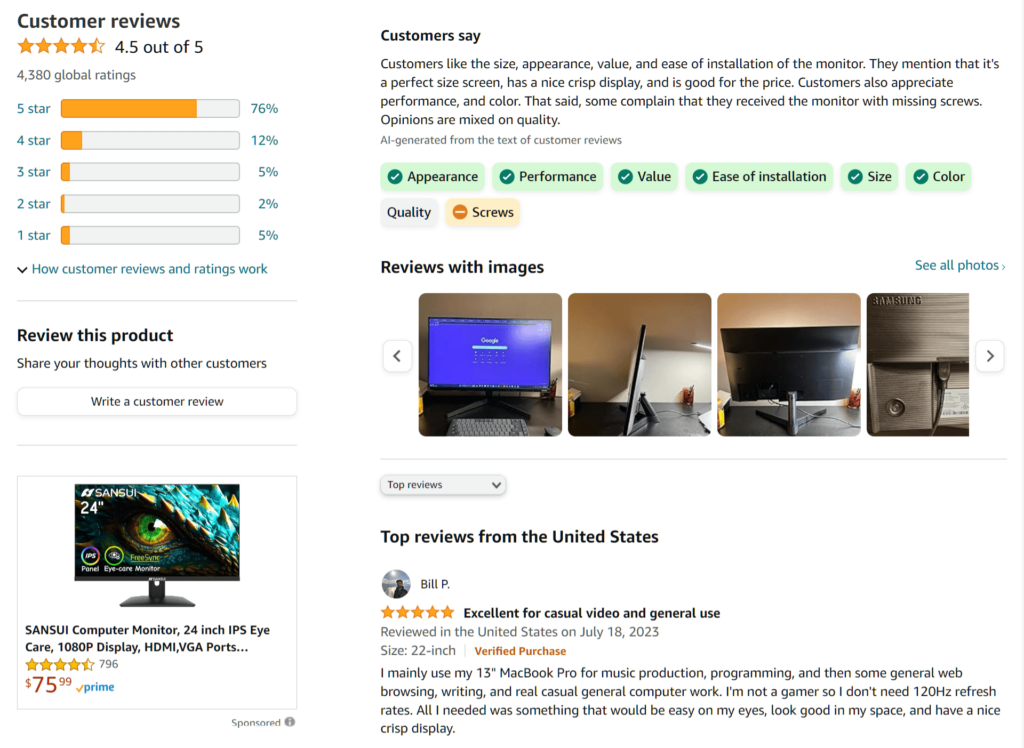
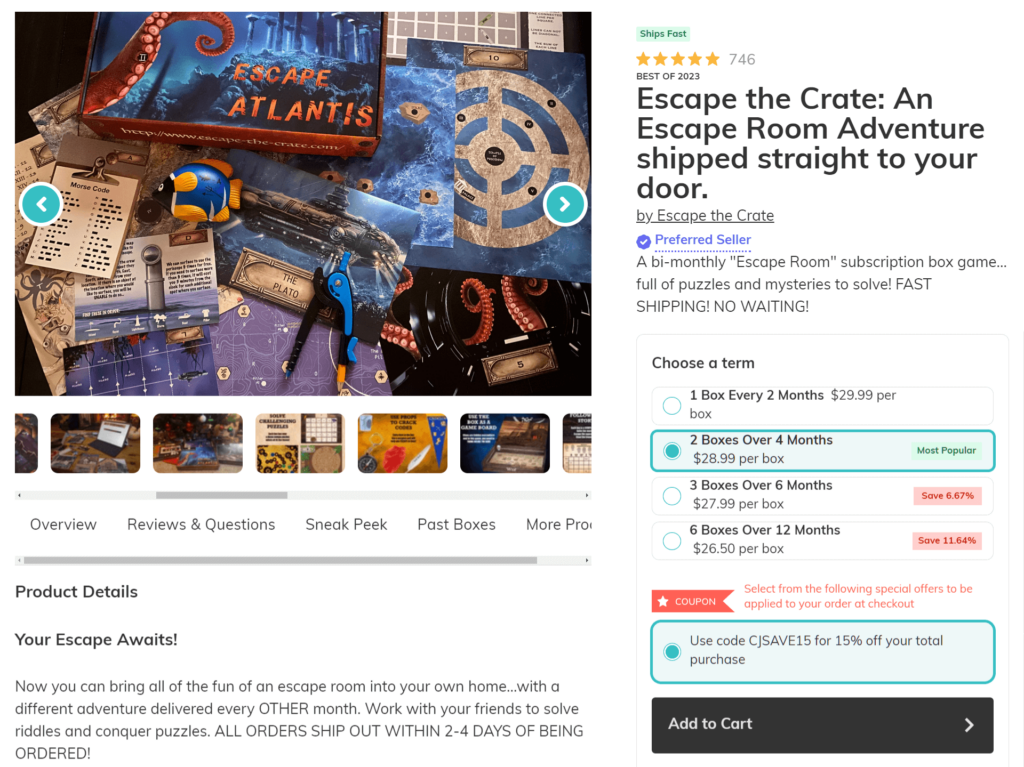
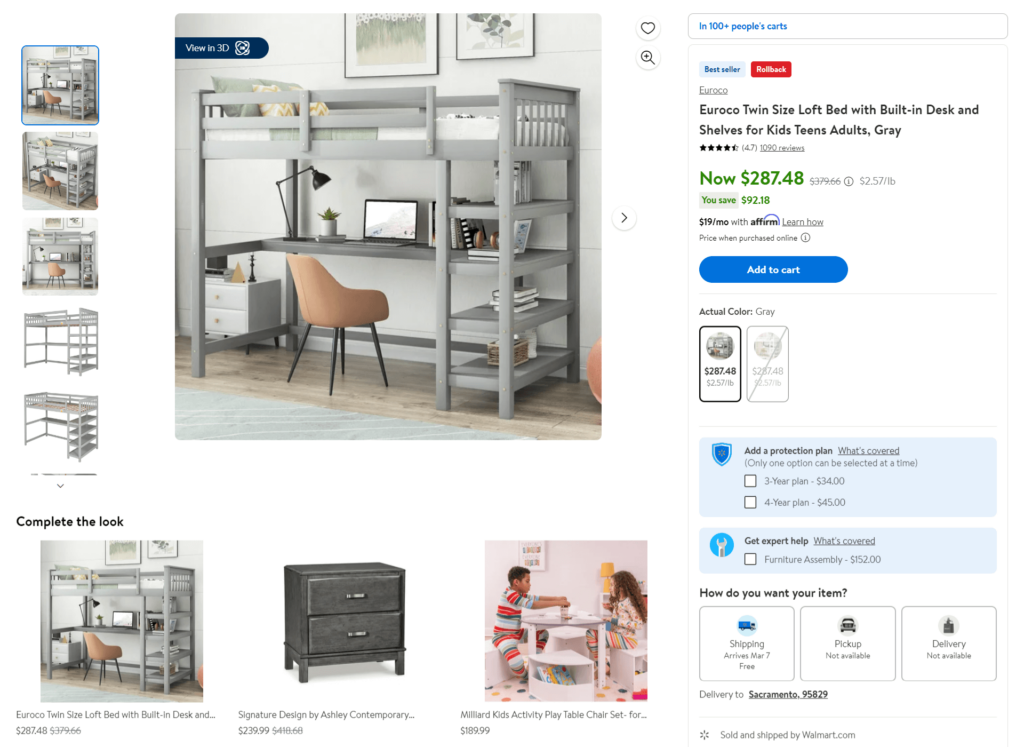
A product listing is a detailed and structured presentation of a specific item that a vendor on an online marketplace is selling. It provides information about the product such as its name, description, specifications, price, images, and sometimes reviews or ratings.
Product listings are crucial for informing potential buyers about products’ features and characteristics, helping them make informed purchasing decisions. They play a major role in online shopping experiences, serving as virtual storefronts for vendor products.
What do product listings consist of?
Typically, a product listing includes the following components:
- Product Title: This is a concise yet descriptive title that grants an overview of the vendor product.
- Product Description: A detailed description that highlights the product’s key features, benefits, and any relevant information that helps customers understand what they’re purchasing.
- Images of the Product: High-quality images or photographs of the marketplace product from different angles, allowing customers to visualize the item.
- Price: The cost of the product, including any discounts or special offers if applicable.
- Product Specifications: Technical details such as size, dimensions, weight, materials, color options, and other relevant specifications.
- Availability: Information about whether the vendor product is in stock and ready for purchase or if it’s temporarily unavailable.
- Shipping Information: Details about shipping options, delivery times, and associated costs.
- Customer Ratings and Reviews: Feedback from previous buyers, including comments and ratings about their experiences with the marketplace product.
- Seller Information: Information about the vendor or seller, which may include their name, ratings, and contact information.
- Add to Cart/Buy Now Buttons: An option for customers to add the vendor product to their shopping cart or proceed directly to checkout.
Product listings are essential for online shopping platforms. When they’re clear and compelling, they can significantly impact a customer’s likelihood of making a purchase. Thus, they can contribute to a multi-vendor platform’s success.
Which brings us to…
II. The Many Benefits Of Marketplace Product Listings
If you want your vendor products to fly off your marketplace’s virtual shelves, ensure you use product listings. After all, these listings can produce the following advantages:
1. Easy shopping
Product listings serve as a comprehensive digital catalog of all the vendor products available in your marketplace. Thus, they make it easy for people to find and buy what they want online.
2. Detailed information
Listings provide detailed information about each vendor product, like what it looks like, its size, color, features, and how much it costs. This helps shoppers decide if it’s what they’re looking for.
3. Comparison
With marketplace product listings, shoppers can compare different vendor products side by side. This allows them to see which one has the best features or price, helping them make a smart choice.
4. Convenience for customers
Instead of going to a physical store, people can shop from the comfort of their own home. They can browse through marketplace product listings anytime, anywhere, using their phone or computer.
5. Convenience for businesses
Marketplace product listings allow marketplace operators and vendors to effortlessly manage orders and keep track of what’s in stock. After all, many e-commerce platforms can automatically track product availability, order processing, and shipping, thus saving time and resources.
6. Variety
Online marketplaces often boast a broad range of vendor products to choose from. Product listings showcase this variety, giving shoppers lots of options to explore and find exactly what they need.
7. Customization
Marketplace product listings can be customized to cater to specific target audiences or demographics. Businesses can tailor their listings’ content, imagery, and promotions to resonate with different customer segments, enhancing the overall shopping experience.
8. Reviews and ratings
Well-crafted listings include reviews and ratings from other shoppers who have bought the product. This feedback helps new shoppers decide if the product quality meets their expectations or if they should look for something else.
9. Targeted marketing
Product listings can be optimized with keywords and tags that match what customers are searching for. This helps attract the right audience to the product, increasing the likelihood of making a sale.
10. Brand building
When marketplace product listings are consistent and visually appealing, they can help build brand identity and recognition. Well-presented listings with cohesive branding elements create a positive impression on customers, instilling trust in the brand.
11. Cross-selling and upselling opportunities
Marketplace product listings can be designed to showcase related or complementary items, encouraging customers to explore additional products and potentially increase the value of their purchase.
12. Promotional opportunities
Your marketplace product listings are a great way to advertise any sales or special deals you have going on. You can highlight these discounts to attract more customers and boost your sales.
13. Social sharing
Many e-commerce platforms enable customers to share marketplace product listings with their social networks. This facilitates word-of-mouth marketing, which helps expand the product’s visibility through social media channels.
14. Increased visibility
When a vendor product is listed online, it becomes accessible to potential customers worldwide, thus allowing the marketplace to tap into international markets. This expanded reach can attract more buyers than traditional brick-and-mortar stores.
15. 24/7 Availability
Physical stores are known for having opening and closing hours. In contrast, online marketplaces are available every day of the week, which means their product listings are also accessible 24/7. This lets customers shop at their convenience, regardless of busy schedules or time zone differences.
16. Accessibility
People can view your product listings from different devices like phones, tablets, or computers. Thus, more people can see what you’re selling no matter how they prefer to shop online.
17. Cost-effective
Traditional advertising, from billboards to print ads, can be extremely costly to launch and maintain. In contrast, it doesn’t take much money to have product listings on your online marketplace. Such listings reduce overhead costs associated with physical storefronts, thereby allowing businesses to reach customers while avoiding massive marketing expenses.
18. Analytics and insights
E-commerce platforms provide analytics tools that track how customers interact with product listings. This information can reveal valuable observations regarding customer preferences, purchasing behaviors, and emerging trends. Thus, they allow businesses to fine-tune their marketing tactics and product selections.
19. Feedback loop
Product listings create a feedback loop between businesses and customers. Customers can rate and review products or services. The marketplace can then use this feedback to improve its offerings.
20. Streamlined checkout
Buying from your marketplace product listings is made easy for customers. They can swiftly add vendor products to their shopping cart and conveniently complete their purchase, encouraging more people to buy from you.
These benefits highlight the enormous advantages that marketplace product listings offer to both businesses and customers in the e-commerce ecosystem.
III. How To Implement Marketplace Product Listings (In 4 Steps)
Now that you know what marketplace product listings are, it’s time to give vendors the ability to use them.
For this tutorial, we’ll use the powerful marketplace solution, WC Vendors. For this plugin to work, however, make sure you already have a traditional online store powered by:
Moreover, you must convert your store into a multi-vendor marketplace using WC Vendors. For details on how this is done, read the following guides:
- How To Create An Online Marketplace: A Beginner’s Guide
- How To Build Your First Multi-Vendor E-commerce Website (Full Guide)
With that in mind, let’s dive into the tutorial!
First, you must locate the options that allow you to create what’s known as a product form.
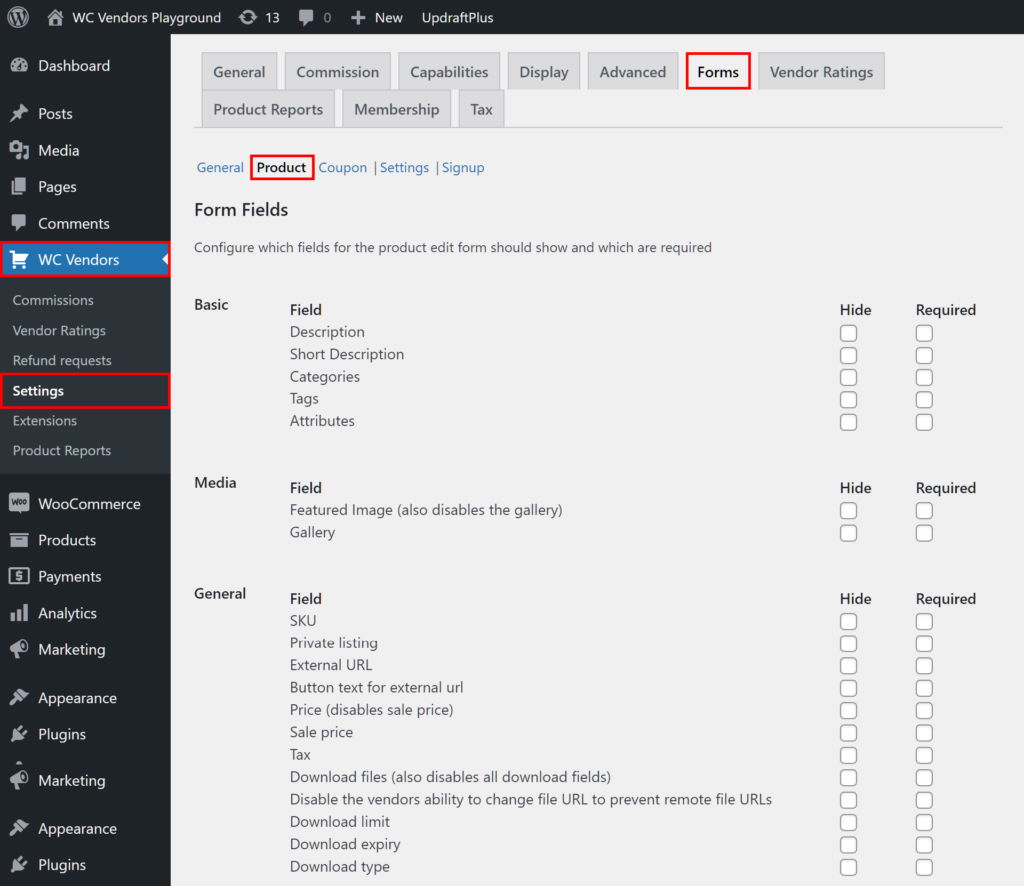
Head to your WordPress dashboard and click WC Vendors > Settings. Then, click the Forms tab followed by the Product subtab.
The Forms section’s Product subsection is where you build a crucial interface known as the product form.
The product form collects data about the product that a vendor wants to add to their store and sell to customers. The form achieves this by having the vendor fill up various data fields. The data they provide is then displayed on the product listing for customers to see. This way, shoppers are provided with information that can convince them to make a purchase.
In short, you must create a product form to grant vendors the ability to create product listings.
As the marketplace owner, you can use the Product subsection’s settings to decide what information the product form gathers from vendors. Therefore, you also play a role in how your vendors’ product listings take shape.
Now that you know what a product form is, you’re ready to build one.
Step 2: Configure the Form Fields settings
The Product subsection page is composed of two main areas.
The first is Form Fields, which boasts many fields that determine the appearance and function of the product form. Basically, if you enable a field, it appears on the form as an entry field that a vendor can fill with information.
Enabling a field is as simple as not ticking any of the available checkboxes on the page.
Speaking of checkboxes, let’s discuss the two types you’ll encounter here.
Required vs. Hide
When you tick a field’s “Required” checkbox, vendors are obligated to provide the details requested. In other words, if they don’t fill in a required entry field, they won’t be able to complete the product listing.
For example, if you tick the Description field’s “Required” checkbox, the vendor has no choice but to provide a description of their product on the form.
We recommend ticking the “Required” checkboxes of the fields that you consider absolutely relevant to your business.
On the other hand, ticking a field’s “Hide” checkbox removes the associated entry field from the product form. In short, ticking “Hide” disables the field. In addition, it prevents you from ticking the field’s “Required” checkbox.
So if you tick the Description field’s “Hide” checkbox, the product form will no longer ask your vendors to describe their products on the form.
We suggest ticking a field’s “Hide” checkbox if you believe it isn’t relevant to your business.
Now, it’s time to explore the fields you can add to or remove from the product form. As there are many field groups available, we won’t discuss all of them.
Basic
As illustrated below, the Basic fields request key details about vendor products.
For example, your product form could ask a vendor for a long and short description of the item they’re listing. Once the vendor has provided these details, they’re then displayed on the product listing for customers to see.
Click here for a tutorial on crafting product descriptions!
Media
The Media fields collect images of the vendor product being listed.
The Featured Image is the main image of the vendor product. In other words, it’s the largest, most prominent image on the product listing, as well as the first image customers will see upon viewing said listing. In addition, it serves as the thumbnail on the vendor’s list of products.
On the other hand, Gallery images are additional images that customers can view. Typically, they appear as thumbnails below the featured image. Customers can scroll through these thumbnails, and then click one to enlarge the image and replace the featured image.
Click here for a tutorial on crafting product galleries!
General
The purpose of the General fields is to acquire an assortment of important information about the vendor product.
For example, you can have the product form request the vendor for their product’s price and SKU. Once the vendor completes the product form, these details will appear on the product listing.
Inventory
The Inventory field gathers data related to vendor product inventory.
For example, your product form can ask the vendor to give you the product’s stock quantity and status. These details are then displayed on the product listing.
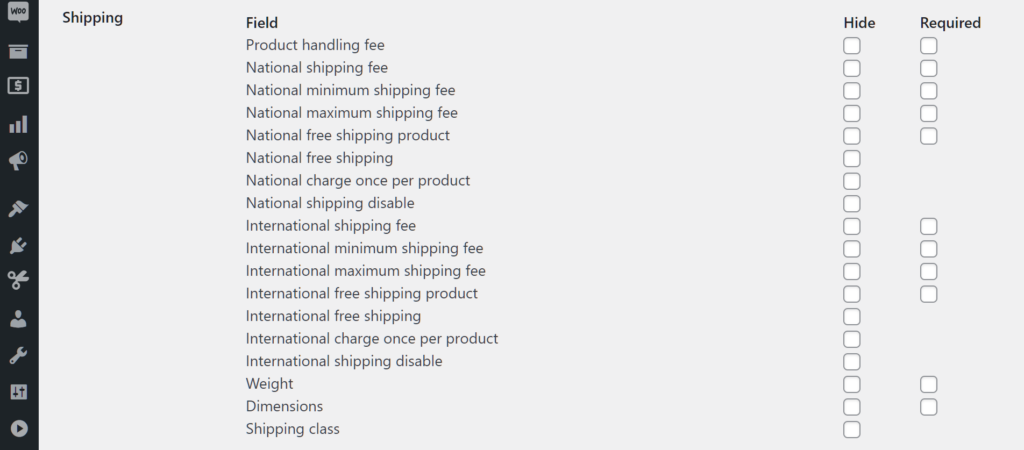
Shipping
You’ve also got Shipping fields, which collect information related to vendor product shipping.
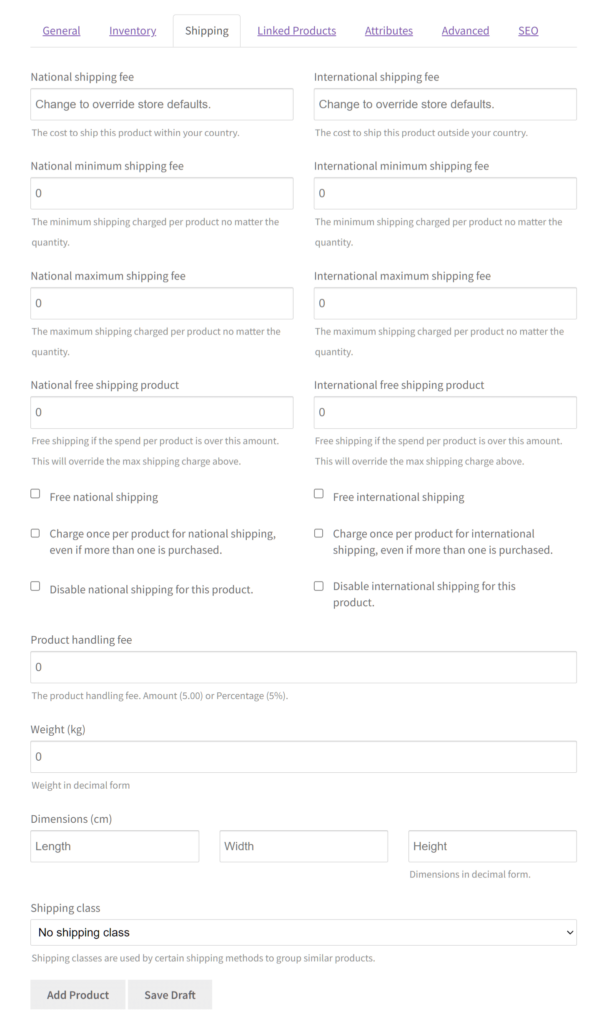
Depending on your needs, you can have the product form ask the vendor for information about their product’s weight, dimensions, handling fee, national shipping fee, and the like.
Upsells/Cross sells
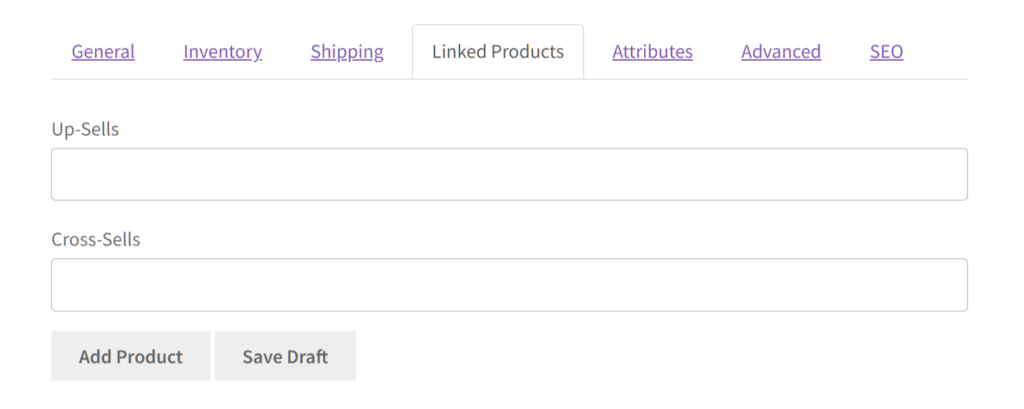
The Upsells/Cross sells fields ask vendors to provide information about other products they wish to promote via the product listing.
If you want your vendors to upsell and/or cross sell related items, you can activate their respective fields. You can even have vendors provide information about the product groups that specific items belong to. This is useful if a vendor product belongs to a group that you want to promote to customers.
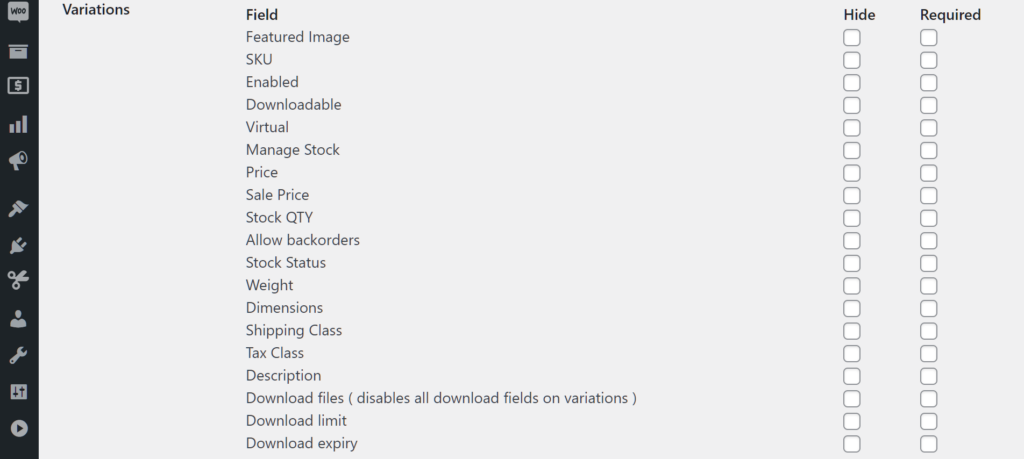
Variations
Some products have variations. For example, a t-shirt can come in various colors and sizes. If your vendor products have different versions or models, it’s a good idea to present these variations to customers so that they can have a selection to choose from.
Basically, the Variations fields collect data about vendor product variants to display variations on the product listing.
As you can see, you can ask vendors lots of information about product variants, such as their SKU, price, stock quantity, weight, description, etc.
Product SEO
SEO can enhance the visibility of a vendor product, making it easier to find online. Thus, the proper implementation of SEO techniques can enhance your sales and even spread awareness about the product as well as your marketplace.
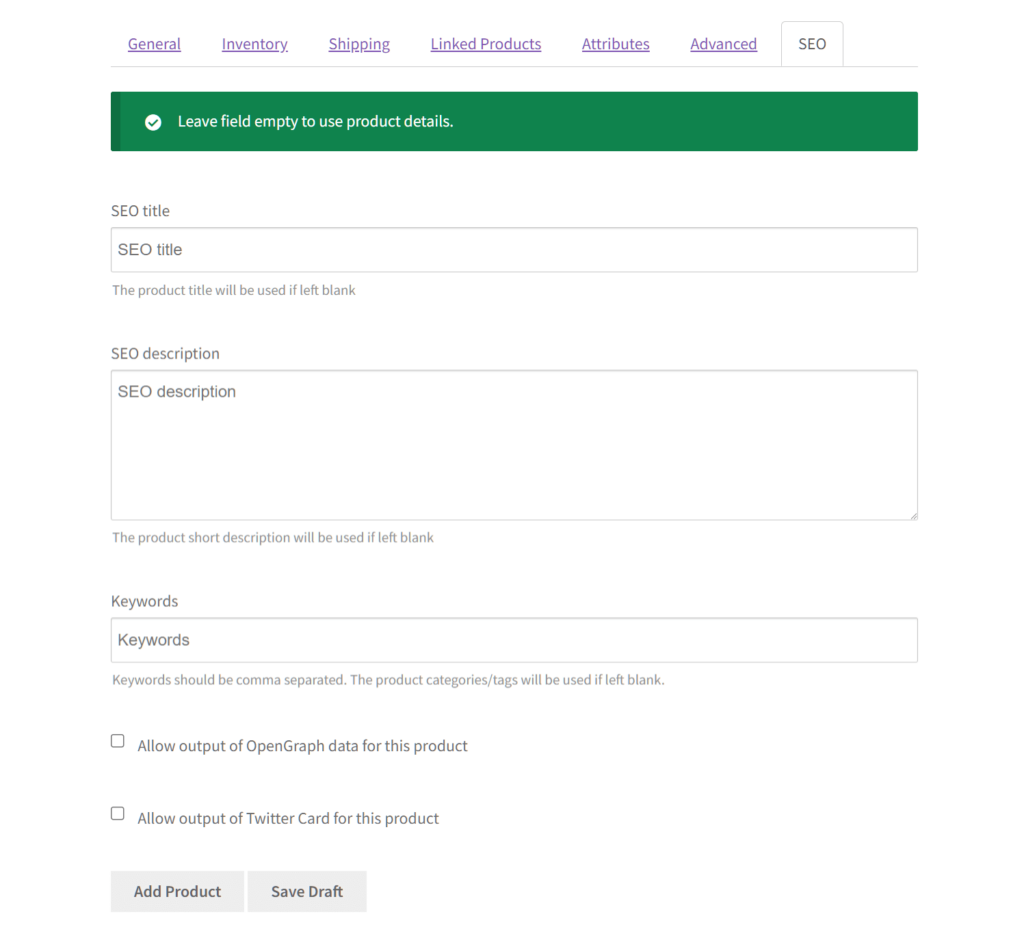
The Product SEO fields allow vendors to use SEO strategies to enjoy the aforementioned benefits.
For instance, you can ask vendors to provide SEO keywords that they can attach to their products. This can raise their products’ Google search rankings, boosting their online discoverability,
Step 3: Configure the Product Form settings
The second area of the Product subsection is Product Form. This contains options allowing you to control the product form’s default appearance and behaviors.
Because Product Form offers a plethora of options, we’ll explore some of them only:
Default Product Forms
WC Vendors Pro boasts three product form styles that you can use as your default form. You can change this style any time you wish.
The three forms include:
- Standard: The standard template mimics all functionality of the WordPress backend.
- Simple: This style allows vendors to create simple products only. While it comes with fewer options, it lets vendors quickly add items to their store without requiring you to disable fields.
- Download/Virtual product: As a dedicated form for downloadable/virtual products, this lets you quickly start a marketplace for digital downloads.
Use HTML
Do you want your vendors to be able to use the WordPress WYSIWYG (What You See is What You Get) editor when writing their product descriptions? Then enable the Use HTML option.
With HTML enabled, vendors will enjoy more control over the content style of their product descriptions.
Allow Media
Activate Allow Media to allow vendors to upload images via the WordPress WYSIWYG editor.
Uploaded images are included in product descriptions. This is useful if you wish to grant vendors the ability to add extra visual information to their descriptions.
Category Display
Enable Category Display to choose how the category selection functions for vendors.
Three category display options are available:
- Multi-select: This lets vendors select multiple categories at a time.
- Single select: This restricts vendors to a single category for every product.
- Checkboxes: This lets vendors make their selection(s) via a checkbox interface.
Hide Categories
Do you wish to conceal certain product categories from your vendors? Then list them down in the Hide Categories entry field.
Take note that you can separate fields using commas.
Categories Limit
You can limit the number of categories a vendor can select per product listing by inputting a number in the Categories Limit entry field.
For example, if you want vendors to select only up to 7 categories, type 7 in the entry field.
Tag Display
With the Tag Display option, you can choose one of two ways that vendors can input tags.
The two options are:
- Multi Select: This gives vendors access to an open-ended box, allowing them to add tags without restriction.
- Multi Select Limited: This functions like a typical dropdown menu, limiting vendor choices to predefined tags.
File Display
The File Display option lets you determine how downloadable products display file details to vendors.
Two options are available:
- File URL: This displays the file URL on the digital download file.
- File Name: This displays only the file name, omitting the URL.
Vendor Disk Usage Limit
By using the Vendor Disk Usage Limit option, you can limit the total size of the files vendors upload to their stores. Take note that the total size is measured in megabytes (MB).
For example, if you want to set a disk usage limit of 100MB, simply type 100 in the entry field.
Vendor File Upload Limit
By using Vendor File Upload Limit, you can limit the maximum number of files vendors can upload to their stores.
For instance, if you want every store to only have a maximum of 100 vendor products, you should input the number 100 in the entry field.
Max Gallery Images
The Max Gallery Images option allows you to set the maximum number of gallery images vendors can upload to each product listing.
For example, if you want each product listing to have up to 10 gallery images only, write the number 10 in the entry field.
Now, for one final step…
Step 4: Save your work!
Once you’re happy with your Form Fields and Product Form settings, scroll down to the bottom of the page and click the Save Changes button. This activates the product form for your marketplace, allowing vendors to create product listings!
Take note: If you want more information on configuring the product form, check out the Forms documentation.
IV. The Vendor’s Perspective: Creating A Product Listing
Now that you’ve finished crafting your marketplace’s product form, your vendors can add products to their stores and create product listings.
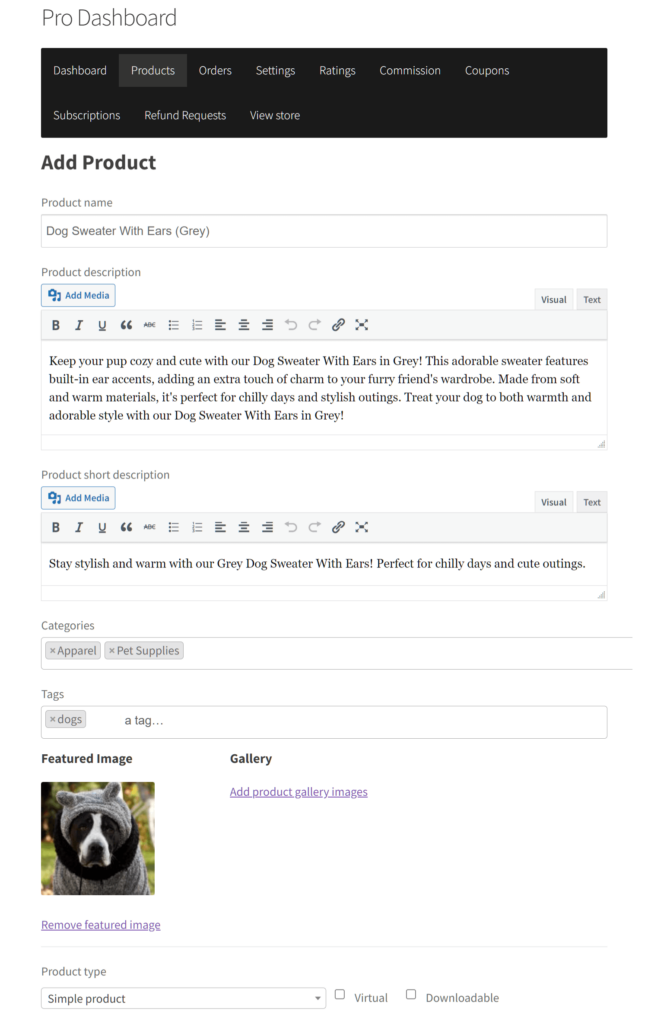
To create a product, a vendor must go to their dashboard and select Product. Then, they must click Add Product. This takes them to the Add Product page, which contains the product form (including all the Form Fields and Product Form options you enabled):
As you can see, the vendor can now fill in enabled Form Fields to provide essential product details, such as the Product Description, Categories, Featured Image, and Gallery.
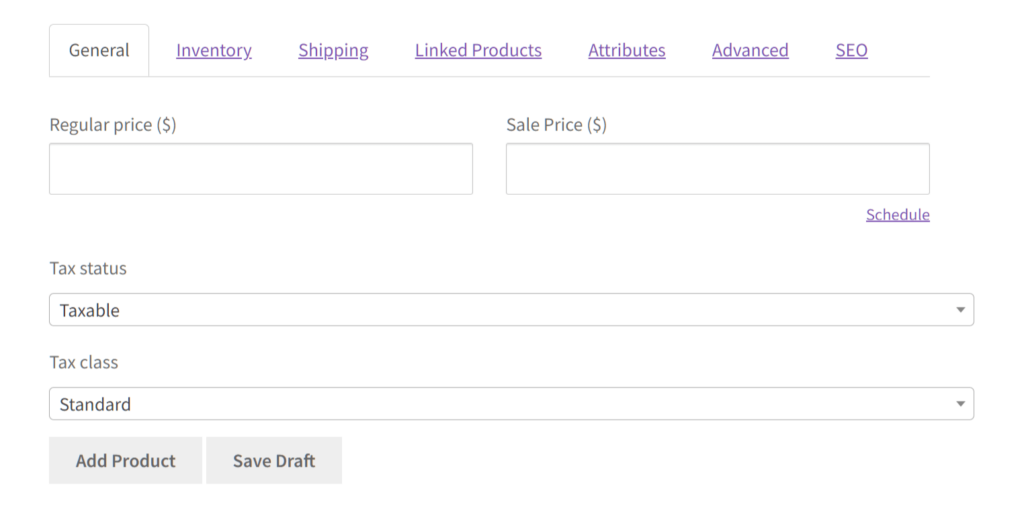
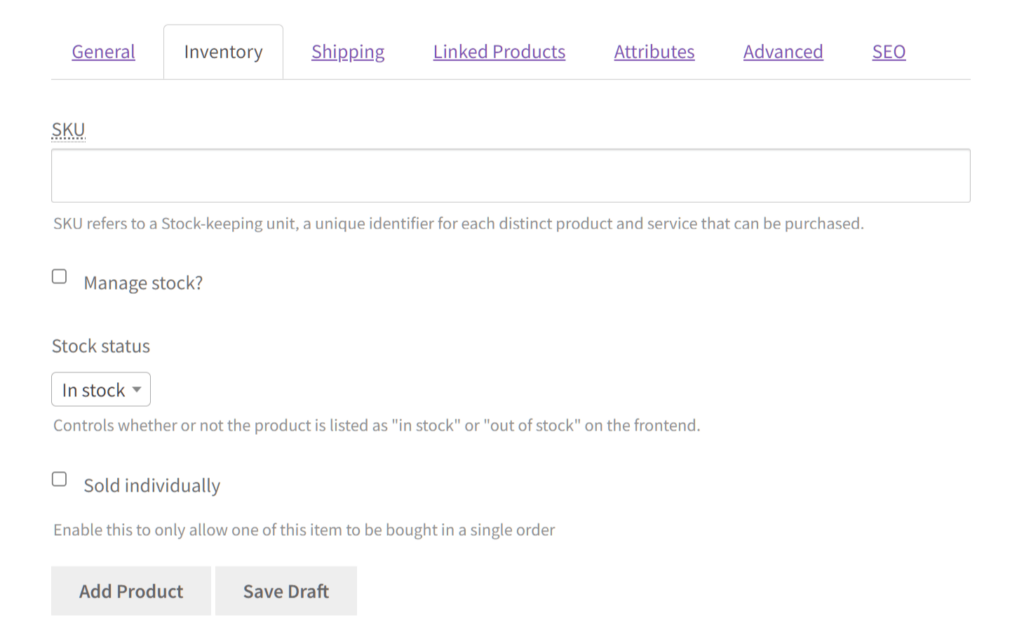
In addition, if you scroll down the vendor product form, you’ll find tabs containing all your enabled options.
For instance, there’s the General tab, which contains the General Form Fields:
Then, there’s the Inventory tab, which displays the activated Inventory Form Fields:
Here are the contents of the Shipping tab:
The Linked Products tab contains the Upsell/Cross Sells Form Fields:
And the SEO tab contains the Product SEO Form Fields:
To finish adding the product and crafting the product listing, the vendor must simply scroll down the Add Product page and click the Save Changes button.
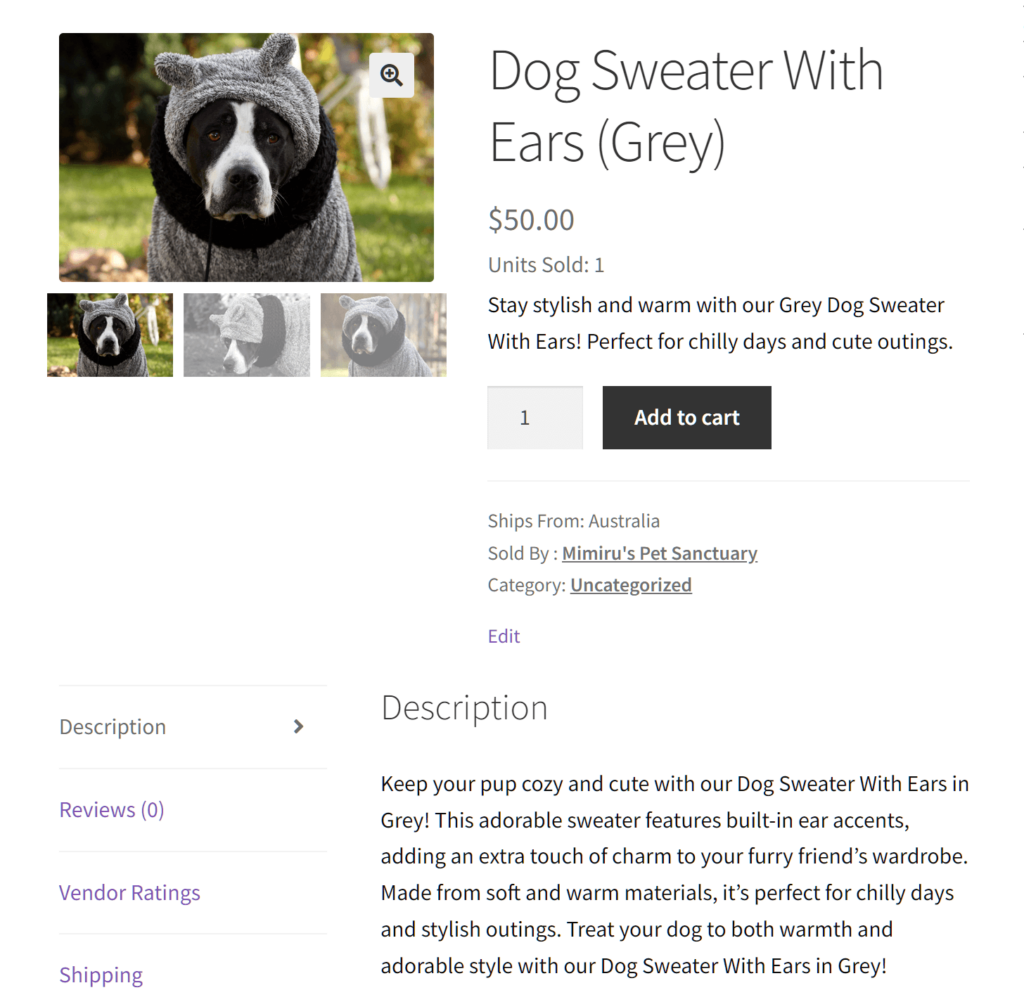
Below is an example of a simple product listing that customers can see on the vendor’s online store.
Conclusion
Product listings are integral components of any multi-vendor marketplace. For starters, they inform consumers that you have vendor products for sale. Equally important, they provide information about these products, allowing customers to make informed buying decisions. They also encourage purchases, promote your brand, simplify order management for vendors and marketplace owners, and more.
To master your marketplace product listings strategy and ensure your vendor products move briskly, familiarize yourself with the following concepts:
- What are product listings in the context of multi-vendor marketplaces?
- The many benefits of marketplace product listings
In addition, you can use WC Vendors to implement product listings on your own multi-vendor platform. To do this, observe the following steps:
- Navigate to the product form options
- Configure the Form Fields settings
- Configure the Product Form settings
- Save your work!
Do you have any questions about marketplace product listings? Let us know in the comments section!
