The foundation of a marketplace’s success lies in the hands of its diverse team of vendors. And if you want only the best people on your team, crafting an effective vendor application process is not just useful; it’s a strategic imperative.
Recruiting the right vendors to your platform requires a nuanced understanding of the vendor application system’s intricacies. For this reason, today’s article will delve into the process’ various stages. We’ll even teach you how to use WC Vendors to implement such a system in your own multi-vendor marketplace.
With that in mind, let’s dive into our comprehensive guide on streamlining the vendor application process!
What Is The Vendor Application Process?
The vendor application process is a crucial component for marketplace owners seeking to onboard new sellers. It serves as the gateway for individuals or businesses looking to offer their products or services on your platform.
This process involves a series of steps designed to ensure that potential vendors:
- Meet certain criteria
- Align with your marketplace’s standards
- Contribute positively to the overall user experience
Therefore, understanding and streamlining the vendor application process is fundamental for marketplace efficiency. Not to mention it’s necessary if you want to maintain a high-quality pool of sellers!

Vendor Application: From Implementation To Registration To Approval/Rejection
The vendor application process consists of three main steps. These are as follows:
1. Implementation: Setting the foundation
Before vendors can apply, you need to establish a seamless and user-friendly vendor application system.
This system involves integrating a dedicated section within your marketplace that provides a straightforward interface for potential sellers. In addition, this section should outline the vendor application requirements, so that applicants know what business and personal data to present to you for approval.
The implementation phase sets the stage for a smooth and efficient process. Thus, it ensures that both marketplace owners and applicants have a clear understanding of the expectations.
2. Registration: Providing essential information
Once the implementation is in place, vendors initiate the application process by registering on your platform.
During registration, applicants are typically required to provide necessary information about themselves or their businesses. This may include any pertinent information required for evaluation, such as:
- Contact details
- Business specifics
- Product/service details
- … and more!
The registration phase acts as the gateway, allowing serious candidates to proceed to the next step.
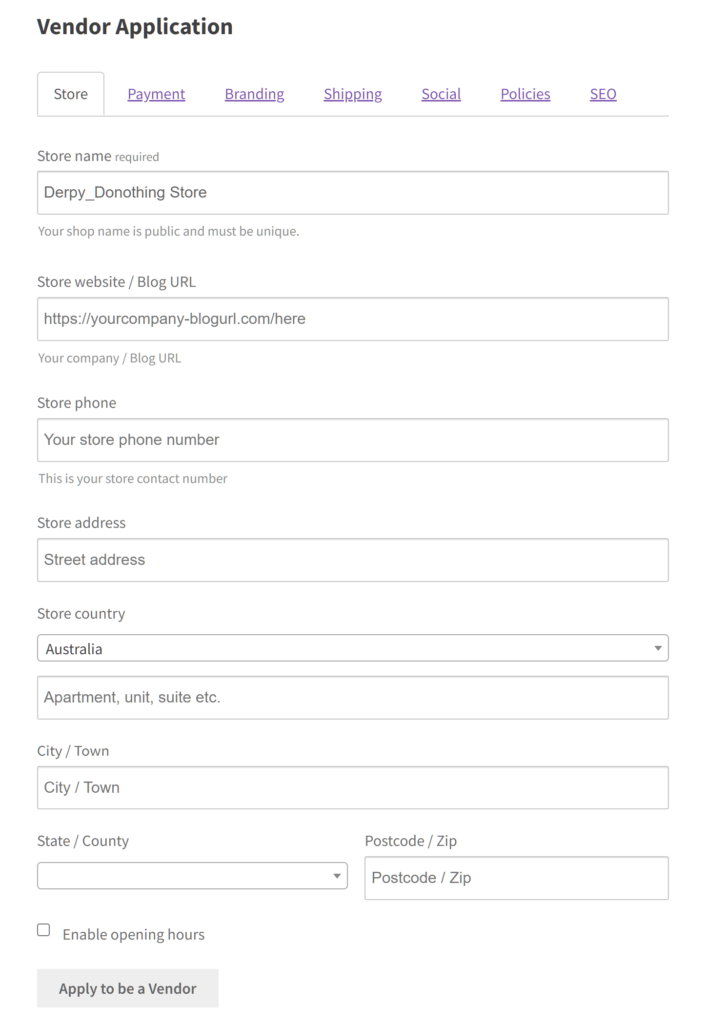
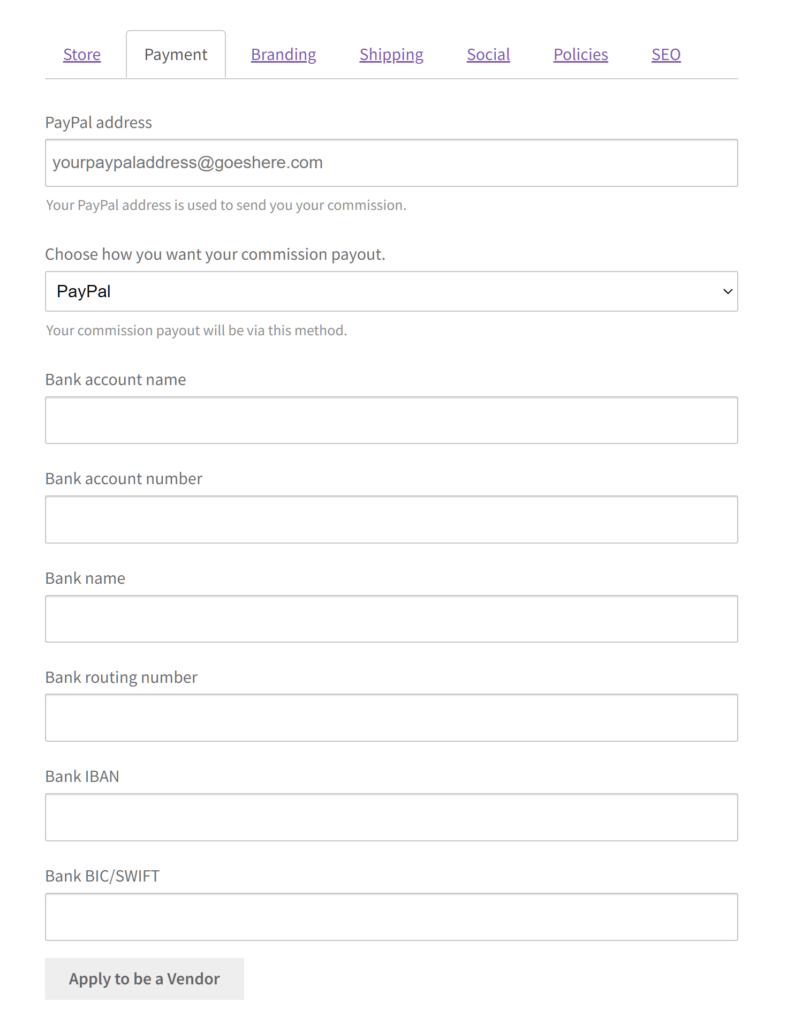
Below is an example of a vendor registration form created using WC Vendors.
3. Approval or rejection: Ensuring quality and consistency
Upon submission of their details, vendor applications undergo a careful review process. Basically, marketplace owners assess the information to determine if the applicants meet predetermined criteria and standards.
The approval or rejection stage is pivotal. After all, it determines which applicants will be welcomed as vendors to the e-commerce platform. Clear communication of the outcome is integral, providing constructive feedback for rejected applicants while celebrating the successful inclusion of new vendors.
By understanding and refining each step of the vendor application process, marketplace owners can foster a thriving ecosystem of sellers. Ultimately, this enhances the overall success and reputation of their platform.

How To Use WC Vendors To Craft The Vendor Application Process (In 3 Easy Steps)
Now that you’re familiar with the vendor application process, it’s time to learn how to use WC Vendors to turn these steps into a reality.
However, before we get to that, you should know that using WC Vendors requires an online store that’s powered by:
Furthermore, you’ll have to use WC Vendors to convert your WooCommerce store into a multi-vendor marketplace. Check out the following articles if you’d like instructions on how to accomplish this:
- How To Create An Online Marketplace: A Beginner’s Guide
- How To Build Your First Multi-Vendor E-Commerce Website (Full Guide)
Now that we’re done with that, let’s start the guide!
Step 1: Allow vendor applications
For vendors to sell their products through your marketplace, you must first allow people to register on your platform as vendors.
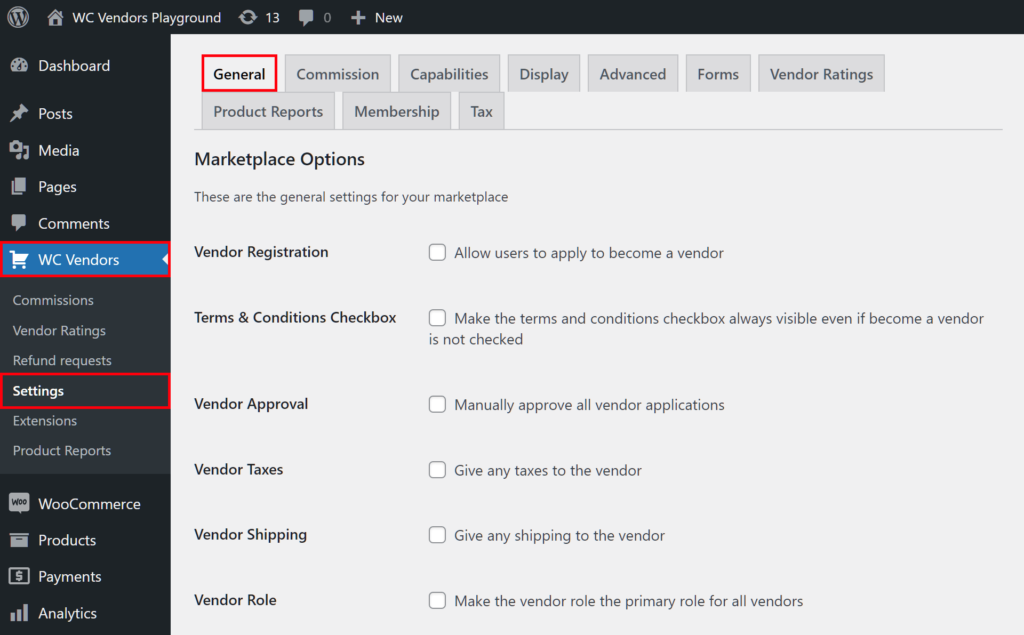
The controls for implementing the vendor application feature are found on the Marketplace Options page. To get there, first access your WordPress dashboard. Then, click WC Vendors > Settings followed by the General tab.
As you can see above, the Marketplace Options page is where you’ll find many crucial settings that govern your platform’s fundamental behavior.
We recommend retaining the settings that WC Vendors configured during the setup phase, as these enable you to launch and manage a fully operational marketplace. However, it’s a good idea to point out a couple of important options:
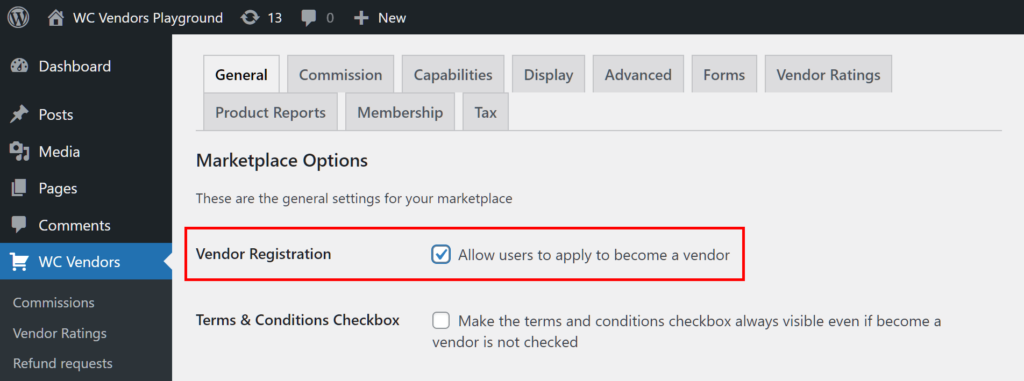
Vendor Registration
Make sure to turn the Vendor Registration option on by ticking its checkbox. When enabled, it gives website visitors the ability to apply to your platform as vendors.
Take note: If this checkbox is unticked, people won’t be able to go through the vendor application process. In other words, it becomes impossible for you to recruit vendors, which means you won’t have a marketplace.
Vendor Registration Form
Tick the Vendor Registration Form checkbox to enable the option. When enabled, website visitors applying to become vendors on your online marketplace are redirected to the vendor registration form, which they’ll need to fill up with relevant data. This is a convenient and effective way to gather data about them, which you can then examine to determine whether or not they’re an ideal fit for your platform.
Vendor Approval
Approving a user’s vendor application is an integral part of the vendor registration process. Thus, we’re dedicating Step 3 to it, as you’ll see further below.
For now, you should simply make sure the Vendor Approval option is enabled (its checkbox should be ticked).
Vendor Registration Box
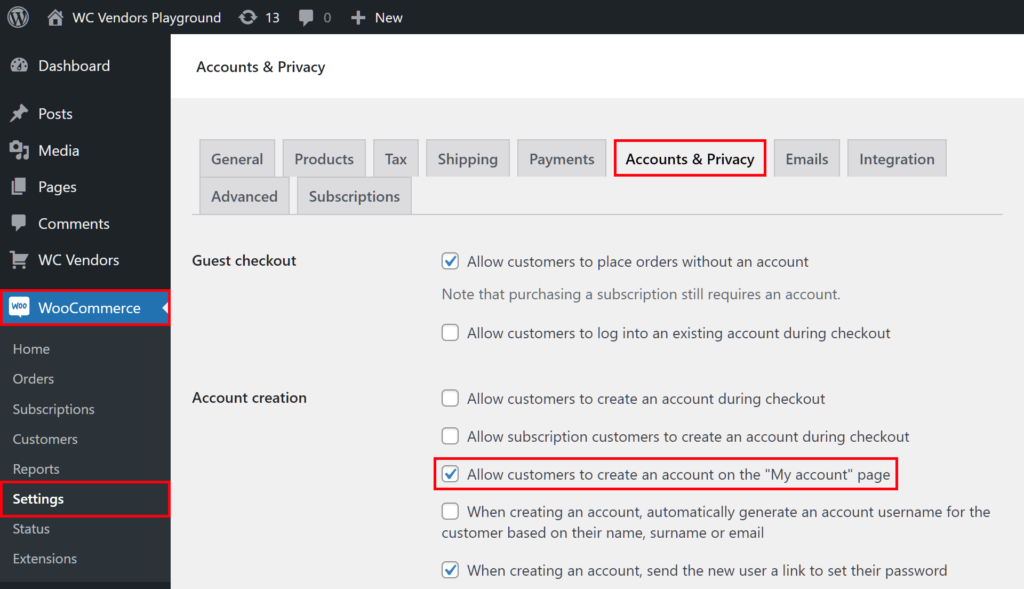
The Vendor Registration Box isn’t an option on the Marketplace Options page. Rather, it’s a special interface that appears on the landing page and that gives users the option to apply to become vendors on your platform.
To enable this registration box, navigate to your WordPress dashboard and click WooCommerce > Settings > Accounts & Privacy. Then, scroll down to Account Creation and tick Allow customers to create an account on the “My account” page.
Once you’re done, remember to scroll down the page and click the Save Changes button!
Step 2: Configure the Signup Form
As previously discussed, the vendor registration form is an online form that collects vital data about your applicants. This way, you can judge who are worth recruiting to your platform as vendors.
Because you enabled the Vendor Registration Form option in Step 1, your platform now presents every applicant with an online vendor registration form to fill up. However, for the best results, you should know how to configure this form.
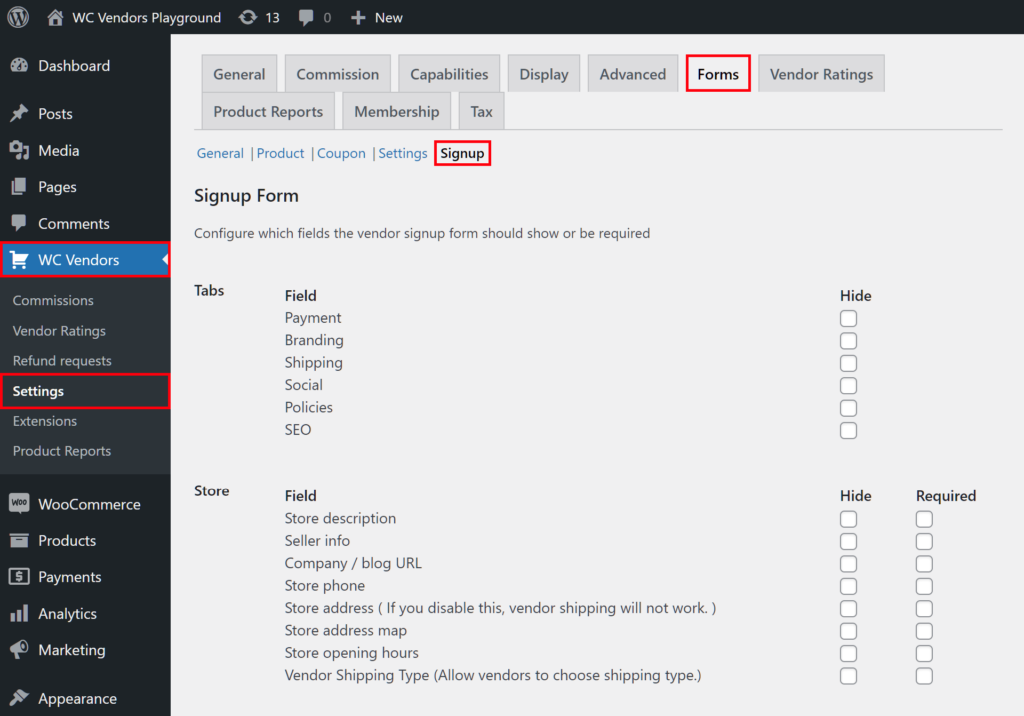
To start the configuration process, head to your WordPress dashboard. Next, click WC Vendors > Settings followed by the Forms tab. Finally, click the Signup tab.
You’re now on the Signup Form page, which boasts many fields that determine the appearance and function of the vendor registration form. Basically, if you enable a field, it appears on the form as an entry field that an applicant can fill in with information.
Enabling a field is as simple as not ticking any of the available checkboxes on the page.
Speaking of checkboxes, let’s discuss the two types you’ll encounter here.
Required VS. Hide
When you tick a field’s “Required” checkbox, applicants are obligated to provide the details requested. In other words, if they don’t fill in a required entry field, they won’t be able to complete the vendor application process.
For example, if you tick the Store Description field’s “Required” checkbox, the applicant has no choice but to write down a description of their store on the form.
We recommend ticking the “Required” checkboxes of the fields that you consider absolutely relevant to your business.
On the other hand, ticking a field’s “Hide” checkbox removes the associated entry field from the registration form. In short, ticking “Hide” disables the field. In addition, it prevents you from ticking the field’s “Required” checkbox.
So if you tick the Store Description field’s “Hide” checkbox, the registration form will no longer ask every applicant for a description of their store.
We suggest ticking a field’s “Hide” checkbox if you believe it isn’t relevant to your business.
Now, let’s go over the entry fields that you can include on or remove from the vendor registration form.
Store
As illustrated below, the Store fields request crucial store details from applicants.
For example, your vendor registration form can ask every applicant to provide a description of their store, their company website URL, their store phone number, etc.
Payment
If you want applicants to provide information about their payment methods, use the Payment fields.
For instance, it can ask the applicant for information such as their PayPal email and payout method, their bank account name and number, and more.
Branding
The Branding fields simply ask applicants to provide images that they wish to use for branding purposes.
A user can, for example, submit an image that they wish to use as their store icon.
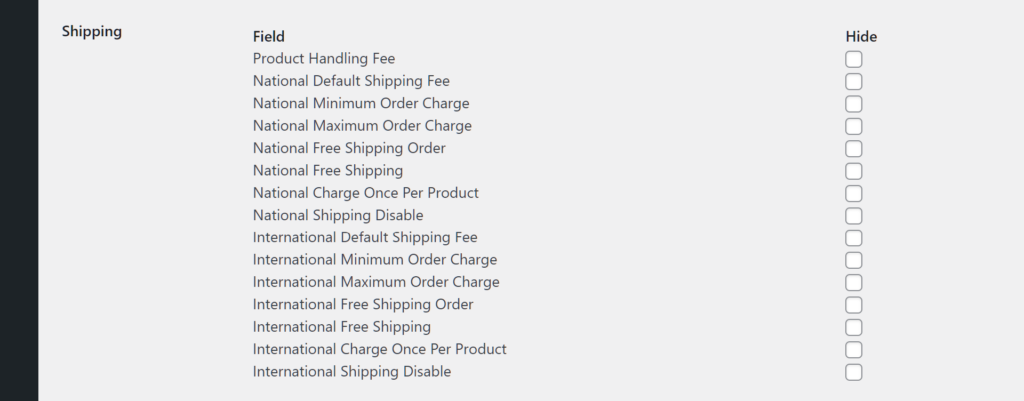
Shipping
The Shipping fields revolve around the shipping process.
For instance, the registration form can ask the applicant to give you their product handling fee, national free shipping, and the like.
Policies
Do you want every store to display information about their policies? Then use the Policies fields.
For example, an applicant can display their return and shipping policies on their store.
Social
If you want your marketplace’s stores to provide links to their vendors’ social media sites, enable the Social fields.
For instance, a vendor can present links to their Facebook, Twitter, and LinkedIn accounts.
SEO
SEO is essential for drawing more visitors to a store. As such, it’s a good idea to turn on SEO fields, as these will let applicants use SEO for their marketing needs.
For example, an applicant may want to use an SEO title, meta description, and meta keywords for their store.
Tabs
These options simply turn the previously discussed field groups on or off.
For example, if you don’t want applicants to provide any shipping details at all, simply tick the Shipping option’s “Hide” checkbox. This removes all Shipping entry fields from the vendor registration form. Basically, this is a more convenient way of ticking each Shipping field’s “Hide” checkbox.
Use HTML for policy
Enable this option if you want applicants to be able to use the WP Editor when writing their store policies on the signup page. This grants them more freedom to craft unique-looking policies.
Again, don’t forget to scroll down the page and click the Save Changes button when you’re finished with your setup.
Take note: Once an applicant completes the vendor registration form, their details are sent to your marketplace’s backend.
Step 3: Approve or reject the vendor application
To understand why the Vendor Approval option is important, let’s first discuss what happens when it’s disabled.
Leaving this option’s checkbox unticked automatically lets users join your marketplace as vendors. In other words, they’re assigned the “Vendor” user role, granting them benefits such as selling their products via your platform. While this may seem convenient, it can cause problems if the system approves a seller whose values are inconsistent with yours.
In contrast, when you tick the Vendor Approval checkbox to enable the option, applicants are assigned the “Pending Vendor” role instead. “Pending Vendors” don’t have access to your marketplace’s tools and thus can’t sell anything. However, the personal and business information that they provided via the registration form remains in your database. Thus, you can scrutinize these details so that you can judge whether or not they belong on your team.
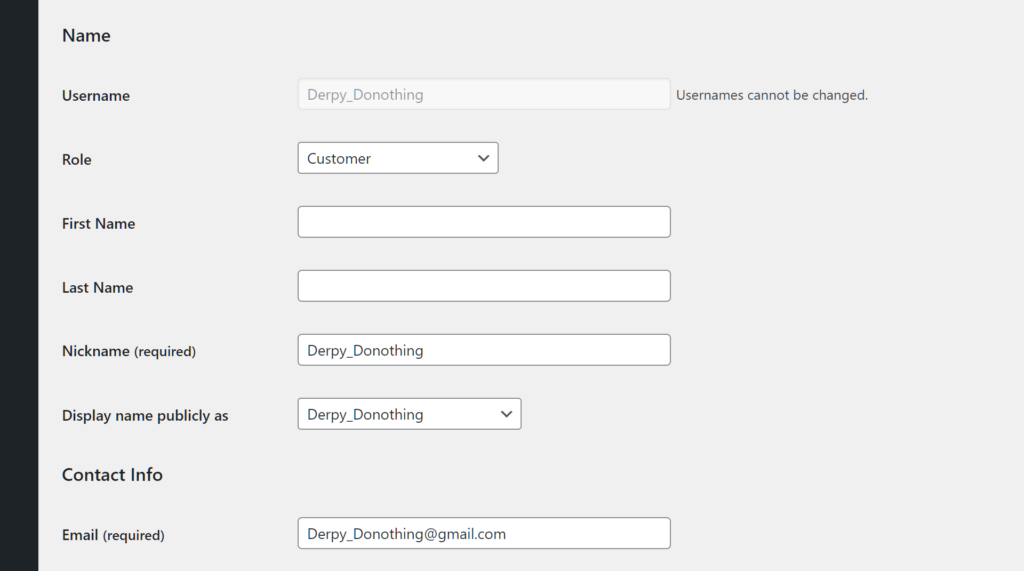
Examine the applicant’s details
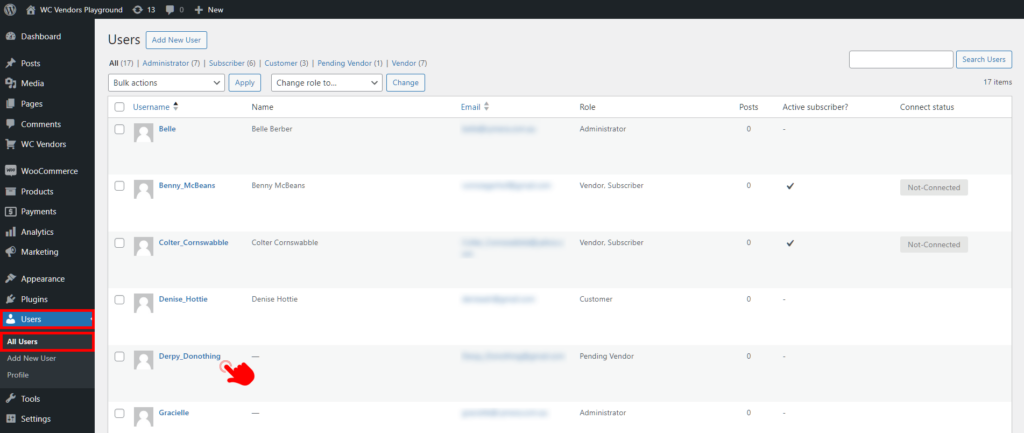
To access the applicant’s information, go to Uses > All Users and look for the applicant. Then, simply click on their username.
This takes you to their Edit User page, where you’ll find all the information they entered on the registration form.
Thoroughly assess every bit of the applicant’s information, as this will help you decide if they’re an appropriate choice to become one of your vendors.
Approve or reject the applicant
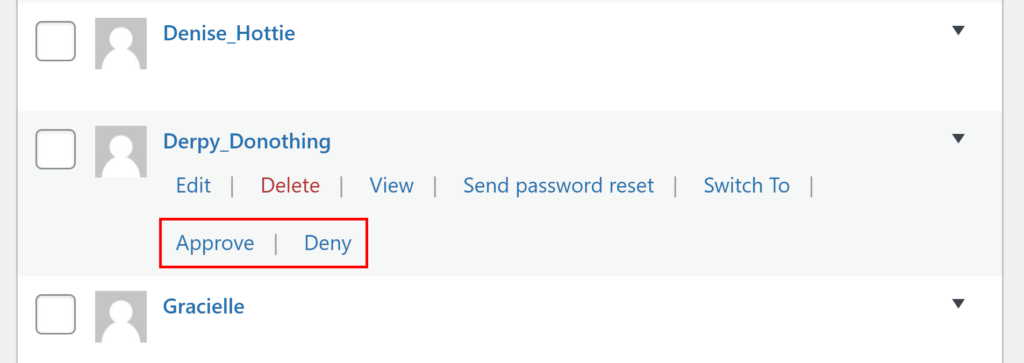
Once the applicant convinces you that they deserve to have their role upgraded from “Pending Vendor” to “Vendor,” your next step is to approve their vendor application.
To do this, simply go back to Users > All Users, and hover your mouse cursor over their username. Then, pick “Approve” if you want them to become a vendor on your marketplace. Otherwise, select “Deny” to reject them.
And that’s it! You’ve successfully completed the applicant’s vendor application process, resulting in either a new vendor or a rejection.
For more information on the manual approval of vendors, check out our article, “Navigating Vendor Approval: How To Manually Recruit Sellers To Your Marketplace (3 Steps).”
Conclusion
The vendor application process is crucial to the successful operation of your online multi-vendor marketplace. After all, it’s what allows you to onboard the right sellers onto your platform.
If you want to implement the vendor application process on your online marketplace, use WC Vendors to observe the following steps:
By doing so, you can take applicants through the entire vendor application system, potentially culminating in the recruitment of a new vendor.
Would you like to know more about the vendor application process? Let us know in the comments section!
