Thanks to the rise of e-commerce, the concept of a storefront has transcended its traditional brick-and-mortar origins and found a new digital incarnation within online marketplaces. Thus, to optimize your WooCommerec multi-vendor platform’s sales potential, you must master the art of WooCommerce storefront customization.
Today, we’ll explore the nuances of WooCommerce storefront customization within the realm of multi-vendor marketplaces, highlighting the many benefits it offers. Furthermore, we’ll show you how to leverage the versatile WooCommerce marketplace solution, WC Vendors Pro, to create compelling digital storefronts that captivate audiences and foster business.
So let’s dive in!
What Is A Storefront Within An Online Marketplace?
When it comes to physical stores, a storefront is the public-facing part of a retail establishment. Typically, this is where goods or services are displayed to customers. It often features large windows, signage, and sometimes outdoor displays to draw in potential customers. The storefront’s design and layout are pivotal in attracting potential customers and forming a positive perception of the business.
In the context of an online store within a marketplace, a storefront is a digital interface, usually a landing page or homepage, that a seller uses to showcase their products or services. Thus, in this regard, the virtual storefront serves the same purpose as its brick-and-mortar counterpart.
In general, the online storefront includes product listings, images, descriptions, and pricing information, allowing customers to browse and make purchases. Just like with a physical storefront, the online storefront’s design and layout are crucial for attracting potential buyers and conveying a favorable impression of the seller’s brand and offerings.
What Is WooCommerce Storefront Customization?
So, what is storefront customization in the context of online stores within a WooCommerce marketplace?
Basically, WooCommerce storefront customization refers to the ability of the marketplace operator or administrator to personalize and tailor their vendors’ digital storefronts within the larger marketplace platform. It involves modifying the storefront’s various elements to reflect the vendor’s brand identity, showcase their products or services, and provide a unique shopping experience.
Key aspects of WooCommerce storefront customization may include:
- Branding: Incorporating the vendor’s logo, color scheme, and brand imagery to maintain consistency with their overall brand identity.
- Visual design: Aligning the storefront’s appearance with the seller’s aesthetic preferences and enhancing the storefront’s visual appeal.
- Product presentation: Optimizing product listings with high-quality images and accurate pricing to attract and inform potential customers.
- Navigation: Configuring intuitive navigation systems and search functionality to help customers locate products and find their way through the vendor’s offerings with ease.
- Promotions and discounts: Implementing promotional banners, discount codes, or special offers to incentivize purchases and encourage customer engagement.
- Customer engagement: Integrating features such as customer reviews, ratings, and more to foster trust and interaction with potential buyers.
- Localization: Adapting the storefront’s language, currency, and product offerings to cater to specific regional or demographic preferences.
Overall, WooCommerce storefront customization empowers sellers to differentiate themselves within the marketplace, build brand recognition, and create a personalized shopping experience that resonates with their target audience.
How To Optimize WooCommerce Storefront Customization To Empower Vendors (In 6 Steps)
As discussed, a great-looking storefront is crucial to an online store’s success. So, how do you ensure that the vendors on your marketplace have awesome storefronts? Simple: through WooCommerce storefront customization!
To customize your vendors’ storefronts, we’ll use the powerful WooCommerce marketplace solution, WC Vendors Pro:
However, for WC Vendors to work, you must first have an online store powered by:
Then, once said online store is up and running, you must convert it into a multi-vendor marketplace using WC Vendors. For more detailed information on how to do this, read the following guides:
- How To Build Your First Multi-Vendor E-Commerce Website (Full Guide)
- How To Create An Online Marketplace: A Beginner’s Guide
With all that in mind, let’s start our quick guide on vendor storefront customization!
Take note: our tutorial will focus on how you, as the marketplace operator/administrator, can customize each vendor’s storefront yourself.
Step 1: Understand the different parts of the WC Vendors Pro storefront
A storefront created using WC Vendors Pro comes with various common elements. To optimize the results of your WooCommerce storefront customization, you need to know the purpose each element serves.
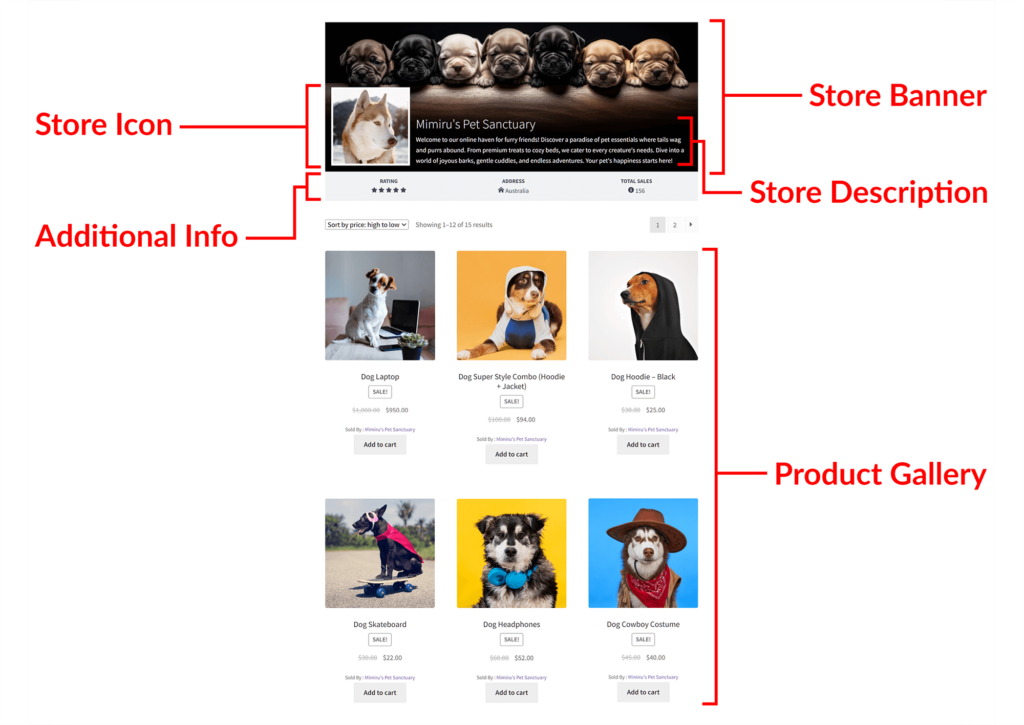
Below is an image highlighting the main elements we’ll be working on in this guide:
Let’s discuss these elements more thoroughly.
Store Banner
The store banner serves as a visual introduction to an online store within a multi-vendor marketplace.
Usually displayed prominently at the top of the store’s page, the store banner visually represents the store’s identity, branding, and theme. It’s often the first thing customers notice when they visit the store, making it a crucial element in capturing their attention and conveying the store’s essence.
A well-designed store banner goes beyond mere aesthetics; it communicates important information about the store’s offerings, promotions, or unique selling points. Through captivating imagery, compelling slogans, or strategic placement of key messages, this storefront element entices customers to explore further and engage with the store’s products.
With an awesome store banner, the store can enjoy many advantages, such as:
- Strengthens brand identity and leaves a lasting impression.
- Showcases and promotes deals, discounts, or new items to drive sales
- Highlights unique style, personality, or value to make the store stand out
- Engages by grabbing attention, thus encouraging browsing
- Maintains consistent marketplace design for a seamless experience
Store Icon
The store icon plays a crucial role in making your online presence memorable within a multi-vendor marketplace.
Your store icon is like your digital storefront sign, catching the eye of potential customers browsing through the marketplace. It serves as a visual representation of your brand, instantly conveying the essence of what your store offers.
A well-designed store icon not only grabs attention but also communicates your brand identity effectively. Whether it’s a logo, symbol, or a combination of both, your store icon should reflect the personality and values of your brand.
Having an eye-catching store icon can do wonders for your marketplace:
- Attracts attention and draws customers to explore your store
- Reinforces brand recognition and recall
- Improves user experience by aiding store recognition
- Signals professionalism and trust, fostering positive brand perception
- Sets your store apart, boosting visibility in a competitive market
Store Description
A store description acts as a written piece that informs customers about an online store within a multi-vendor marketplace.
Typically, this description gives customers a quick overview of what the store sells. However, a great description does more than that; it tells a story to show what makes the brand unique in the marketplace. Furthermore, it helps customers see the seller’s personality, skills, and products.
An amazing store description can benefit the store in various ways, including the following:
- Educates customers about the store
- Creates an emotional connection between the store and its customers
- Showcases credibility and authenticity
- Make the store easier to discover online
- Helps the store stand out among the competition
- Reduce the likelihood of returns and disputes
- Boosts customer loyalty and repeat business
- Ensures brand consistency
Product Gallery
A product gallery serves as a visual window into the offerings of an online store within a multi-vendor marketplace.
A well-curated gallery serves as a pivotal asset, offering customers a captivating visual journey through the store’s offerings. Of course, it also allows customers to click each item to see its listing in more detail.
Moreover, the product gallery enables customers to perceive the seller’s creativity, and expertise. Ultimately, it fosters lasting connections, driving marketplace success.
An exceptional product gallery grants the seller numerous benefits, including:
- Enlightens customers about the store’s offerings
- Forges an emotional bond between the store and its clientele
- Exhibits trustworthiness and genuineness
- Enhances the store’s visibility in online searches
- Sets the store apart from competitors
- Diminishes the likelihood of returns and disputes
- Fosters customer devotion and repeat business
Step 2: Provide a Store Banner
For the second step of WooCommerce storefront customization, let’s figure out how to give the vendor’s storefront a store banner.
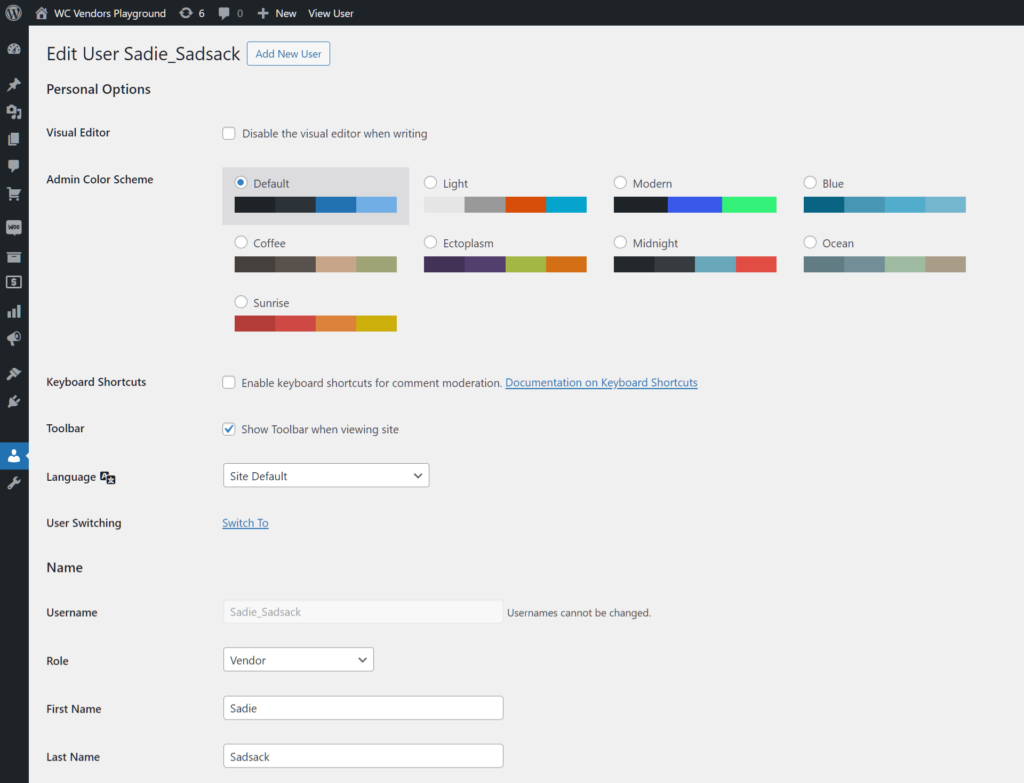
Go to your WordPress dashboard, click Users > All Users, and choose the vendor whose storefront you want to customize. Then, click your desired vendor’s name or their Edit button to go to their Edit User page.
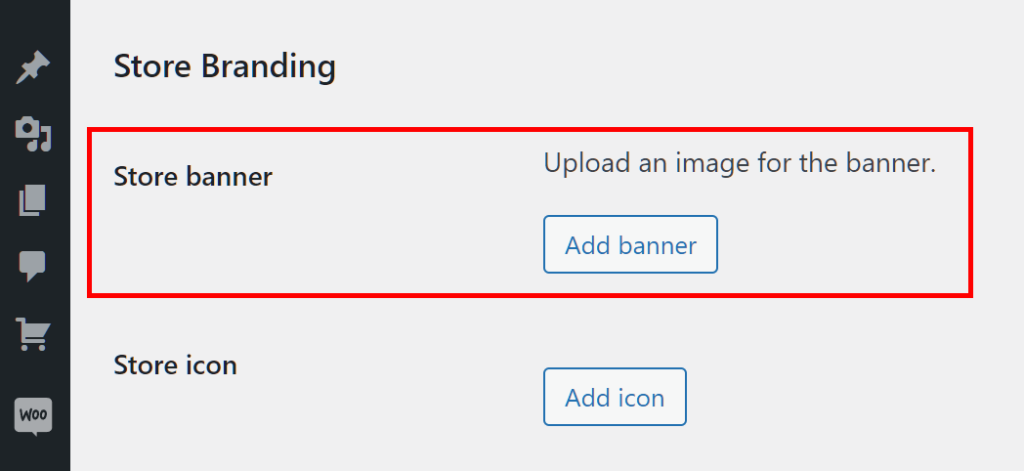
Next, scroll down to the Store Banner option and click the Add Banner button.
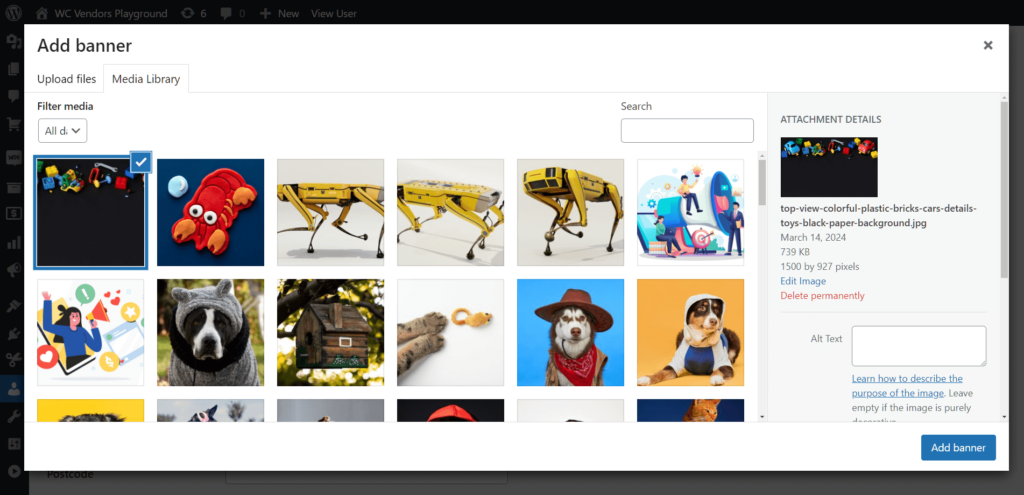
This lets you upload a new file to the WordPress Media Library so that you can use it as the store banner. Alternatively, you can pick an existing image from said Media Library.
Simply select the image you’d like to serve as your store banner, then click the Add Banner button. This prepares the image as the store banner. In addition, it returns you to the Edit User page should you want additional store customization.
But what if you don’t want your vendors to have individual store banners? What if you’d rather have all of them display the same banner to establish consistent branding across the marketplace?
Simple: you use a marketplace store banner, instead.
To know how to do this, check out our article, “How To Personalize Your Marketplace Brand (Full Guide)!”
Step 3: Provide a Store Icon
Now, let’s give your storefront a store icon.
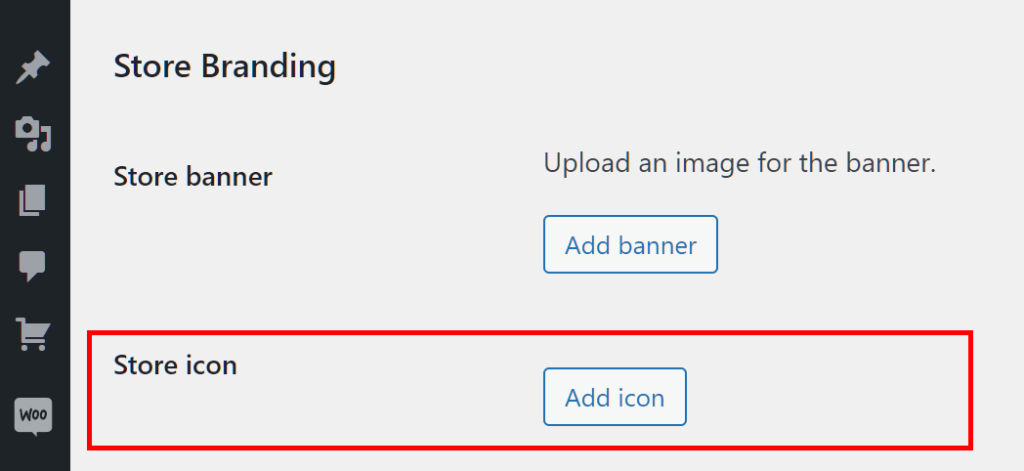
Thankfully, you don’t have to navigate away from the Edit User page to do this. You won’t even have to travel far, because immediately below the Store Banner option is the Store Icon option.
Click this option’s Add Icon button to once again access the Media Gallery, where you can either use an existing image or upload a new one. Then, click the Select button to prepare the image as the store icon and return to the Edit User page.
Now, onto the next step of the WooCommerce storefront customization process!
Step 4: Craft a Store Description
Our next goal is to write a store description to be displayed on the storefront.
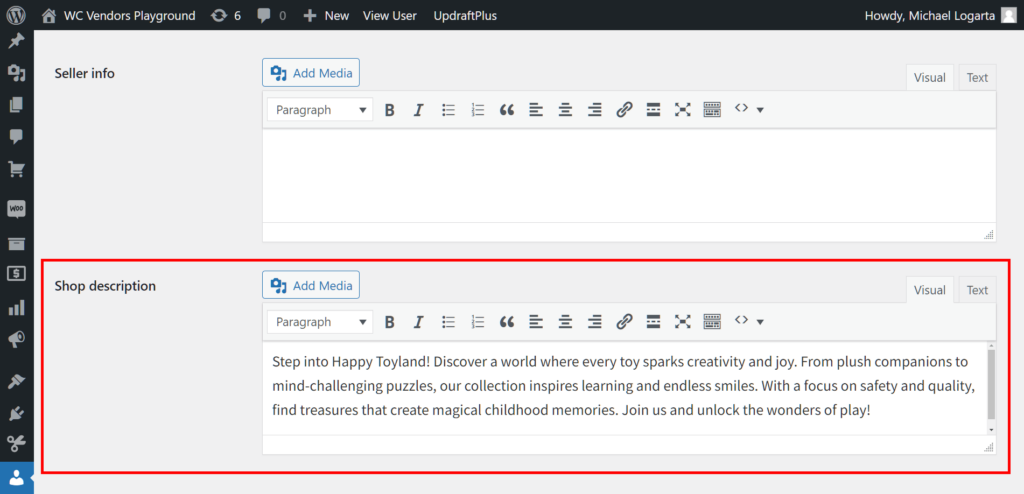
While on the Edit User page, look for the Shop Description option. This is some distance above the Store Banner and Store Icon options, so you’ll have to do a lot of scrolling!
The Shop Description option comes with a large entry window. Here, you can write a description for the store using the WYSIWYG editor. This editor grants you extensive freedom on how you want your text to look. For example, you can change the font size and text, create titles and paragraphs, modify the text alignment, insert links, and more. You can even click the Add Media button to insert images into the description.
In addition, you can switch between the Visual and Text editors. Visual offers the simpler way to craft and edit your message; all you have to do to make modifications is click the available buttons. On the other hand, Text grants you extra control over the store description customization by allowing you to leverage HTML.
For more information on crafting store descriptions, read our article, “How To Use Store Descriptions To Boost Customer Interest (In 3 Steps)!”
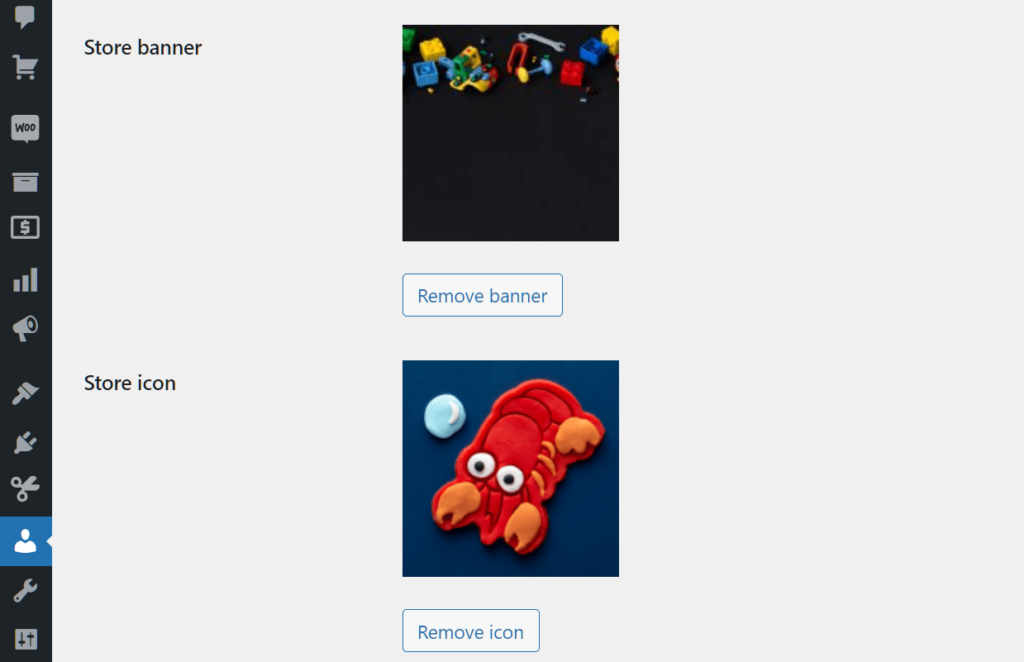
Once you’re done, scroll to the bottom of the page and click the Update User button. This implements your chosen store banner, store icon, and store description. In other words, updating the page displays these elements on the storefront so that anyone visiting the vendor’s store can see them.
Step 5: Add products
A crucial aspect of WooCommerce storefront customization is ensuring the storefront is populated with products. And for any vendor store to have a product gallery, you must add products to their store.
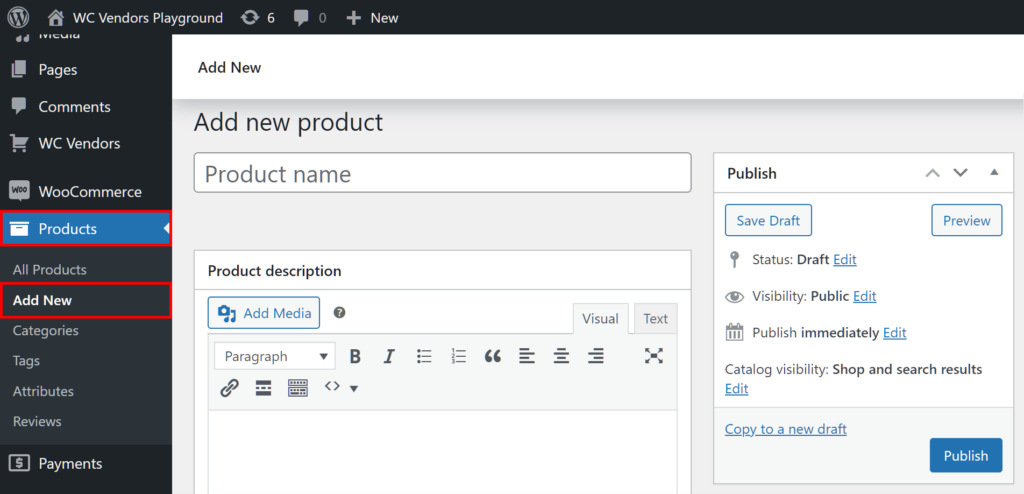
Go to your WordPress dashboard, then click Products > Add New. This takes you to the Add New Product page, which allows you to add a new product to any store.
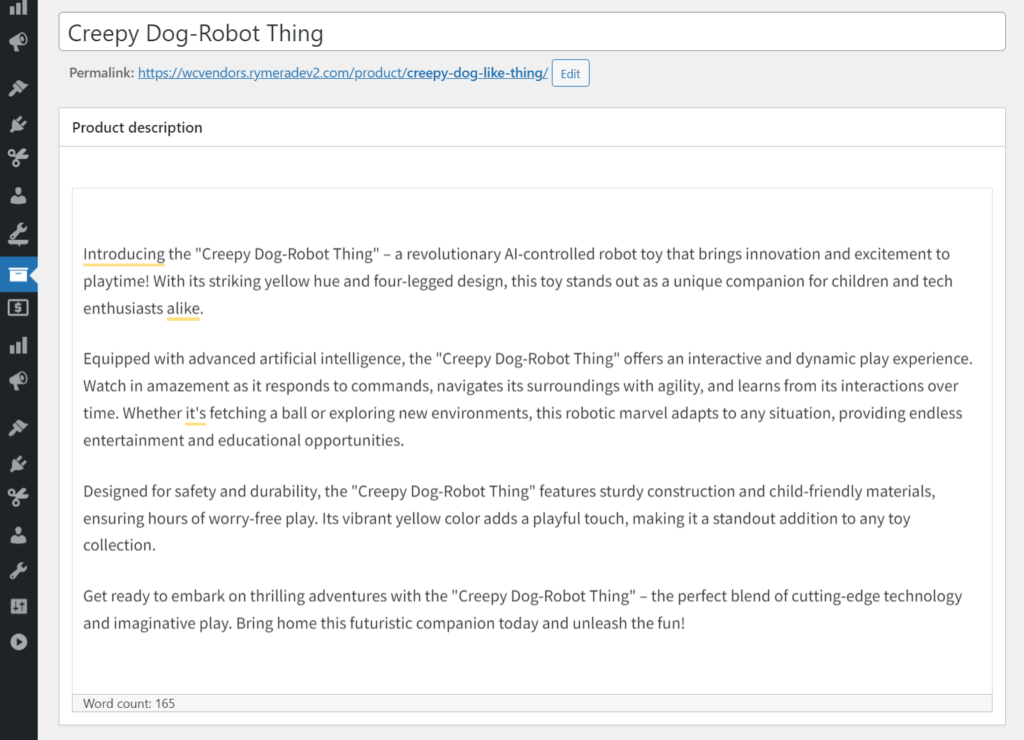
First, name your product by filling in the Product Name entry field. Then, go to the Product Description box and write a description using the WYSIWYG editor. You can also scroll down to the Product Short Description box to write a shorter description.
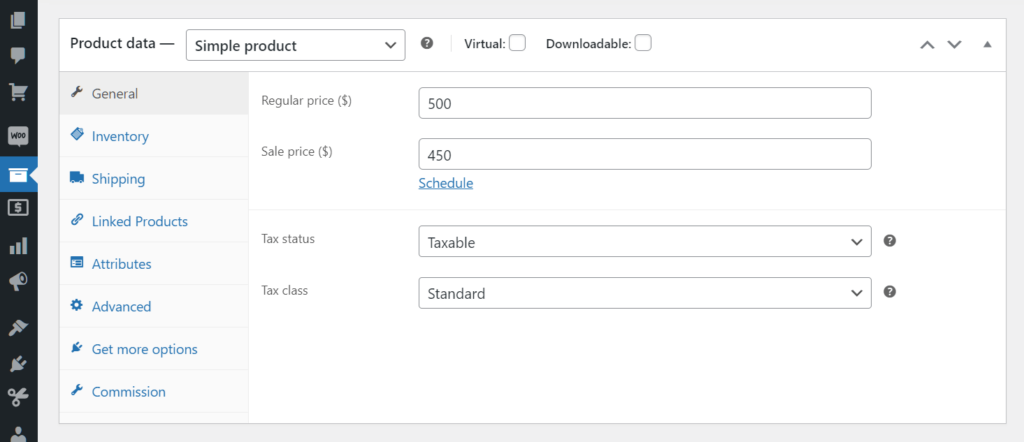
Now, go to the Product Data box to add crucial data to your product, such as its price, stock status, commission type, and the like.
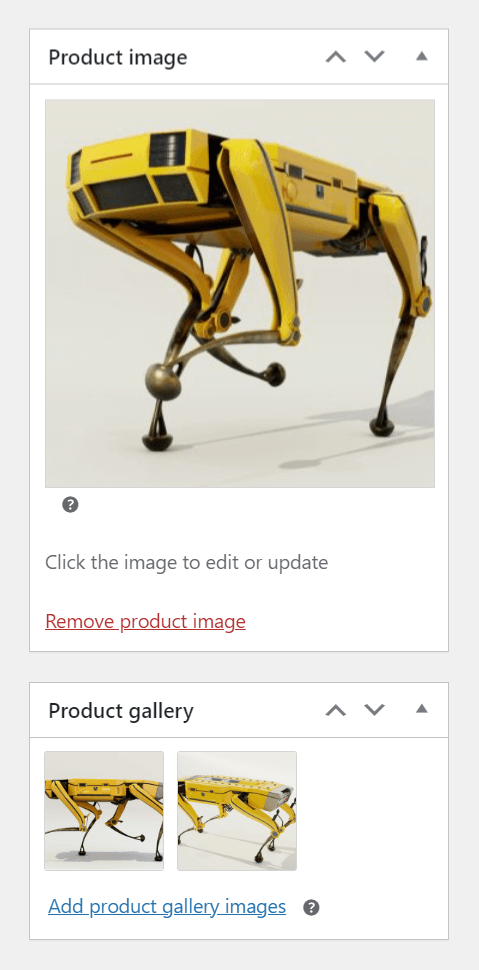
Next, head to the Product Image box on the right side of the page, then click the Set Product Image button. This takes you to the now-familiar Media Gallery. Furthermore, you can use the Product Gallery box to pick the item’s gallery images.
Lastly, scroll down to the Vendor box and type the name of the vendor whose store you want the product added to.
Once you’re happy with your product, click the Publish button on the page’s upper right corner. This adds the product to the vendor’s store, thus making it appear on their storefront.
Add more products to the same store to create a product gallery on the storefront.
For more information on adding products, read the official WooCommerce documentation.
Step 6: Finalize additional settings
Our vendor storefront customization isn’t quite done yet! For all the elements we’ve set to appear on the storefront, we have to configure a few more settings.
Store Settings
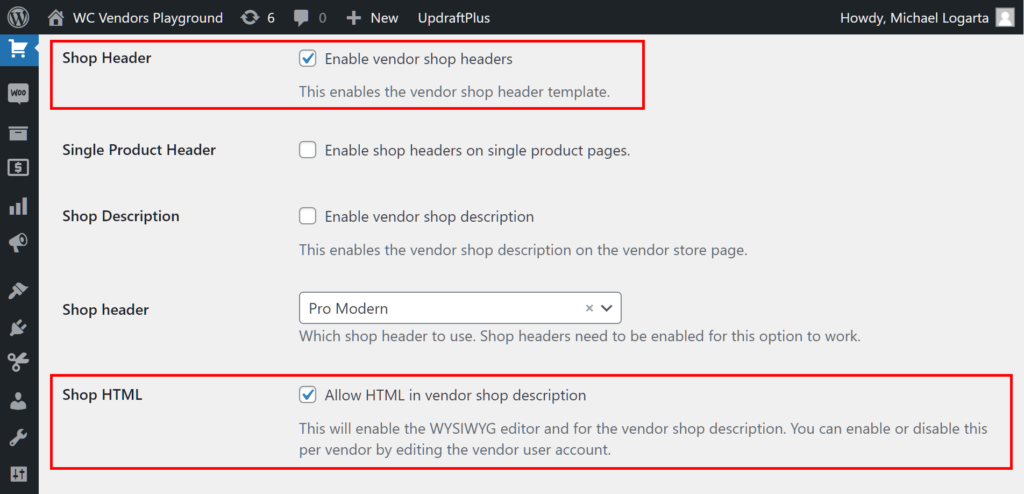
First, let’s go to the Store Settings area, which you can find by clicking WC Vendors > Settings > Display > General.
Now, enable the Shop Header and Shop HTML options by ticking their checkboxes. For this tutorial, leave the other checkboxes unticked.
In addition, you can choose the appearance of your shop header from the dropdown menu.
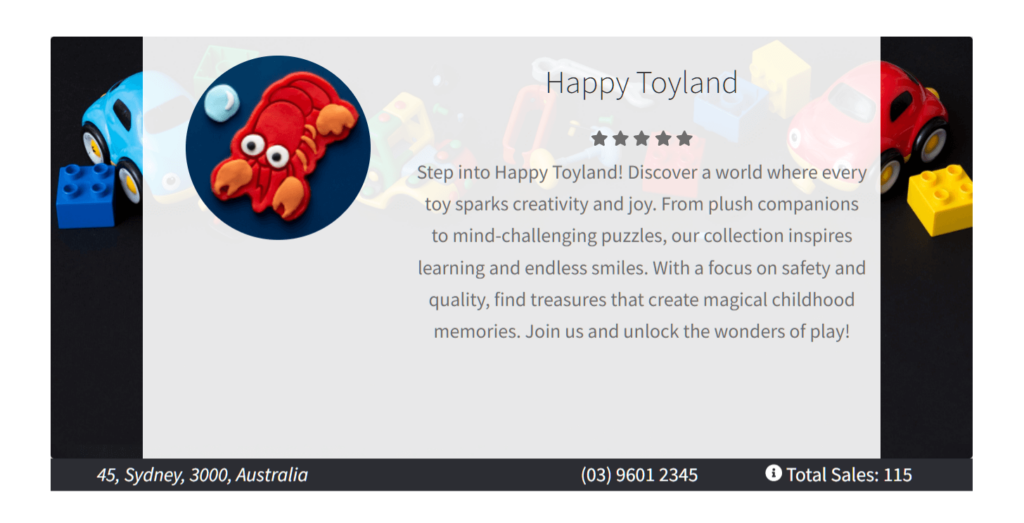
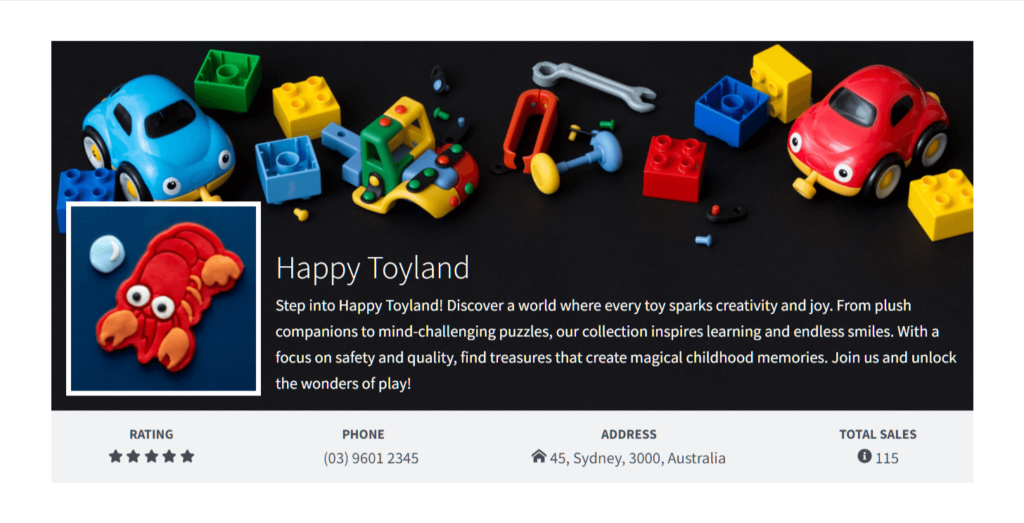
“Free,” the only available selection to owners of the free version of WC Vendors, removes the shop header but retains the store description. Meanwhile, “Pro” and “Pro Modern” offer two different ways to overlay store descriptions on header images.
Vendor Ratings System
Do you want your vendor’s rating to be displayed on the storefront? Then head to WC Vendors > Settings > Vendor Ratings, which takes you to the Vendor Ratings System page. Here, enable the Feedback System option by clicking its checkbox.
For more detailed instructions on the Feedback System option, read our article, “Seller Reviews: How To Use The Vendor Rating System To Boost Customer Trust.”
Vendor phone number and address
How about the other details on the storefront, such as the vendor’s phone number and address?
The vendor provides their phone number and address during the application process, when they’re given a registration form to fill up. But how do you ensure everyone applying to become a vendor on your platform completes this registration form?
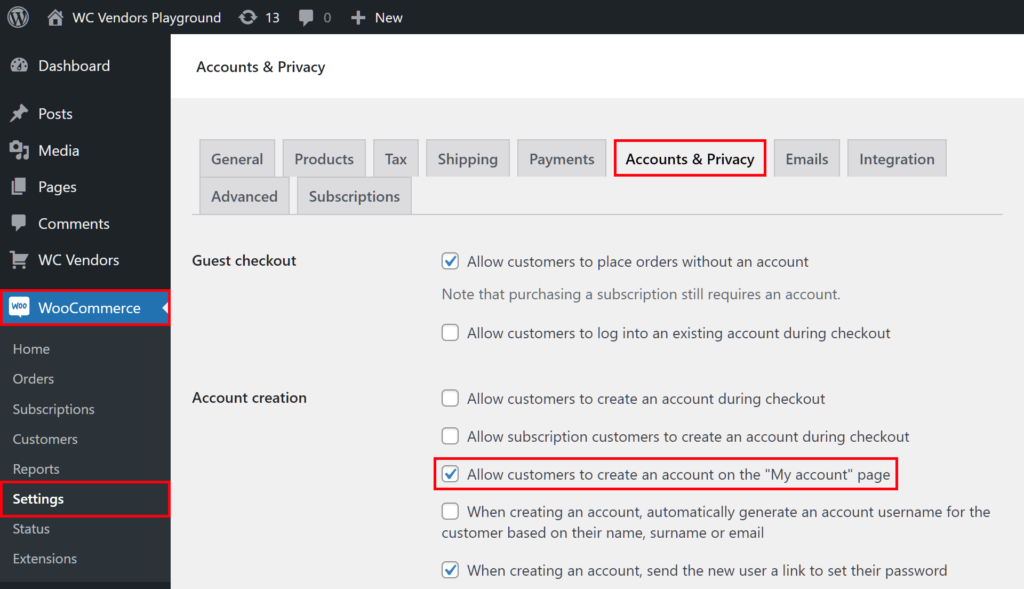
First, enable the registration box by navigating to your WordPress dashboard and clicking WooCommerce > Settings > Accounts & Privacy. Then, scroll down to Account Creation and tick Allow customers to create an account on the “My account” page.
Next, go to WC Vendors > Settings > General. Then, enable the Vendor Registration and Vendor Registration Form options by ticking their checkboxes. We also recommend enabling Vendor Approval.
Now, head to WC Vendors > Settings > Forms > Signup. Here is where you can enable or disable fields that ask applicants for information about themselves. To require every applicant to offer their address and phone number, scroll down to the Store area and tick the “Required” checkboxes for the Store Phone and Store Address fields.
Learn more about configuring the vendor registration form by reading our article, “Streamlining The Vendor Application Process: Your Ultimate Guide.”
Alternatively, you can input this data into your marketplace database yourself. First, go to a vendor’s Edit User page and search for the Store Address section. Then, enter the vendor’s phone number and address into their respective entry fields.
Vendor sales
So, how do you show the vendor’s total sales on the storefront?
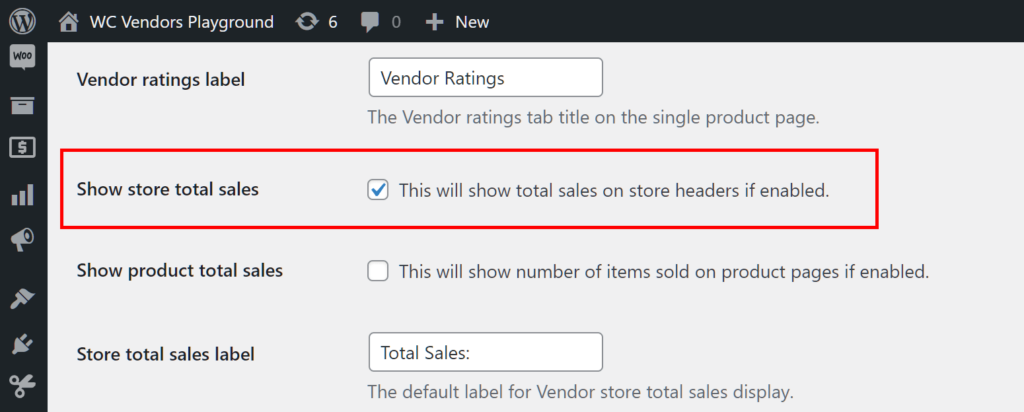
Navigate to WC Vendors > Settings > Display > Labels. Then, enable the Show store total sales option by ticking its checkbox.
WooCommerce Storefront Customization Results
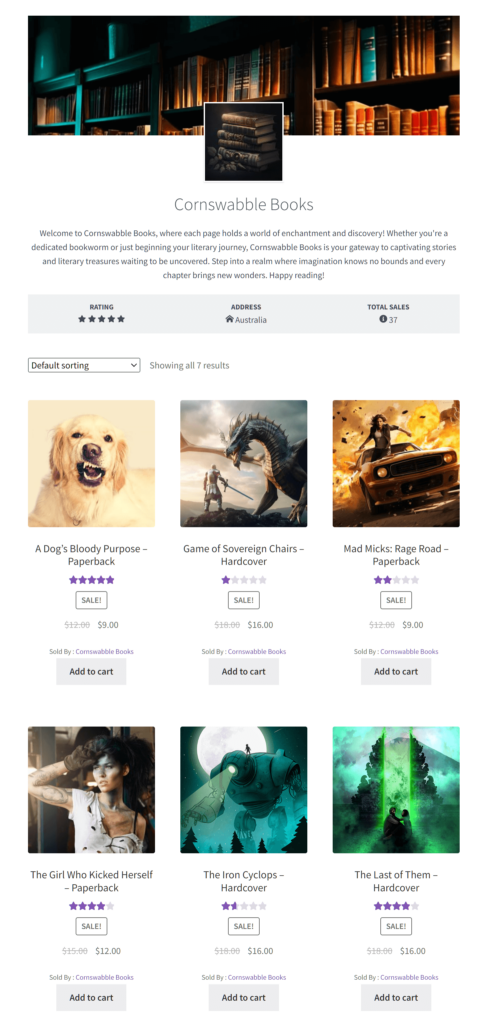
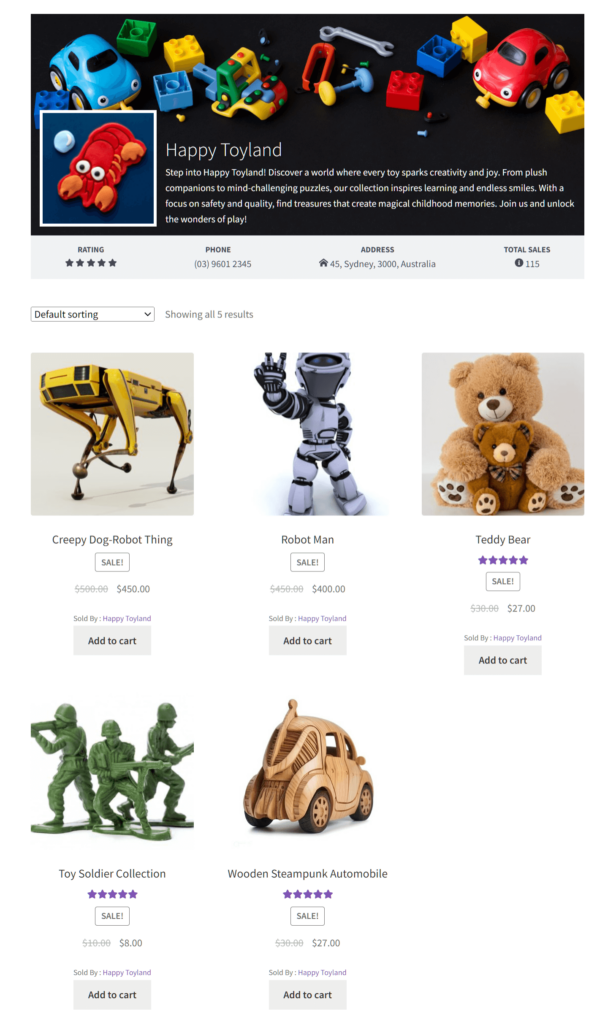
Congratulations! You’ve completed the vendor storefront customization process as outlined in the steps above. Now, your vendor’s storefront is ready to be viewed by customers:
Conclusion
WooCommerce storefront customization is a powerful tool for making your multi-vendor marketplace stand out, connect with customers, and drive business success. By understanding the pivotal role of storefronts in shaping brand identity, showcasing products, and fostering engagement, you can empower vendors to unleash the full potential of their digital storefronts.
To implement vendor store customization in a marketplace powered by WC Vendors Pro, implement the following steps:
- Understand the different parts of the WC Vendors storefront
- Provide a Store Banner
- Provide a Store Icon
- Craft a Store Description
- Add products
- Finalize additional settings
Do you have any questions about WooCommerce storefront customization? Let us know in the comments!
