In the fiercely competitive landscape of online marketplaces, the visual representation of your products holds immense power. Fortunately, among the array of tools available to captivate your audience, a well-crafted WooCommerce product image gallery stands as a beacon of persuasion and trust.
If you aspire to launch or enhance your online multi-vendor marketplace, mastering the art of the WooCommerce product image gallery is non-negotiable. For this reason, today’s article will explore everything you need to know about setting up compelling item showcases. This way, you can transform your multi-vendor platform into the go-to destination for eager shoppers.
Understanding The Essence Of The WooCommerce Product Image Gallery
Imagine strolling through a physical store where products are concealed in unopened boxes. Would you feel inclined to make a purchase? Unlikely!
In the virtual realm, product image galleries serve as the window displays of your marketplace, offering visitors a glimpse into what awaits them.
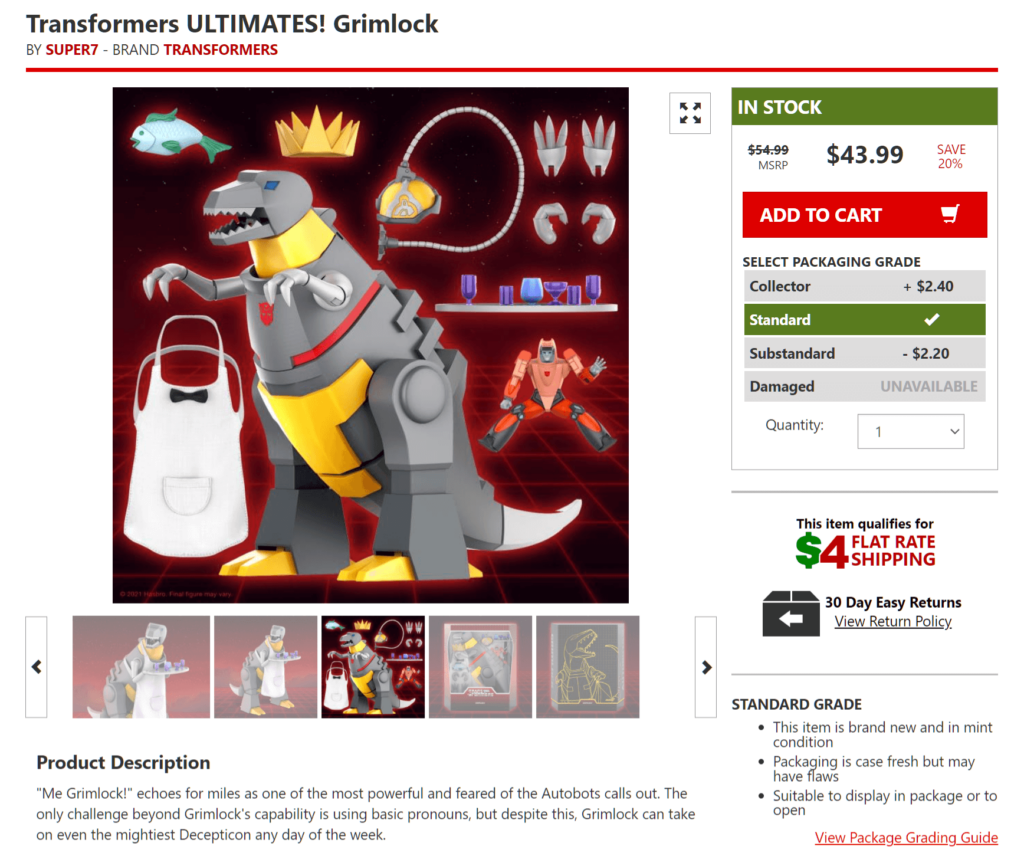
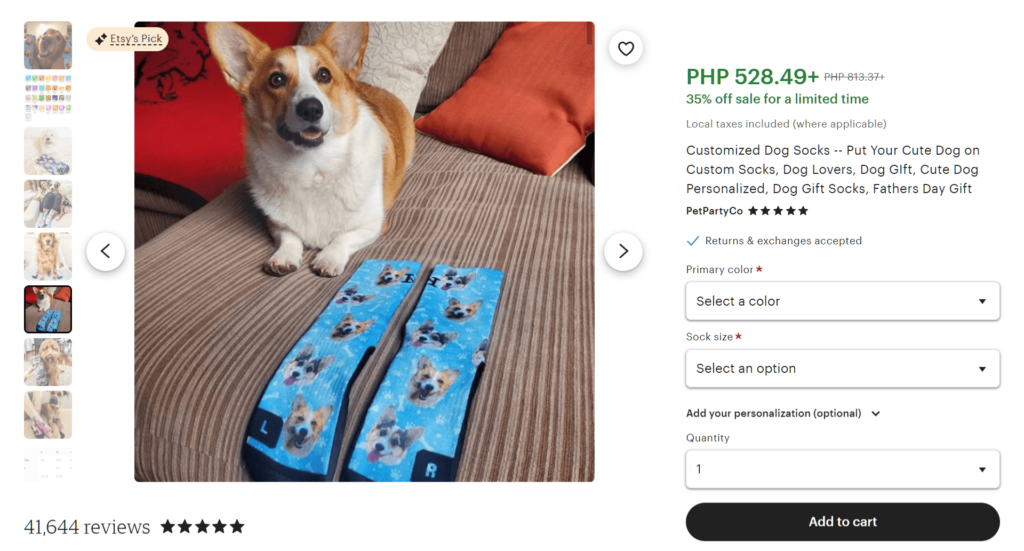
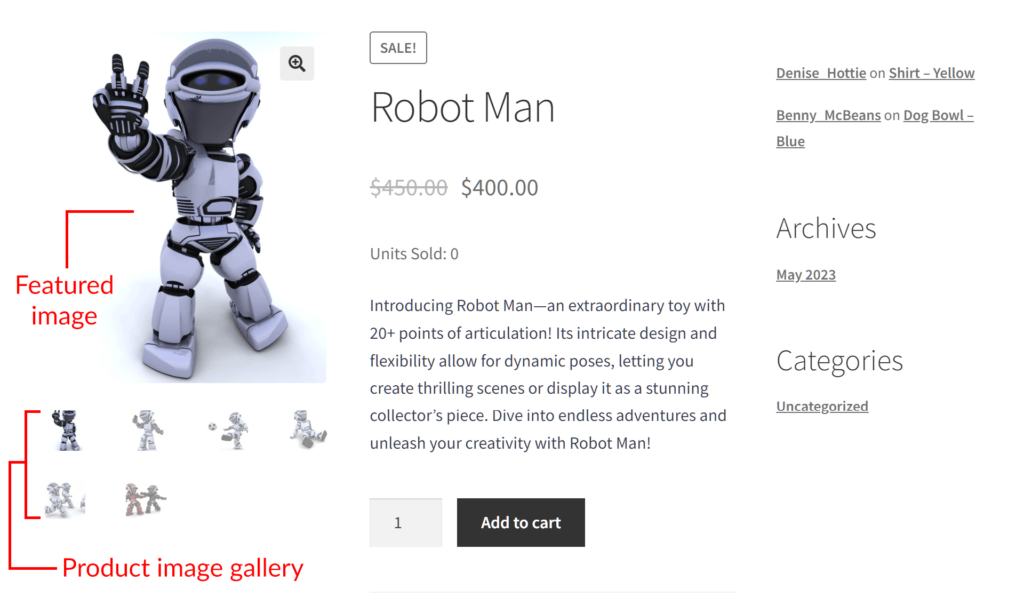
In essence, a WooCommerce product image gallery is a series of images that showcases a specific product offered by one of the vendors on a WooCommerce multi-vendor marketplace. Typically, this gallery contains multiple pictures presenting various aspects of the product, such as different angles, close-ups, contextual shots, or images highlighting unique features.
In a multi-vendor setting, each seller normally has multiple galleries dedicated to the items they’re selling. These galleries aim to engage customers, build trust, and ultimately drive sales by presenting products in an attractive and informative manner.
At its core, a WooCommerce product image gallery is more than just a collection of pictures; it’s a strategic storytelling tool. Each image should meticulously convey the essence, details, utility, and unique selling points of the product. The process involves capturing high-resolution images from various angles, showcasing intricate details, and painting a vivid picture of the product in action, if applicable.
Let’s explore these concepts more thoroughly…
Crafting A Compelling WooCommerce Product Image Gallery
An exceptional WooCommerce product image gallery not only draws customers to a store but also persuades them to make a purchase. But how, exactly, can you make your galleries more compelling?
To create a product image gallery that can enhance your sales, keep the following concepts in mind:
1. Quality reigns supreme
The higher the quality of your photos, the more attractive they are and the more effective they become at boosting sales. Thankfully, investing in professional photography or utilizing advanced digital imaging technologies ensures that your product images are of the highest quality. Here are some tips to capture high-resolution images and showcase intricate details:
- Camera and equipment: Use high-resolution cameras and appropriate lenses to capture fine details. For example, with their ability to take extreme close-ups and capture fine details, macro lenses are excellent for showcasing intricate features of jewelry or small gadgets.
- Lighting: Proper lighting is crucial. Natural light or studio lighting setups can highlight product details and colors accurately. Avoid harsh shadows by diffusing light sources.
- Angles and perspectives: Take photos from various angles to showcase the product’s best features. For example, if you’re selling handcrafted pottery, you can capture overhead shots revealing intricate designs, close-ups highlighting textures, and more. Different perspectives enhance the portrayal of the item’s unique craftsmanship.
- Zoom and focus: Use your camera’s zoom and focus features to highlight specific details. For instance, a close-up of a watch’s dial or a shoe’s stitching can emphasize craftsmanship.
- Digital imaging technology: Use powerful digital imaging software (such as Photoshop) to enhance images further. Adjustments in contrast, brightness, or removing imperfections can polish and refine the overall appearance of your product images.

2. Variety adds depth
Offering diverse perspectives through multiple images enriches the customer’s understanding of the product. To paint a vivid picture of an item in action, turn the following concepts into reality:
- Contextual shots: These shots portray the item in use or within its intended environment. This lets customers visualize how it fits into their lives.
For example, in a kitchenware gallery, showcase a set of pots and pans arranged on a stove within a kitchen setting. This presentation helps potential buyers envision the products in action, giving them a sense of the items’ practicality and appearance within a home environment.
- Close-ups and alternate views: These perspectives highlight specific features or unique aspects of the product, providing a detailed look beyond the general presentation.
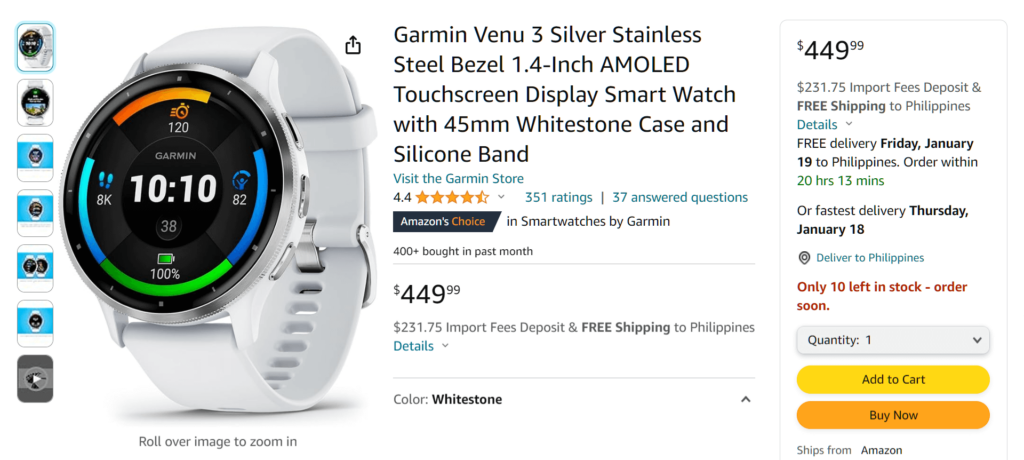
For instance, to create an effective smartwatch WooCommerce product image gallery, offer close-ups highlighting unique features such as its high-tech watch face display and built-in sensors. Such close-ups allow potential buyers to examine the device’s quality and advanced functionalities.
- Product scale: Displaying the product alongside common objects or with measurements helps convey its actual size accurately, especially for items where size matters.
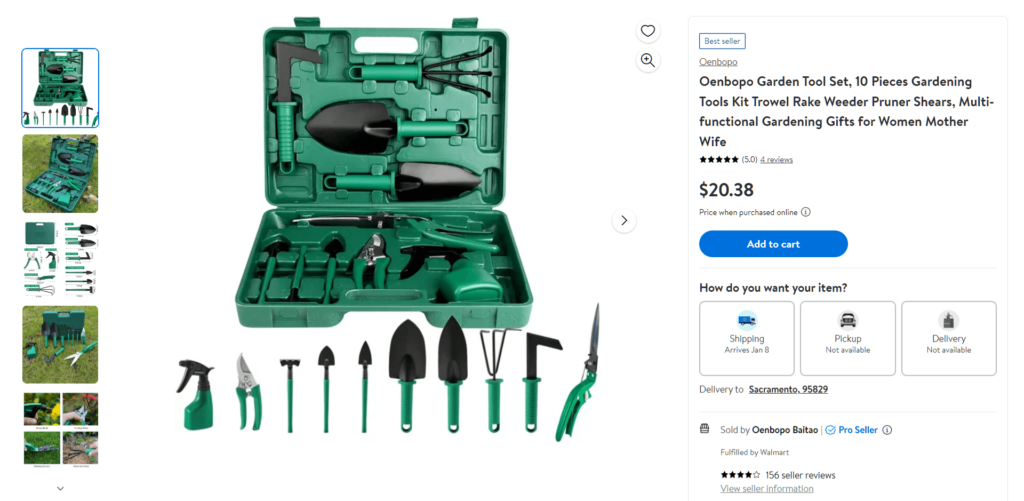
For example, in a WooCommerce product image gallery showcasing gardening tools, displaying a shovel alongside a ruler or a hand can indicate its length and size. This gives customers a clearer understanding of the tool’s dimensions, aiding in their decision-making process.

3. Consistency and cohesion
Maintaining a uniform style and layout across your gallery enhances professionalism and trust. To ensure consistency, observe the following tips:
- Branding elements: Be consistent in your use of colors, fonts, and watermarks across all images to reinforce brand identity.
Imagine a fashion marketplace’s product image gallery. For the visuals, use the same brand colors for the product background or accents in each image. In addition, employ the same font style for any text overlays or descriptions. Lastly, apply a subtle watermark with the brand logo in a uniform position on every image. This consistency creates a cohesive visual identity across the entire gallery, reinforcing brand recognition.
- Background and composition: Keeping backgrounds clean and consistent minimizes distractions and maintains visual coherence.
Let’s say you’re running an electronics marketplace. It’s a good idea to maintain a consistent background – such as a plain white backdrop – for product images. Furthermore, ensure that each item is consistently placed and oriented within the frame, maintaining a similar composition for all products. This uniformity in background and composition allows customers to focus on the products without visual clutter or distractions, ensuring a cohesive browsing experience.
- Image editing: Applying consistent editing styles for color correction and enhancements ensures a cohesive look across all images.
Consider a home decor WooCommerce product image gallery. Apply a consistent editing style for color correction and image enhancements, such as maintaining a warm color tone or a particular level of brightness and contrast across all images. By ensuring uniform editing styles, you create a cohesive visual aesthetic that ties together the diverse range of products within the gallery.
4. Optimization for speed and accessibility
Optimizing images for fast loading times and compatibility across devices is vital.
- File formats and compression: Using web-friendly formats and compressing images without sacrificing quality reduces file sizes for faster loading times.
Consider an online fashion boutique. First, opt for JPEG or PNG formats for product images. Then, when showcasing high-resolution images of clothing, compress the files without compromising the clarity of intricate patterns or fabric textures. This optimization ensures that even detailed images load quickly, enhancing the user experience.
- Responsive design: Ensuring images adapt seamlessly to various devices and screen sizes provides a consistent viewing experience for all users.
For instance, in a home decor marketplace, optimize images of furniture items to adapt flawlessly to different devices. Display a sofa or a table, ensuring that the image scales proportionally and maintains clarity on both desktops and mobile devices. This responsive design allows users to view and evaluate the products without distortion or loss of quality, irrespective of the device used.
- Image alt text: Incorporating descriptive alt text aids in accessibility and SEO by providing context to users and search engines.
For example, for a health and wellness WooCommerce product image gallery, include descriptive alt text for images of supplements or vitamins. Describe the product, its benefits, and its intended use within the alt text. This not only assists visually impaired users in understanding the product but also improves the gallery’s search engine optimization by providing relevant image descriptions.
The Benefits Of Masterful Product Image Galleries
When it comes to online marketplaces, leveraging product image galleries isn’t just about displaying items; it’s about wielding a potent marketing tool to differentiate yourself from the competition. A thoughtfully curated WooCommerce product image gallery can become your distinguishing factor, setting your platform apart and fostering a loyal customer base.
Below are some of the benefits you can expect when you use high-quality galleries in your marketplace:
1. Enhanced user experience
Visually appealing galleries elevate the browsing experience. As a result, they entice visitors to spend more time on your platform, increasing your chances of making a sale.
As per Justuno, 93% of consumers regard visual content as the pivotal factor in making purchase decisions. Moreover, Etsy’s study revealed that approximately 90% of surveyed shoppers emphasized the significant importance of e-commerce image quality in their purchase decisions.
2. Improved conversion rates
Because engaging galleries are great at stimulating desire, they drastically boost a marketplace’s chances of making sales.
Studies consistently highlight the correlation between high-quality images and improved conversion rates. For example, one study discovered that high-quality product images resulted in a 94% higher conversion rate compared to lower-quality images.
3. Trust and credibility
Clear and detailed images establish trust, mitigating uncertainties buyers may have about the product’s appearance and quality.
For example, Shopify’s research revealed that utilizing professional product images led to a 30% increase in the perceived value of the product.
How To Use WC Vendors To Implement Product Image Galleries (In 3 Simple Steps)
Product image galleries can do your marketplace a whole lot of good. And with WC Vendors, your vendors can showcase their items in a way that’ll attract consumers and encourage purchases.
However, to use WC Vendors, you must first have an online store that’s powered by:
Then, you must use WC Vendors to convert said online store into a multi-vendor marketplace. For detailed instructions on how to accomplish this, read the following guides:
- How To Build Your First Multi-Vendor Ecommerce Website (Full Guide)
- How To Create An Online Marketplace: A Beginner’s Guide
With all that in mind, let’s start our quick WooCommerce product image gallery guide!
Step 1: Enable the WooCommerce product image gallery option
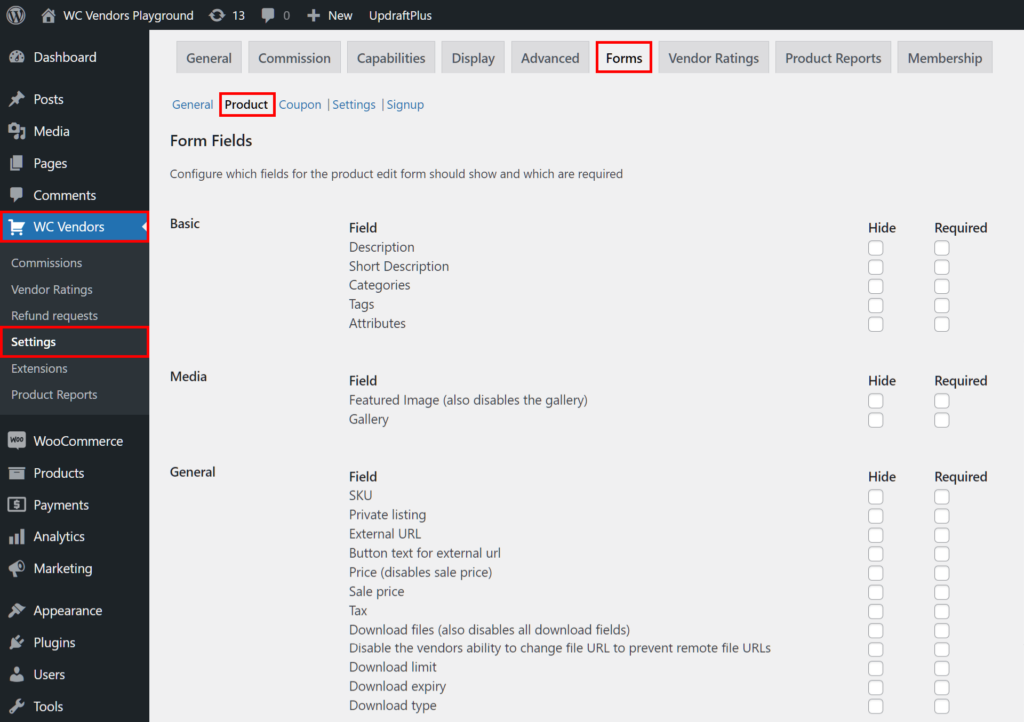
First, you must give your vendors the ability to create product image galleries. To do this, navigate to your WordPress dashboard and click WC Vendors > Settings. Then, select the Forms tab followed by the Product subtab.
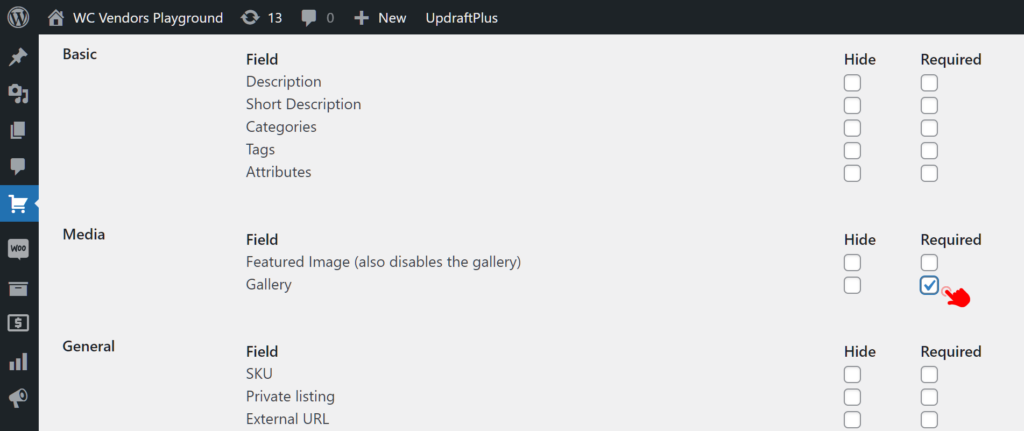
Now, scroll down to the Media area and take note of the Gallery option, which has two checkboxes: “Hide” and “Required.” By default, both checkboxes are unticked. This means all vendors have access to the option to create product image galleries. Therefore, you don’t have to change this default setting.
However, if you want to require vendors to create a product image gallery for every item they publish on their store, tick the “Required” checkbox.
Ticking the “Hide” checkbox conceals the option from vendors, preventing them from creating galleries. Thus, for this tutorial, leave the “Hide” checkbox unticked.
Step 2: Determine the maximum number of images per WooCommerce product image gallery
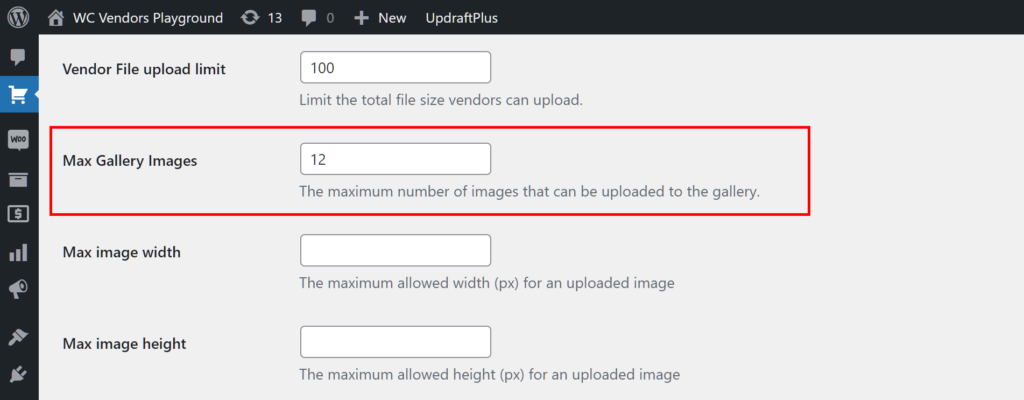
While staying in the Product subsection, scroll down to the Product Form area and look for the Max Gallery Images option.
Basically, this option lets you put a limit on the number of images a vendor can upload to their WooCommerce product image gallery. All you have to do is input a number in the entry field.
For example, if you want vendors to be able to upload a maximum of 12 images only, enter the value of 12 in the Max Gallery Images entry field.
Consider playing around with the other options under Product Form. For instance, you can determine the maximum and minimum dimensions of the images that vendors can upload to their stores.
Step 3: Save your work!
Once you’re happy with the settings, simply click the Save Changes button to activate all of them. And that’s it!
Creating Product Image Galleries – The Vendor’s Perspective
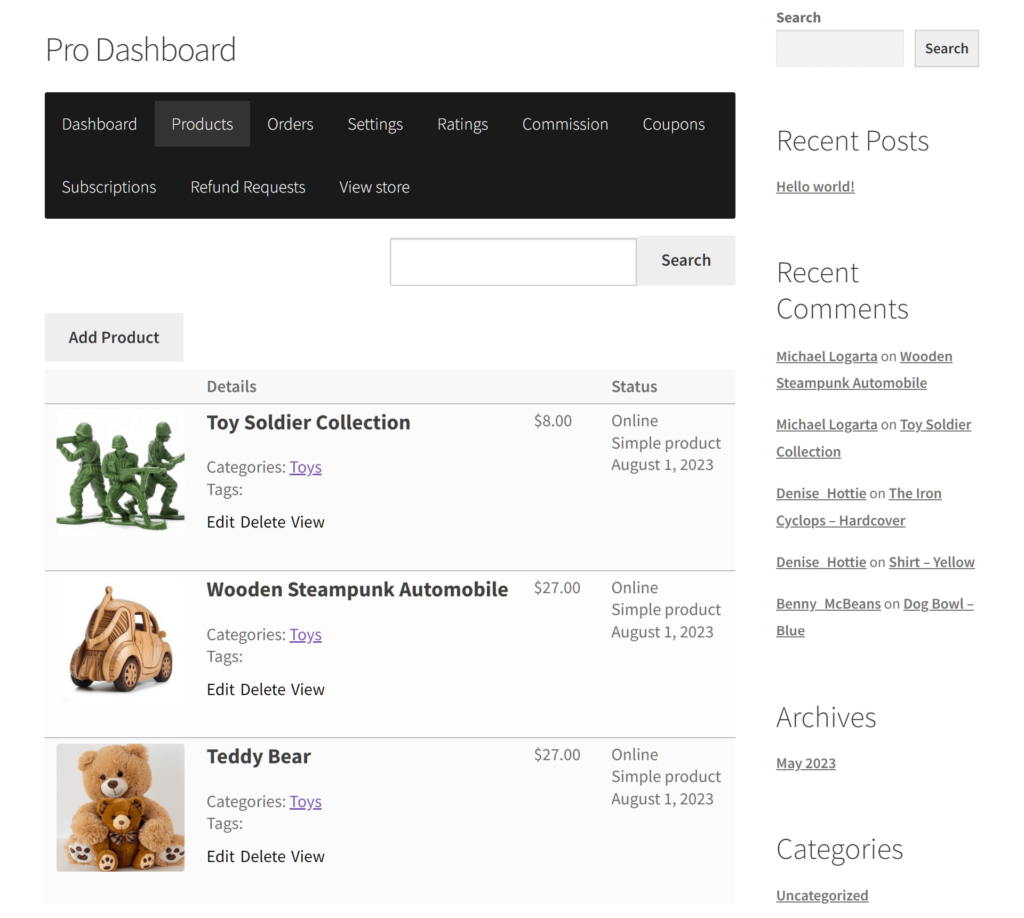
To create a WooCommerce product image gallery, a vendor must first head to their Pro Dashboard, then click Products. This takes them to their store’s Products page, which lists the items they’re selling.
The vendor can edit an existing product or add a new one to their store. For this example, let’s say the vendor clicks the Add Product button to upload a new product.
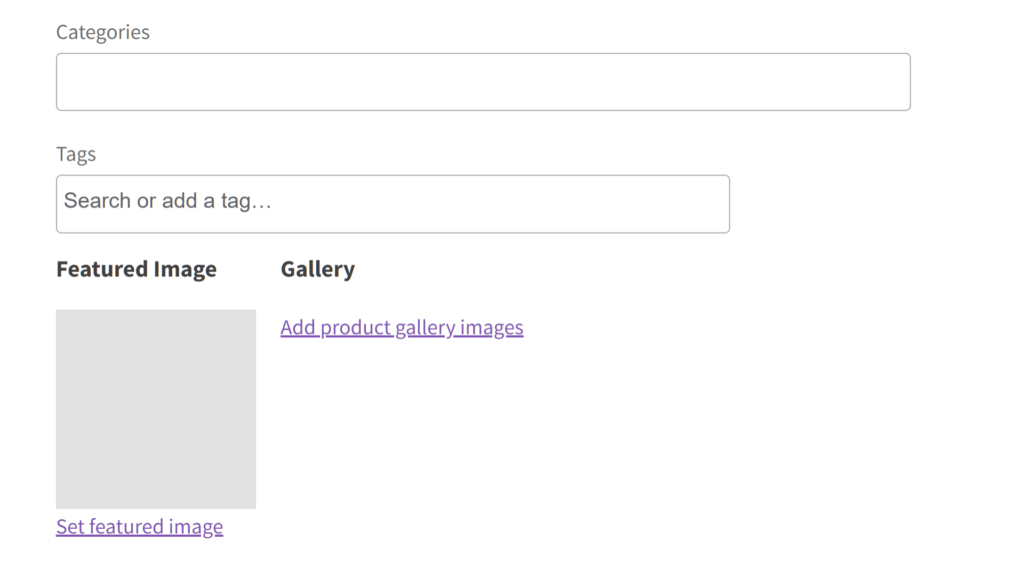
This takes them to the Add Product page. Here, they can fill various fields with essential product information, such as the product name, description, price, etc. In addition, this page is where they can upload multiple images for the WooCommerce product image gallery and a single image to serve as the product’s “Featured Image.”
Clicking Add product gallery images or Set featured image lets the vendor access the media library, where they can either upload new pictures or select from existing ones.
Add product gallery images lets the vendor select several images by holding down the keyboard’s Shift key while clicking on the desired images. These become part of the series of pictures that make up the WooCommerce product image gallery. Shoppers can click and view each gallery image individually.
On the other hand, Set featured image allows the vendor to pick only one image. Basically, this “Featured Image” is the product thumbnail that customers see when browsing the vendor store. Furthermore, it’s the most prominent image they’ll initially encounter upon visiting the product page.
Finally, to publish the product on their store, a vendor must scroll down the Add Product page and click the Save Changes button.
Conclusion
Mastering the creation and utilization of product image galleries is a pivotal aspect of success in the realm of online marketplaces. It’s not merely about showcasing products; it’s about creating an immersive and compelling experience for your audience. Therefore, elevate your marketplace by transforming your product image galleries into captivating narratives that entice, inform, and convert.
To craft compelling product image galleries, prioritize the following concepts:
- Quality reigns supreme
- Variety adds depth
- Consistency and cohesion
- Optimization for speed and accessibility
To grant vendors the ability to create such galleries, observe the following steps:
- Enable the WooCommerce product image gallery option
- Determine the maximum number of images per WooCommerce product image gallery
- Save your work
Remember, in the digital marketplace landscape, a picture is worth not just a thousand words but potentially thousands in revenue. So embrace the power of product image galleries, and watch your online marketplace thrive!
Do you have any questions about how to craft an exceptional WooCommerce product image gallery? Reach out to us and let us know; we’d be happy to help you out!
