We’re living in a digital age where social media has become a key part of our lives, influencing how we communicate, connect, and even shop. One impactful strategy that harnesses the power of social media within online marketplaces is the implementation of marketplace social media sharing.
Social media buttons are interactive icons that seamlessly bridge the gap between virtual storefronts and social media platforms. They allow vendors to expand their reach and engage with customers on a more personal level. Thus, they can do wonders for any online marketplace.
Today, we’ll explore marketplace social media buttons and what they can do for e-commerce businesses. Moreover, we’ll teach you how to use WC Vendors, a top-notch WooCommerce marketplace plugin, to create and implement such buttons in your own platform.
So let’s get started!
What Are Marketplace Social Media Buttons?
Marketplace social media buttons are interactive icons integrated into a digital marketplace platform. These icons come with embedded links so that when they’re clicked, the user is redirected to a social media site. Typically, vendors use such buttons to link their stores within an online marketplace to their social media channels. As such, marketplace social media buttons allow vendors to share content as well as extra information about their products and/or services via their social media channels.
To illustrate this further, let’s imagine a scenario where a vendor in a marketplace has a Facebook site. To link their Facebook site to their store, they create and then display a Facebook button on their store’s landing stage. Thus, any customer who sees this button can click it to visit the vendor’s Facebook site.
By incorporating social media buttons, online marketplaces leverage the power of social networks to boost their vendors’ reach. As a result, vendors and the marketplace itself engage with a broader audience. Ultimately, this fosters greater user interaction and participation within the platform.
Why You Should Allow Vendors To Create Marketplace Social Media Buttons
Social media is huge. In fact, the global count of social media users has surged to an unprecedented 4.9 billion individuals worldwide. Furthermore, projections indicate that by 2027, this figure will rise to around 5.85 billion users. This means businesses that neglect to leverage social media risk missing out on valuable marketing opportunities.
Speaking of social media marketing…
- 76% of users on social media have bought something they discovered on social media platforms. 11% bought immediately. On the other hand, 44% made purchases later, while 21% bought in physical stores.
- Gen X, Millennials, and Gen Z favor discovering products via social media compared to any other platform.
- Social media ranks third among the channels where shoppers are most responsive to advertising.
These are but some of the statistics proving the power of social media as a marketing tool.
How To Display Your Vendors’ Social Media Buttons In Your Marketplace (In 4 Simple Steps)
Is your online marketplace powered by WC Vendors? Then you’ll have no issues linking your vendors’ social media channels to their stores within your platform. After all, WC Vendors offers you a bunch of tools that can promote your e-commerce venture, thereby expanding your customer base.
If you’ve yet to build a multi-vendor marketplace, then your first objective is to create a traditional online store using WordPress and WooCommerce. Then, you must use WC Vendors to convert said store into a marketplace. For more information on this conversion process, check out the following guides:
- How To Create An Online Marketplace: A Beginner’s Guide
- How To Build Your First Multi-Vendor E-Commerce Website (Full Guide)
With all that in mind, let’s learn how to create marketplace social media buttons!
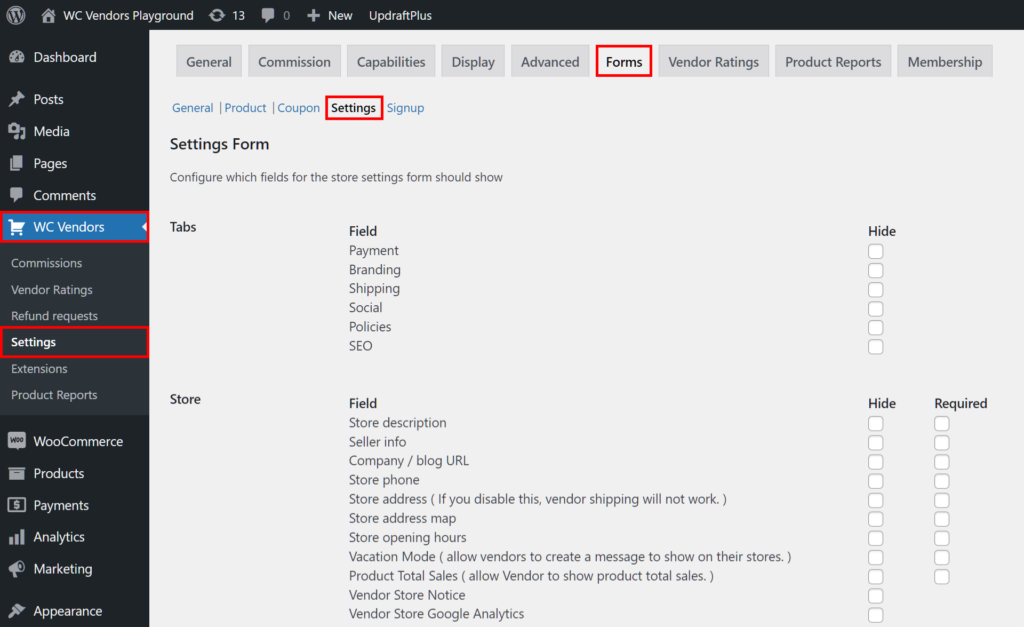
Step 1: Navigate to the Settings Form page
Your first order of business is to find the Settings Form page. Basically, this is where you’ll find options for displaying various vendor information to customers.
Thus, head to your WordPress dashboard and click WC Vendors > Settings > Forms > Settings.
Now that you’re on the Settings Form page, let’s proceed to the next step…
Step 2: Ensure the Tabs: Social field is enabled
Next, scroll down to the Tabs option and look for the Social option.
Ensure Social’s “Hide” checkbox isn’t ticked. We’ll explore why this is important later. For now, let’s move on to the next step.
Step 3: Enable Social fields
Scroll down to the Social option and take note of its fields.
As illustrated by the above image, each Social field represents a popular social media channel. Here, your objective is to decide which social media channels your vendors can link their stores to.
When you enable a field, it shows up on the vendor dashboard, requesting the vendor to enter the URL of the respective social media channel. The link they provide is then displayed on the marketplace frontend as a button. Any customer can click this button if they want to visit the vendor’s social media site.
Here’s the thing: by default, all the Social fields are already enabled. As such, you don’t have to do anything to activate them.
However, if you don’t want the vendor to provide their link to a specific social media channel, you can tick its respective field’s “Hide” checkbox.
This removes the field from the vendor dashboard, thus preventing the vendor from sharing the social media link.
For instance, if you don’t want vendors linking their Facebook sites to their stores, all you must do is tick the Facebook field’s “Hide” checkbox.
Once you’re done, let’s proceed to the final step …
Step 4: Save your work!
Scroll down to the bottom of the page and click the Save Changes button. This implements all the settings you’ve made on the page.
And we’re all done! Each vendor in your marketplace can now create social media buttons on their store. Thus, customers who want to visit their social media sites can do so by clicking said buttons.
Take note: There’s a lot more you can do with the Settings Form page, which empowers you to provide vendors with significant control over their store settings. For example, you can enable options to display each store’s:
- Store description
- Banners and icons
- Opening hours
- Social media buttons
- Seller information
- … and more!
Are you interested in learning more about the Settings Form page? Then check out our article, “Vendor Store Mastery: Fine-Tuning Your Settings For Success (A Complete Guide).”
Creating Marketplace Social Media Buttons: The Vendor’s Perspective
So, how can a vendor create and display social media buttons on their store? Simple!
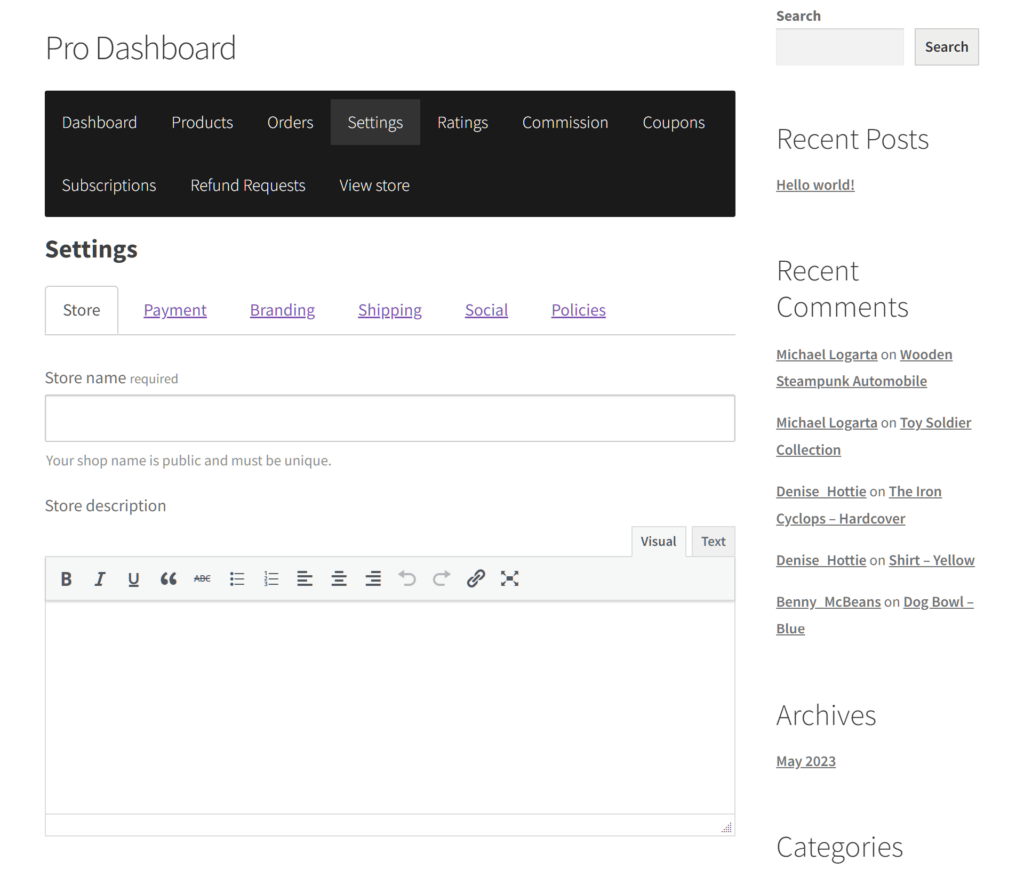
First, the vendor must navigate to their dashboard and choose the Settings panel. This redirects them to the Settings page as shown below.
Remember enabling the Tabs: Social field in Step 2? Well, because of that, the Settings page should now have a Social tab.
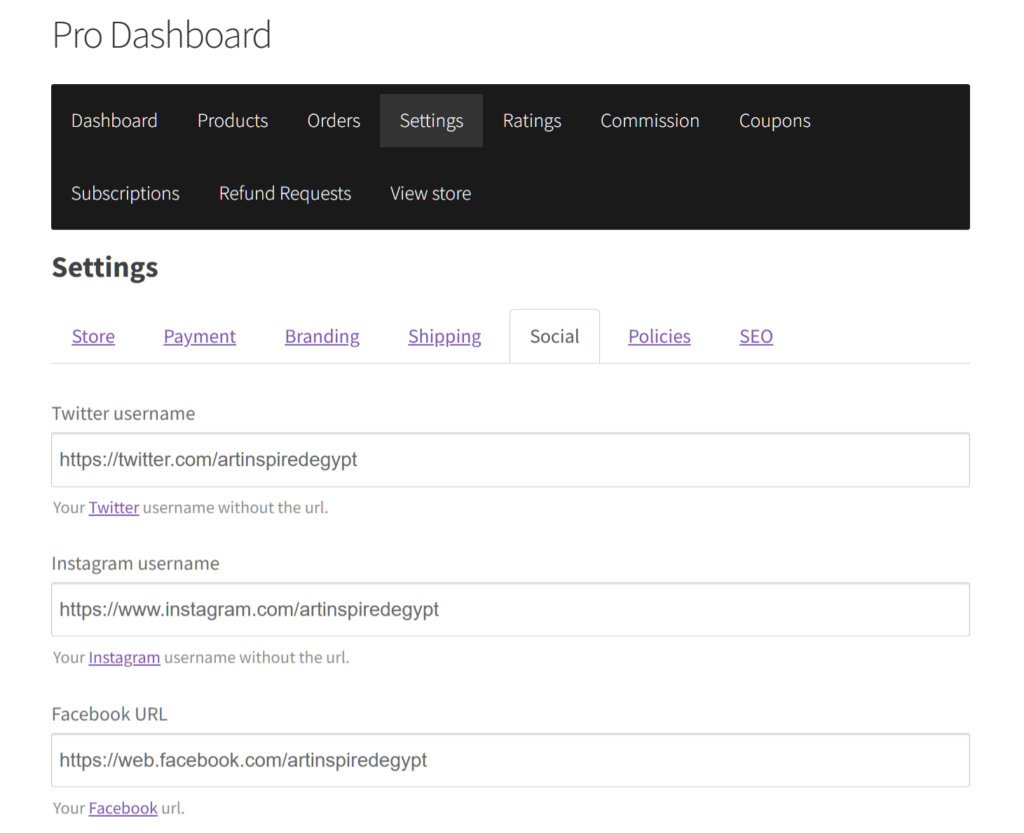
When the vendor clicks the Social tab, they’re taken to a page filled with entry fields, with each corresponding to a specific social media channel.
The vendor can now type the URLs of their social media sites in these fields. Take note that only the social media fields you enabled in Step 3 will be available on this page for the vendor to fill.
Once they’re done, the vendor must scroll down the page and click the Save Changes button. This makes the social media buttons available on their store, allowing customers to interact with them.
Viewing Marketplace Social Media Buttons: The Customer’s Perspective
So, how do customers view a marketplace policy?
When the customer visits an online store within your marketplace, they can find the social media buttons below the store banner.
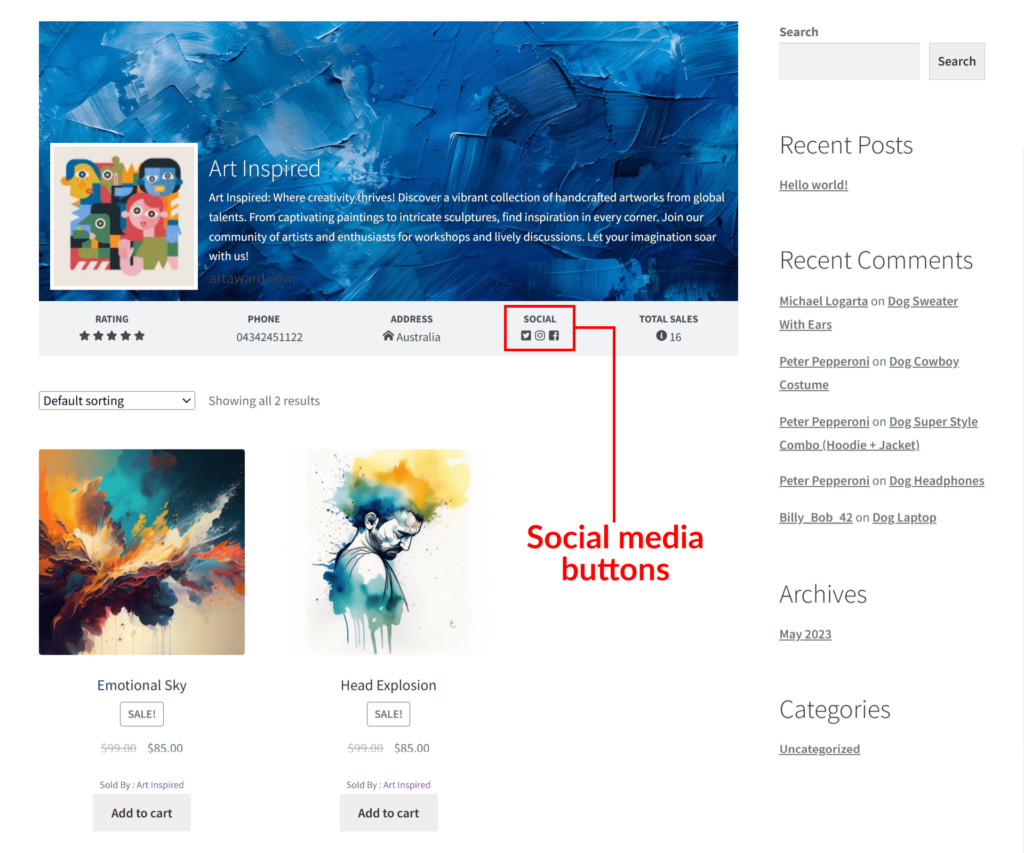
Now, customers can visit any vendor’s social media sites by simply clicking these marketplace social media buttons.
And that’s it!
Conclusion
Marketplace social media buttons are more than just clickable icons; they pave the way for enhanced connectivity and marketing opportunities for vendors within online marketplaces.
Embracing social media integration allows you to foster greater engagement and build stronger relationships with customers. Ultimately, it allows your multi-vendor platform to thrive in the competitive world of e-commerce.
Thankfully, you can use WC Vendors to allow vendors to create marketplace social media buttons linking their stores to their social media channels. All you have to do is observe the following steps:
- Navigate to the Settings Form page
- Ensure the Tabs: Social field is enabled
- Enable Social fields
- Save your work!
Do you have any questions about how to let vendors create and share marketplace social media buttons? Feel free to reach out to us; we’d be happy to help!

