Making sure you have the right amount of products to sell is crucial for any business, especially multi-vendor platforms. Therefore, if you’re operating such an e-commerce venture, it’s to your best benefit to master marketplace inventory management.
Whether you’re a marketplace operator or a vendor selling products, understanding inventory management is key to ensuring smooth operations and customer satisfaction. For this reason, today’s guide will explore the basics of inventory management, and explains its significance in online multi-vendor marketplaces.
We’ll discuss why marketplace inventory management matters and the essential functionalities it entails. Furthermore, we’ll teach you practical steps to implement it using WC Vendors – a powerful marketplace solution in WooCommerce.
I. What Is Inventory Management?
Inventory management is the process of supervising and regulating the movement of products within a business. Typically, it involves tracking inventory levels, replenishing stock when necessary, and optimizing inventory turnover.
Efficient inventory management maintains the appropriate stock levels to fulfill customer demand. In addition, it entails minimizing excess inventory and associated costs.
What is marketplace inventory management?
Marketplace inventory management involves coordinating the inventory of multiple vendors who sell their products through a multi-vendor platform.
Marketplace inventory management includes functionalities such as:
- Allowing vendors to manage their stock levels
- Providing real-time visibility into inventory quantities
- Enabling notifications for low stock levels
- Making it easier for vendors and the marketplace manager to communicate about inventory levels
Basically, marketplace inventory management aims to ensure that all sellers and the marketplace itself work smoothly together to handle inventory well.
II. Why You Need Marketplace Inventory Management
Marketplace inventory management is essential for several reasons:
- Optimized stock levels: It keeps stock levels just right so you avoid both excess inventory and shortages. In turn, you save money and meet customer demand.
- Improved customer experience: Accurate inventory management helps customers find and buy what they need without running into out-of-stock issues or delays.
- Vendor empowerment: Giving vendors control over their own inventory builds a sense of ownership and leads to better product availability and satisfaction.
- Data-driven decision-making: Real-time inventory data helps marketplace operators make smart choices about purchasing, pricing, and allocating stock.
- Enhanced marketplace performance: Keeping inventory data accurate and current improves the marketplace’s efficiency and overall success.
III. Choosing The Best Marketplace Inventory Management Software
Choosing the right marketplace inventory management tool is a challenge—it must fit your workflow and keep your store running smoothly. We’ve tested several options, and here are the solutions we trust for marketplaces.
| Software | BOM (Bill of Materials) | Users | Multilocation | Multichannel |
|---|---|---|---|---|
| QuickBooks Commerce | ✗ | Varies | ✓ | ✓ |
| Cin7 | ✗ | Unlimited | ✓ | ✓ |
| Zoho Inventory | ✗ | 1–7 | ✓ | ✓ |
| WC Vendors + WooCommerce | ✗ | Unlimited | ✓ | ✓ |
1. QuickBooks Commerce (formerly TradeGecko)
QuickBooks Commerce has impressed us with its clear, real‑time stock updates and easy order syncing.
- It tracks your inventory across multiple channels with up-to-the-minute data.
- It integrates order management with advanced reporting features, which is useful when handling multiple vendors.
- Overall, the pros are its clarity and efficiency, while the con is that it might require a bit of learning if you’re new to cloud-based systems.
- Its pricing starts at around $39 per month, which we consider a solid investment.
2. Cin7
Cin7 is a reliable inventory management tool that works well for ecommerce sellers in multi-vendor marketplaces. We found it helps you keep track of orders and stock across different sales channels.
- It automatically updates orders and stock levels, so you always have a clear view of your inventory.
- Overall, we liked its clear performance and easy integration, but the higher cost can be a drawback compared to simpler tools.
- It has features that handle the needs of a busy online store, though its pricing starts at around $299 per month, which makes it more suited for larger operations.
3. Zoho Inventory
Zoho Inventory stands out with its user-friendly interface and real‑time tracking that many small and growing businesses enjoy.
- It sends low stock alerts automatically.
- It integrates smoothly with other Zoho apps, giving you a complete view of your sales and customer data.
- Its pros are its simplicity and strong customer support, while the con is that it might lack advanced customization options for more complex needs.
- The starting price is $59 per month, and a free trial lets you explore its features before making a commitment.
4. WC Vendors + WooCommerce
WC Vendors + WooCommerce is built for marketplaces and comes with built-in inventory management.
- It provides a straightforward vendor dashboard that allows each seller to manage their inventory without without extra hassle.
- The core plugin is free, and while you can add premium upgrades for more detailed reporting, the inventory management features are already included.
- Overall, its design is tailored for marketplaces and is easy to use, though additional features may require paid upgrades.
Each option has been proven in our own experience to deliver real‑time insights and ease the challenges of marketplace inventory management. Choose the one that fits your business’s unique workflow and budget best, and don’t hesitate to request a demo to see how it works in action!
IV. How To Manage Your Marketplace Inventory (In 3 Simple Steps)
If your multi-vendor platform is powered by WC Vendors, then marketplace inventory management should be easy. In fact, all it takes is a few steps!
If you’ve yet to use WC Vendors to build a marketplace, check out the following guides:
- How To Create An Online Marketplace: A Beginner’s Guide
- How To Build Your First Multi-Vendor Ecommerce Website (Full Guide)
With all that in mind, let’s begin!
Step 1: Enable stock management options
First things first: you must grant your platform inventory management capabilities.
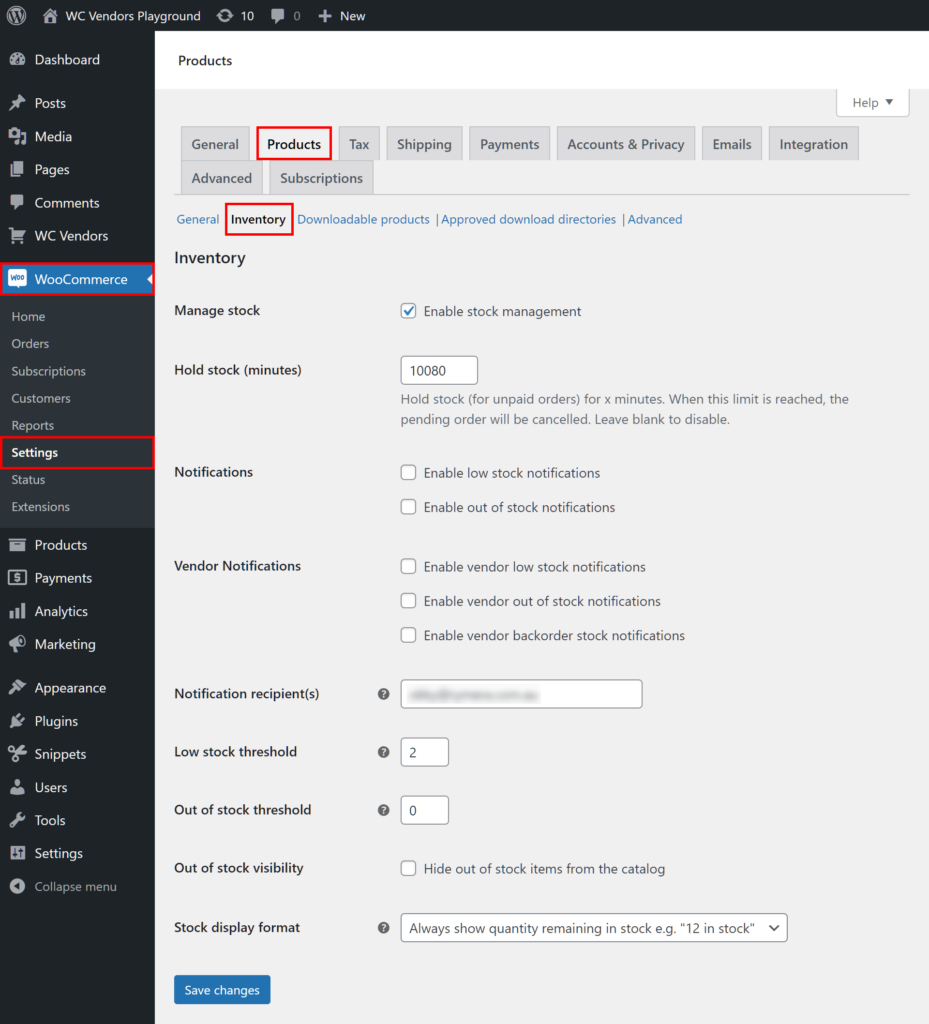
Thus, head to your WordPress dashboard, then click WooCommerce > Settings > Products > Inventory. Basically, this takes you to the Inventory page, which boasts all the options associated with inventory management.
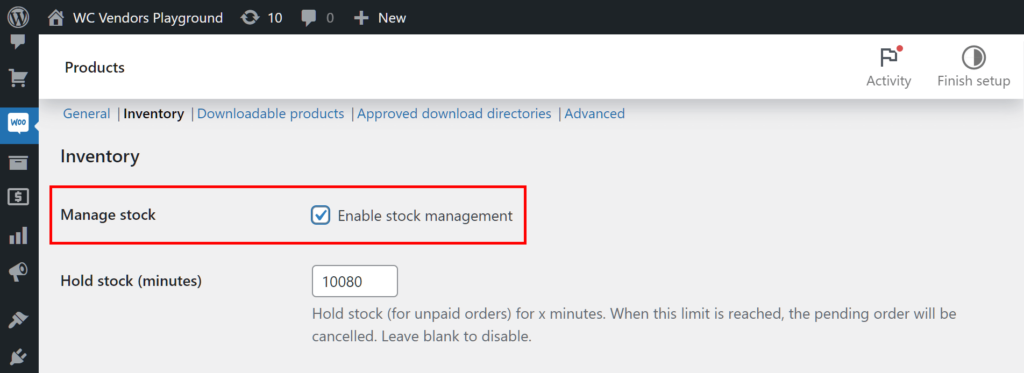
Many options on this page are useful, but the key step is to tick the Manage Stock checkbox. This enables you and your vendors to control inventory on the marketplace.
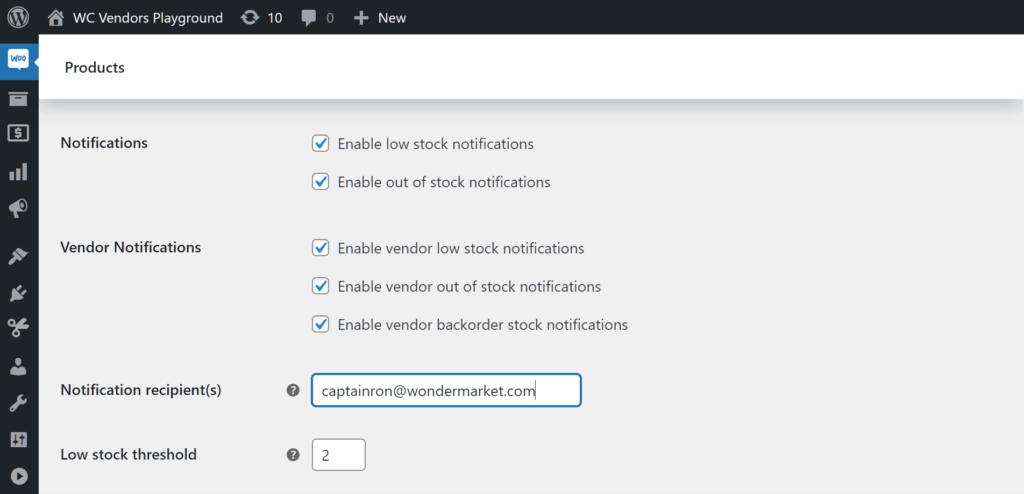
If you want notifications sent to you and/or your marketplace administrators when items are low in or out of stock, tick the Notifications option’s two checkboxes.
Make sure to pinpoint the Notification recipient(s). In your case, this could be your email and/or the emails of your marketplace administrators.
If you want your vendors to be similarly notified about their stock levels, tick all three of the Vendor Notifications option’s checkboxes.
Consider enabling the other options on this page, as well!
Once you’re happy with your settings, scroll down the page and click the Save Changes button.
Step 2: Grant vendors marketplace inventory management capabilities
Next, you must allow your vendors to manage their stocks via their frontend dashboards.
However, before we proceed, let’s talk about a crucial interface known as the product form.
Product form
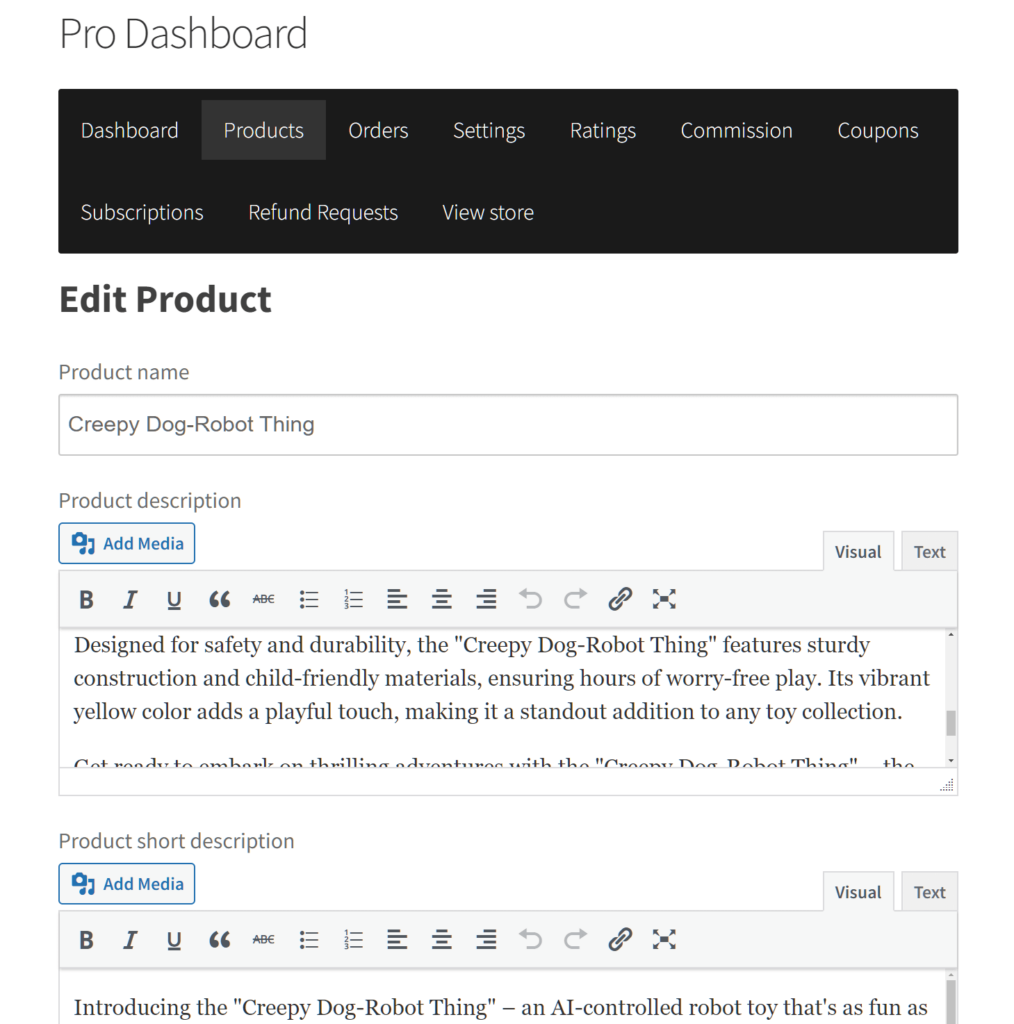
The product form appears on the frontend vendor dashboard.
This form collects the data vendors provide when adding a product to their store. The information is stored in the marketplace backend and shown on the product listing for customers.
Through your customization efforts, you can have this product form ask vendors for information about their stock.
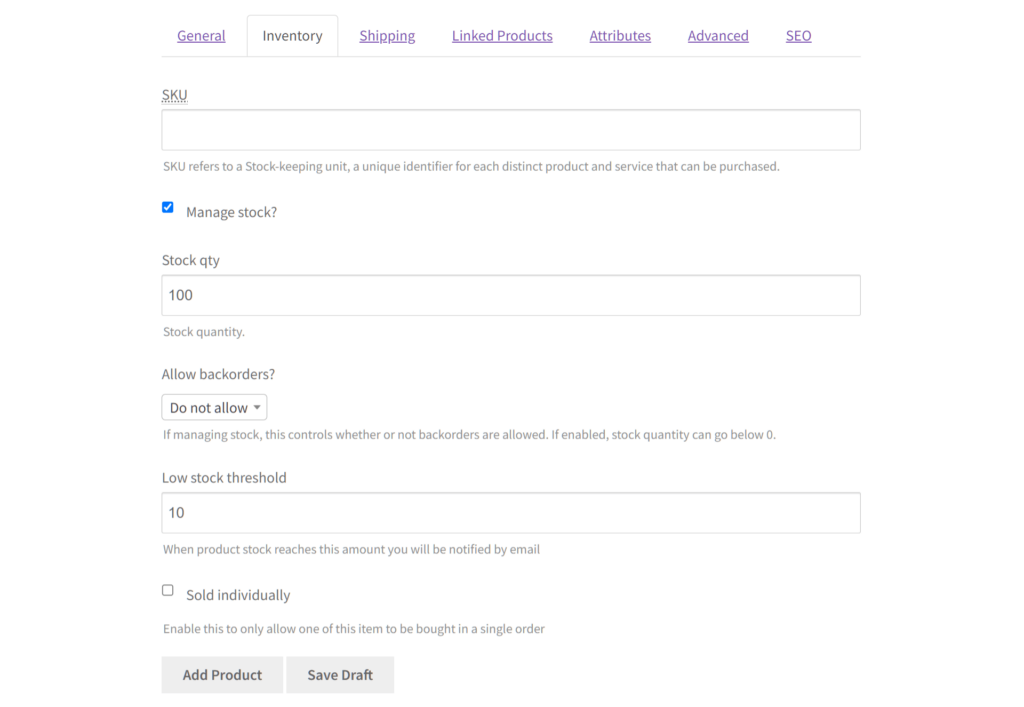
For example, when a vendor enters a product with a stock quantity of 100, the marketplace backend automatically records that figure. At the same time, the product listing updates to show the current stock level to customers.
Want to learn more about creating products and listings? Read our Vendor Products Handbook: Mastering Your Marketplace Product Listings (Full Guide)
Customizing the product form
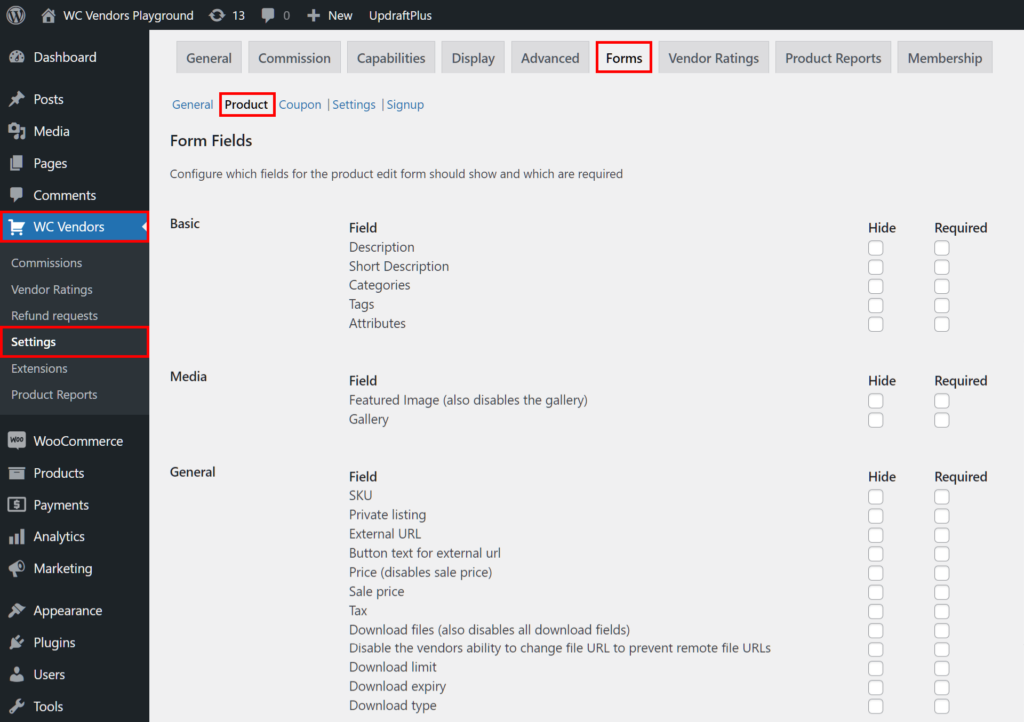
Navigate to your WordPress dashboard and click WC Vendors > Settings > Forms > Product. This takes you to a page allowing you to customize the product form.
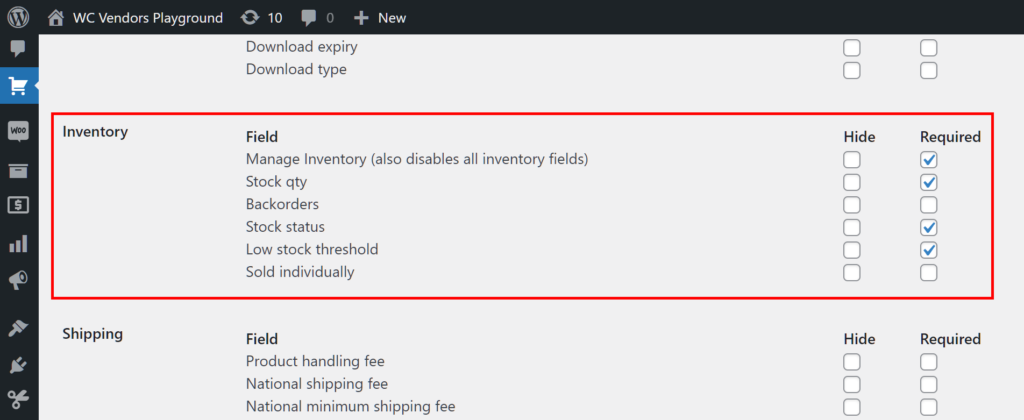
Head down to Inventory, where fields are enabled by default so you don’t need to tick any checkboxes. However, you can mark specific fields as “Required” to ensure vendors submit the necessary information.
For this tutorial, we don’t recommend ticking the “Hide” checkboxes. Hiding a field removes it from the product form, which means vendors cannot provide vital inventory information.
We recommend keeping the following fields enabled:
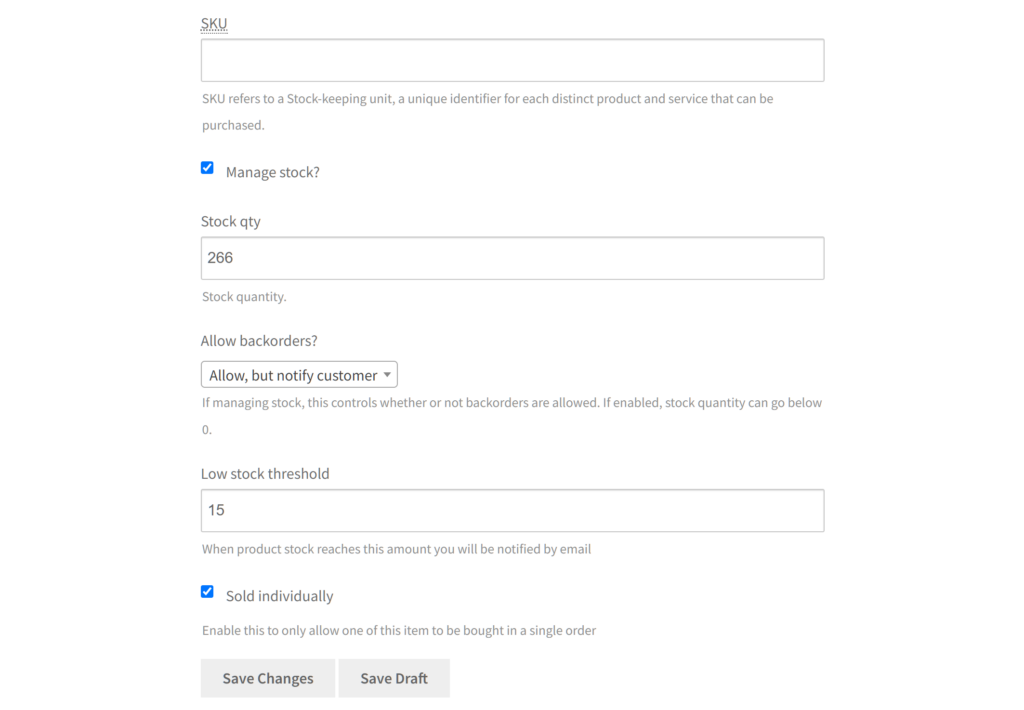
- Manage Inventory: Gives vendors the option to manage an item’s stock
- Stock Qty: Allows vendors to input the quantity of an item available in their inventory
- Stock Status: Lets vendors be notified about an item’s stock status
- Low Stock Threshold: Enables vendors to set a product stock quantity threshold, triggering a notification when the item reaches the specified stock level
Enabling the following fields is up to you:
- Backorders: Lets customers place orders even when an item is out of stock, resulting in a negative quantity
- Sold Individually: Allows customers to purchase only one of a product per order
Once you’re happy with your configuration, scroll down the page and click the Save Changes button. This activates your settings so that they’re reflected on the frontend vendor dashboard.
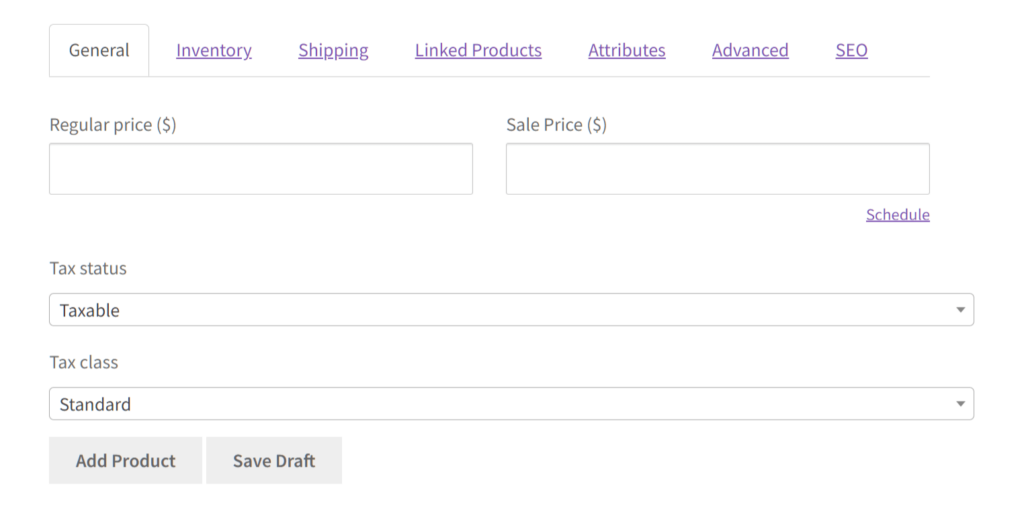
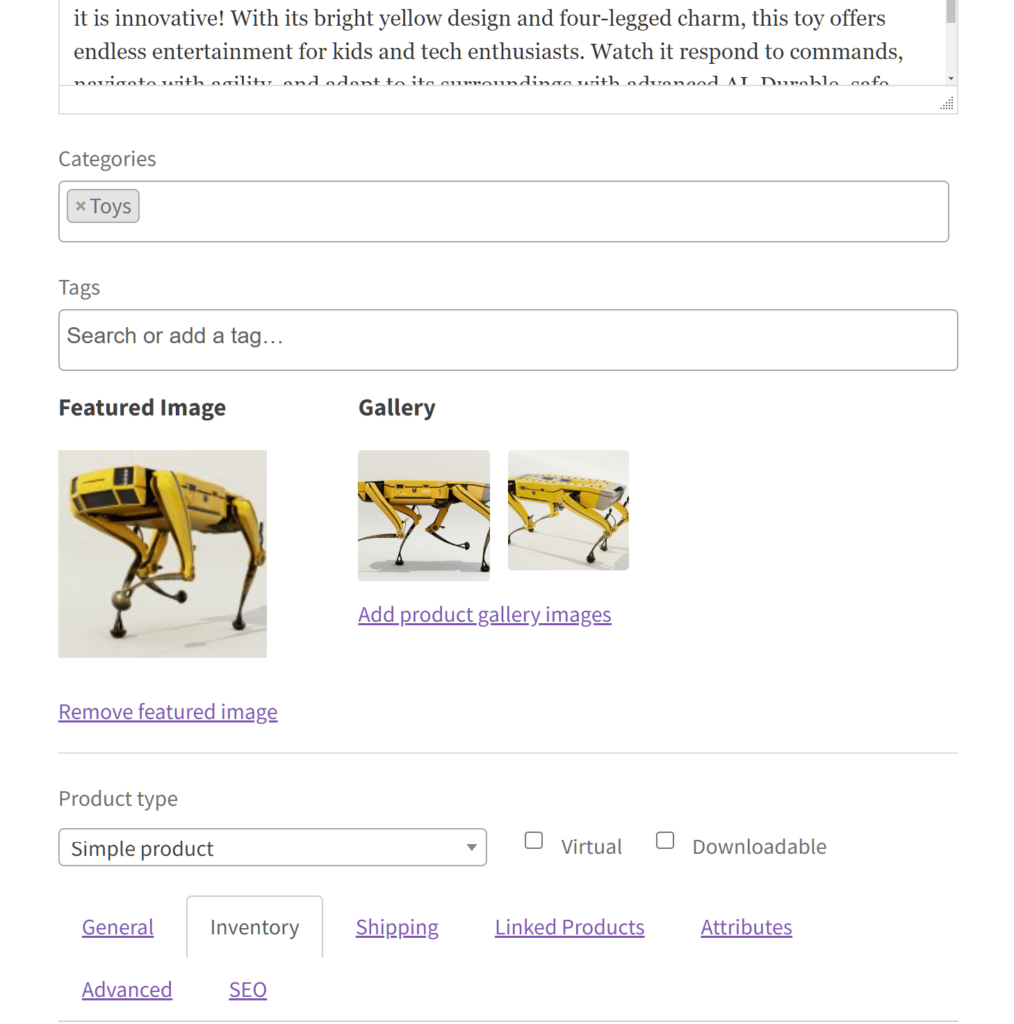
Below is an example of the frontend product form, demonstrating marketplace inventory management enabled, and filled with information provided by a vendor:
Step 3: View and/or edit product stock quantities
The marketplace operator/administrator can also check and/or edit the quantity of each product remaining in vendors’ inventories.
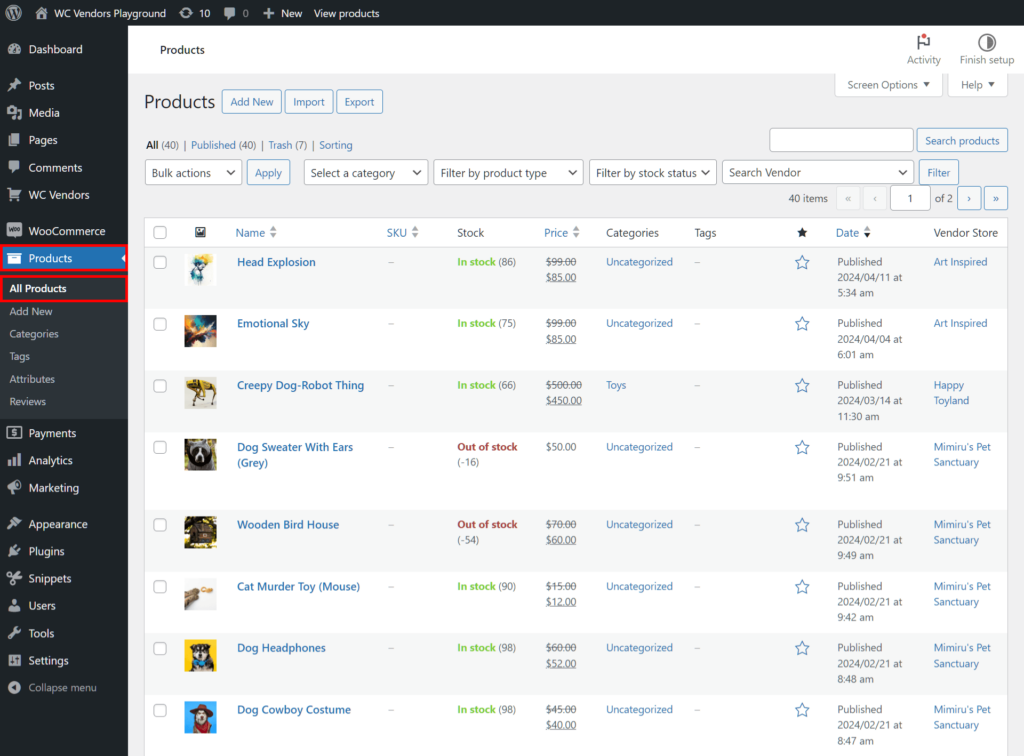
To do so, head to your WordPress dashboard. Then, click Products > All Products. Basically, this redirects you to a page listing the products every vendor is selling via your marketplace.
Viewing stock quantities
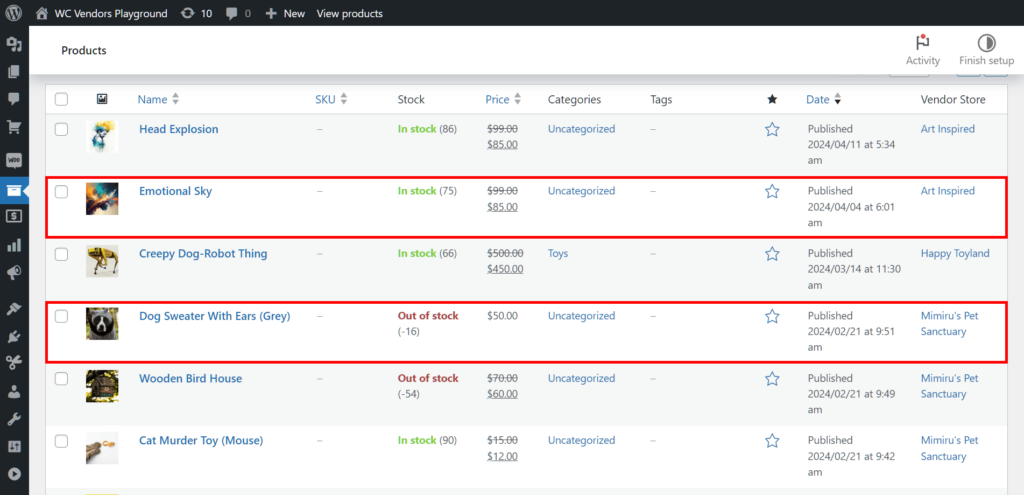
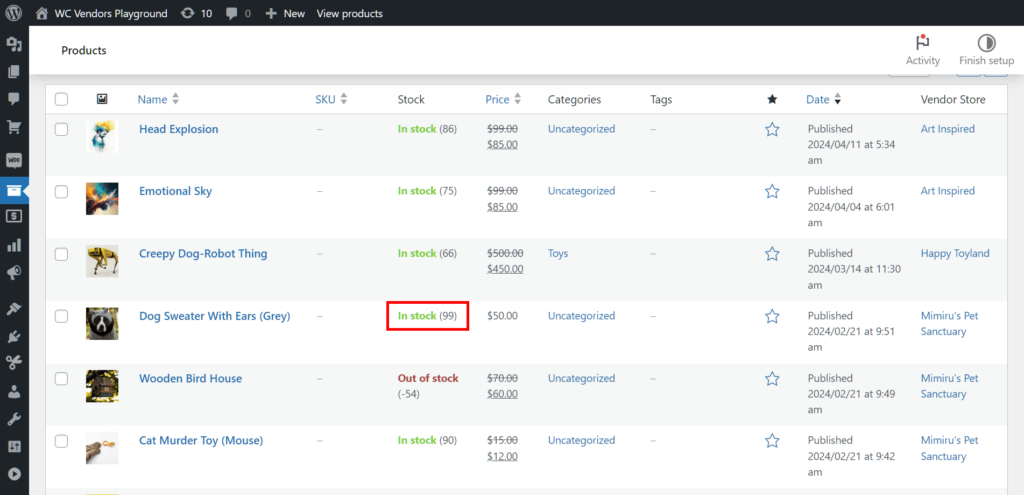
As you can see below, with marketplace inventory management enabled, stock quantities are displayed under the “Stock” column. Moreover, it shows out-of-stock items and the quantity of their backorders.
For example, the vendor store “Art Inspired” has 75 of the product “Emotional Sky” remaining in their inventory.
Meanwhile, the product “Dog Sweater With Ears (Grey)” is out of stock at “Mimiru’s Pet Sanctuary.” However, customers have made 16 backorders of the item.
Editing stock quantities
As the marketplace operator or administrator, you can update stock quantities yourself. Simply choose the product you want to edit and click its name or edit button to open the Edit Product page.
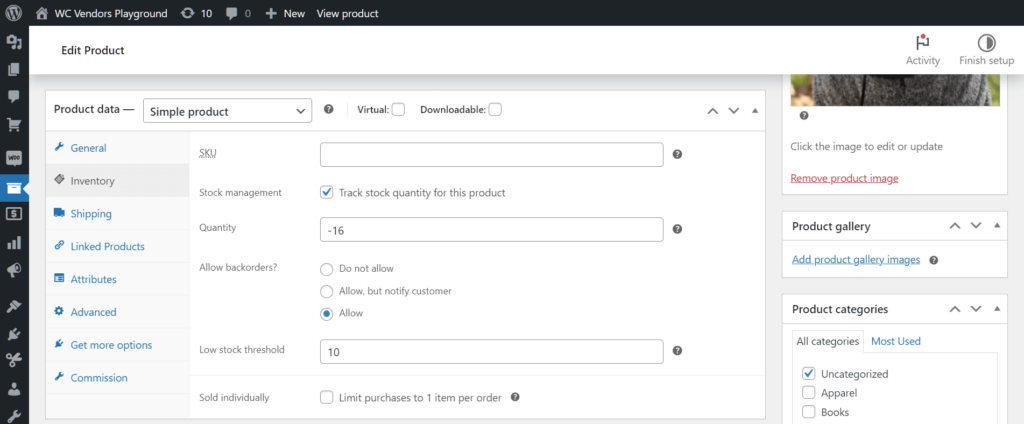
Next, scroll down to the Product Data box. Then, click the Inventory panel to access a section offering marketplace inventory management options.
As you can see, this section provides you with the same options available to vendors on the frontend product form. Basically, this means you can change these settings any time you wish.
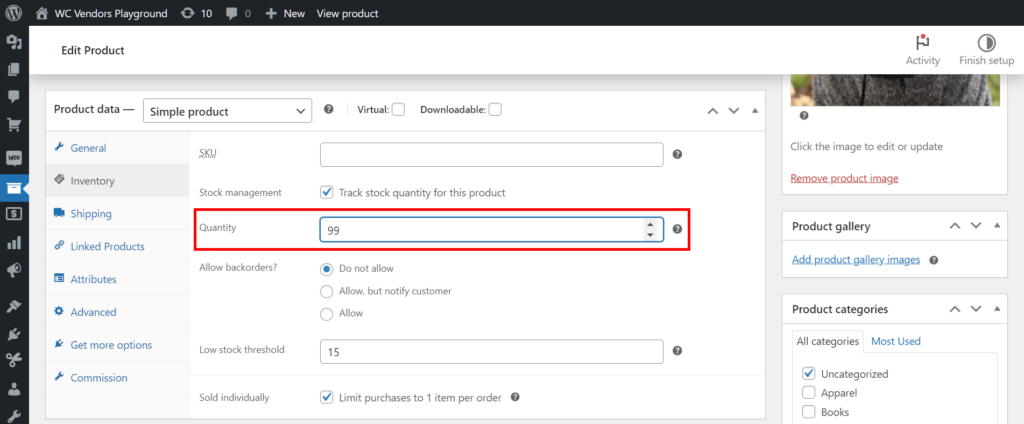
To modify the stock quantity, enter a different number. In our “Dog Sweater With Ears (Grey)” example, we’ll change the product’s “Out of Stock” status by replacing the -16 with 99. In addition, we’ll prohibit backorders, raise the low stock threshold, and limit purchases to 1 item per order.
Once done, click the Update button to implement these changes.
For more detailed information on adding and managing products, read this WooCommerce documentation.
When you revisit the list of products, you’ll see that the item is now in stock, with 99 products in the vendor’s inventory.
Take note: Before updating an item’s stock information, make sure to coordinate with its vendor. This will prevent data inaccuracies and misunderstandings with the vendor.
IV. Putting It All Together: An Example Of Marketplace Inventory Management In Action
What happens now that marketplace inventory management is possible? The vendor dashboard and marketplace backend update automatically with changes from customer purchases, vendor activities, and admin actions.
The customer’s perspective
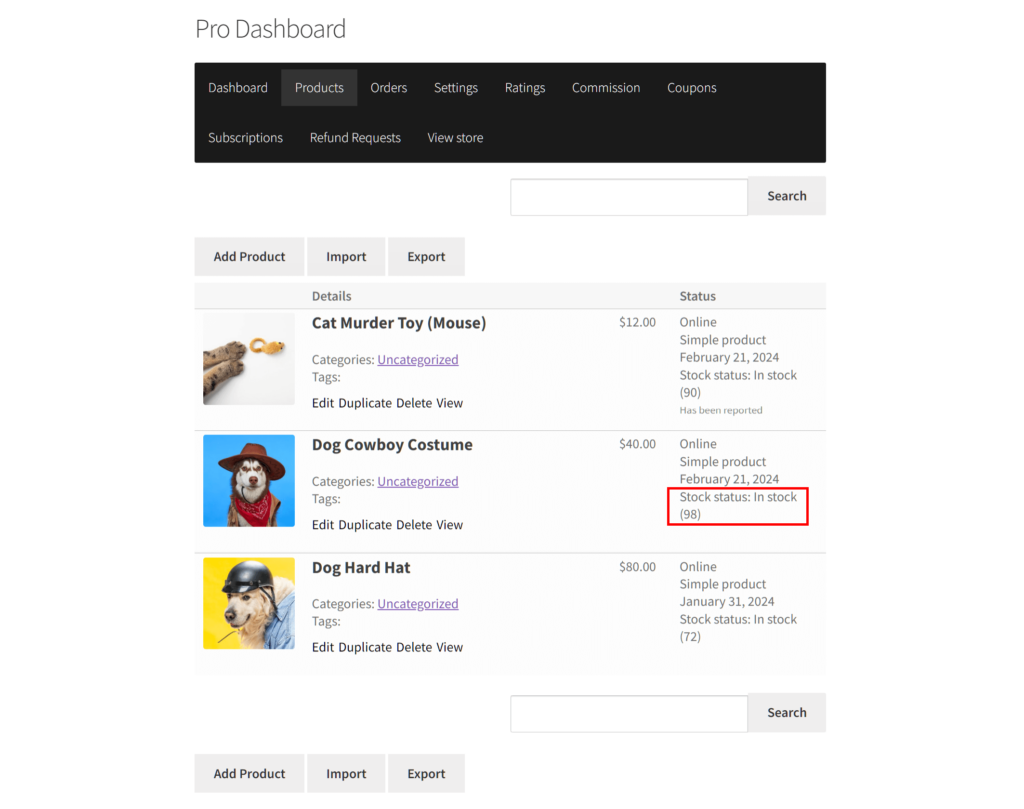
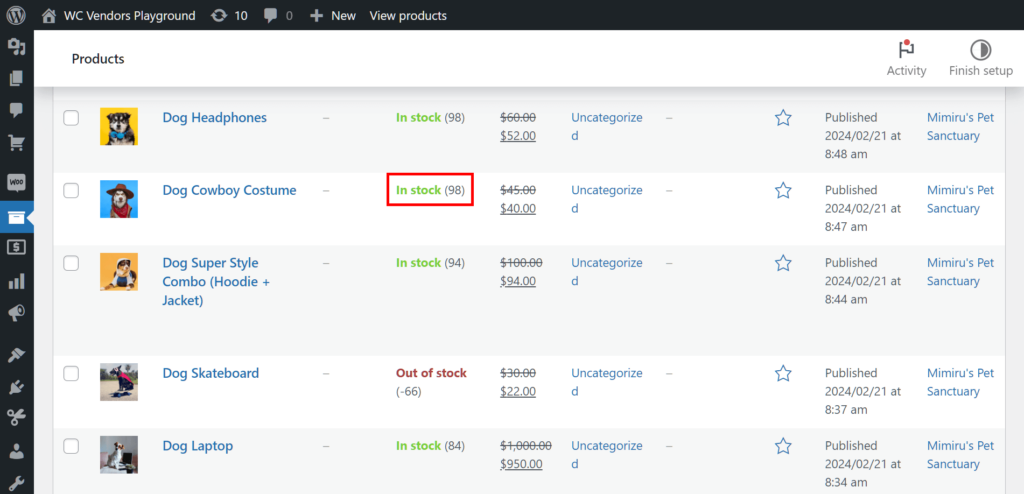
Let’s say the vendor store Mimiru’s Pet Sanctuary offers a product named “Dog Cowboy Costume,” with a current stock of 99 pieces.
Now, what happens when a customer purchases one Dog Cowboy Costume? The item’s stock quantity should drop from 99 to 98.
The vendor’s perspective
Aware of the sale, the vendor goes to their vendor dashboard to examine their product list. They look for Dog Cowboy Costume and discover that its stock quantity has indeed gone down from 99 to 98.
The marketplace operator/admin’s perspective
The marketplace operator finds out about the sale. Thus, they check the product list in the marketplace backend. They discover that the Dog Cowboy Costume stock quantity has dropped from 99 to 98.
This proves the marketplace inventory management functionality is working perfectly.
Frequently Asked Questions (FAQs)
1. What is marketplace inventory?
Marketplace inventory is the total stock of products on a multi-vendor platform. It combines items from various vendors so the marketplace always knows what’s available for customers.
2. What is marketplace order management?
Marketplace order management is the process of tracking orders from placement to completion on a multi-vendor site. It ensures that vendors and the operator update stock levels accurately.
3. What are the 4 types of inventory management systems?
There are several ways to manage inventory, but four common types are:
- A periodic inventory system, where stock counts are done at set intervals.
- A perpetual inventory system, which updates stock levels continuously as sales and deliveries occur.
- A Just-In-Time system, where items are ordered only when needed to meet demand.
- An ABC inventory system, which groups items by their importance and sales volume.
4. How do online marketplaces manage inventory?
Online marketplaces use software to track each vendor’s stock and update inventory automatically when items are sold or added. This prevents overselling and gives the operator a complete view of available products.
Conclusion
Effective marketplace inventory management is key for a successful multi-vendor e-commerce platform. Keeping balanced stock, giving vendors control, and streamlining inventory discussions help keep customers happy, save money, and improve the overall marketplace.
With the right inventory management software and tools, you can simplify how your marketplace handles stock and orders. It helps ensure that every vendor’s inventory stays up-to-date and that you always have a clear view of available products.
To recap, you can use WC Vendors to implement effective marketplace inventory management by observing the following steps:
- Enable stock management options
- Grant vendors marketplace inventory management capabilities
- View and/or edit product stock quantities
Do you have any questions about marketplace inventory management? Reach out to us and let us know; we’d be happy to hear from you!


