Stripe Connect is one of the most popular payment solutions for sending payments directly to vendors. When a customer makes a purchase from a vendor who is connected via Stripe Connect, the payment is automatically split. The vendor receives their commission, and the site admin receives a portion of the earnings based on the settings.
This documentation will guide you through the process of setting up Stripe Connect with the WC Vendors plugin.
To begin, you will need to purchase the Stripe Connect Commissions & Gateway plugin. You can get it by clicking here.
Features
- Vendors can connect their standard Stripe accounts to the platform
- Direct and Separate charges are supported
- Admins can configure the payment gateway for test and live transactions
- Admins can require vendors to connect their accounts before the vendors are allowed to add or edit products.
- Payments are processed instantly and cannot be scheduled at this stage.
- WooCommerce Subscriptions support.
- SCA Ready
- Refund support (WC Vendors Pro required)
Installation
- In WordPress Dashboard, go to Plugins > Add New > Upload
- Click Choose File and find your downloaded ZIP file
- Activate the extension through the ‘Plugins’ menu in WordPress
- Go to WooCommerce > Settings > Payment Gateways > Stripe Connect to configure the plugin
Plugin Options
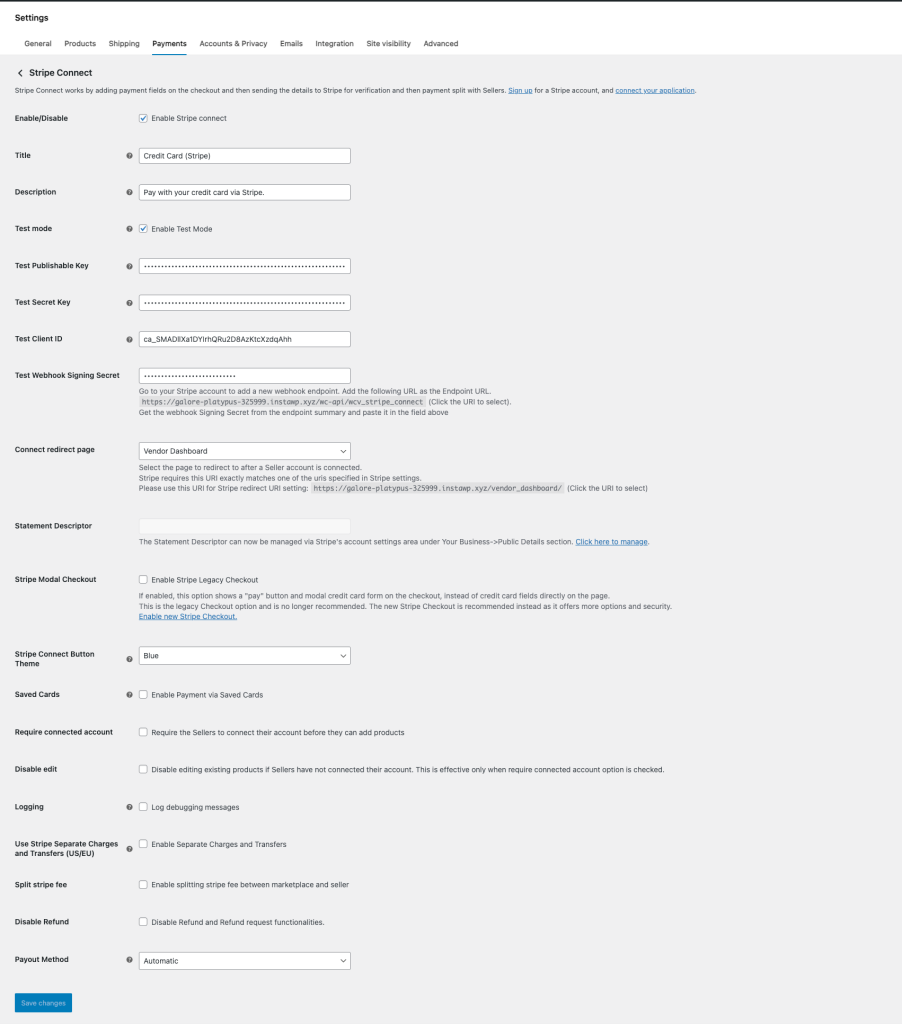
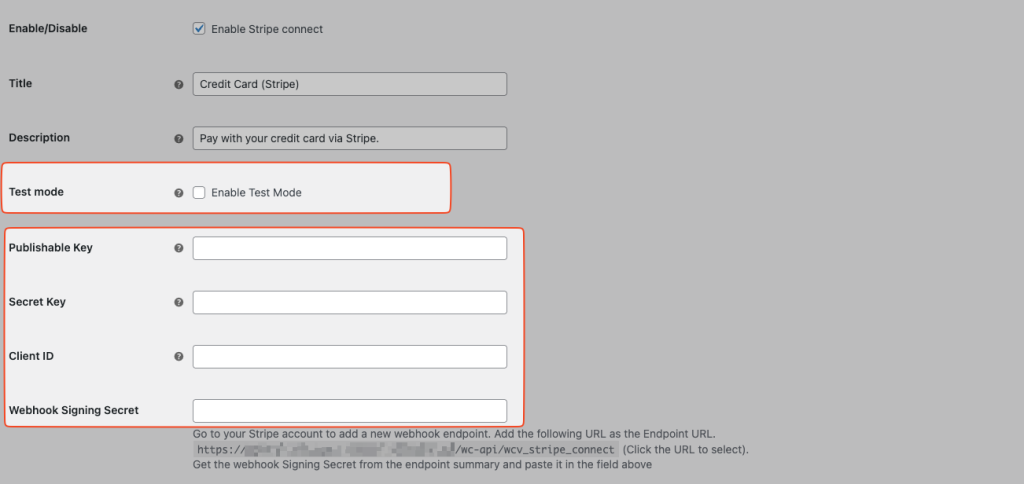
The plugin options are configured on the WooCommerce > Payments – Stripe Connect screen. The following options are available for configuration.
- Enable/Disable – This enables the payment gateway
- Title – This is the payment title shown on the checkout page
- Description – The description shown on the checkout page
- Test Mode – Enable this mode to set the gateway to test mode. You should use this mode before you launch your marketplace
- Publishable Key – This API key is required for both live and test modes
- Secret Key – This API key is required for both live and test modes
- Client ID – The client ID is required for both live and test modes
- Webhook Signing Secret – Use this secret to verify that events come from Stripe.
- Connect redirect page – This is the page that your vendors will be redirected to after they connect to your marketplace. We recommend the Dashboard or My Account pages.
- Statement Descriptor – This is the description shown on the customer’s credit/bank statements
- Stripe Checkout – Enable the new Stripe checkout option
- Stripe Connect Button Theme – This is the color of the button that the vendors will see on their dashboard
- Saved cards – Enable this to allow the customer to save their payment details to your platform. This does not store credit card information on your marketplace, only a reference.
- Require Connected Account – This will require vendors to have a connected account before they can add products.
- Disable Edit – If the required connected account option is ticked, this will disable the ability to edit existing products
- Logging – This will enable debug logging, which can be useful if you are having issues with your payments. You can find the logs in WooCommerce > Status > Logs.
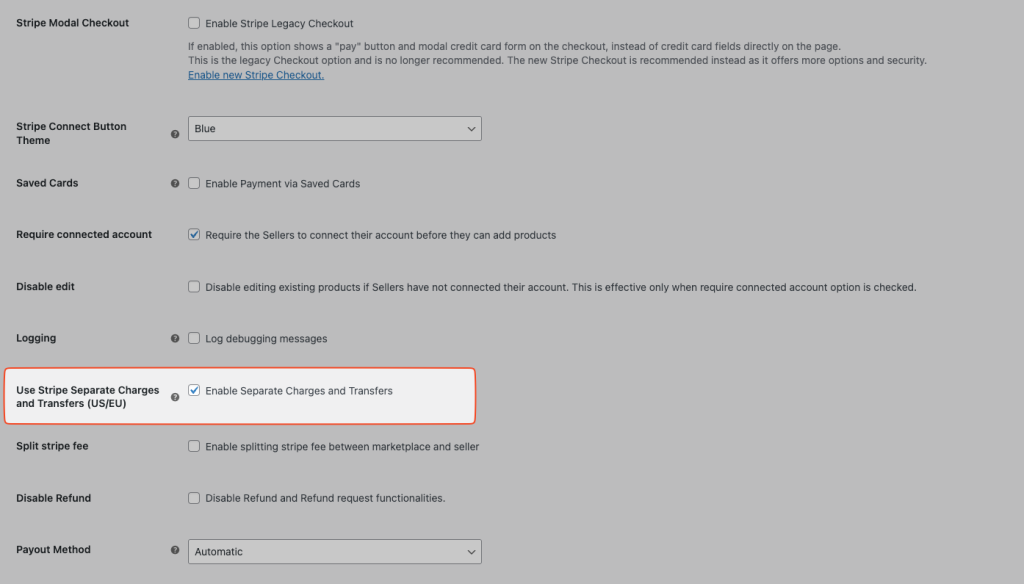
- Use Stripe Separate Charges & Transfers – This will change the default charge method for Direct Charges to Separate Charges and Transfers.
- Split Stripe fee – This allows the marketplace to split the Stripe fees between the marketplace and the vendor. By default, direct charges for all fees are charged to the vendor.
- Disable Refund – This will disable the refund system.
- Payout Method – This will allow you to select the payment methods automatically/manually/automatic schedule
What customers will see when choosing payment methods
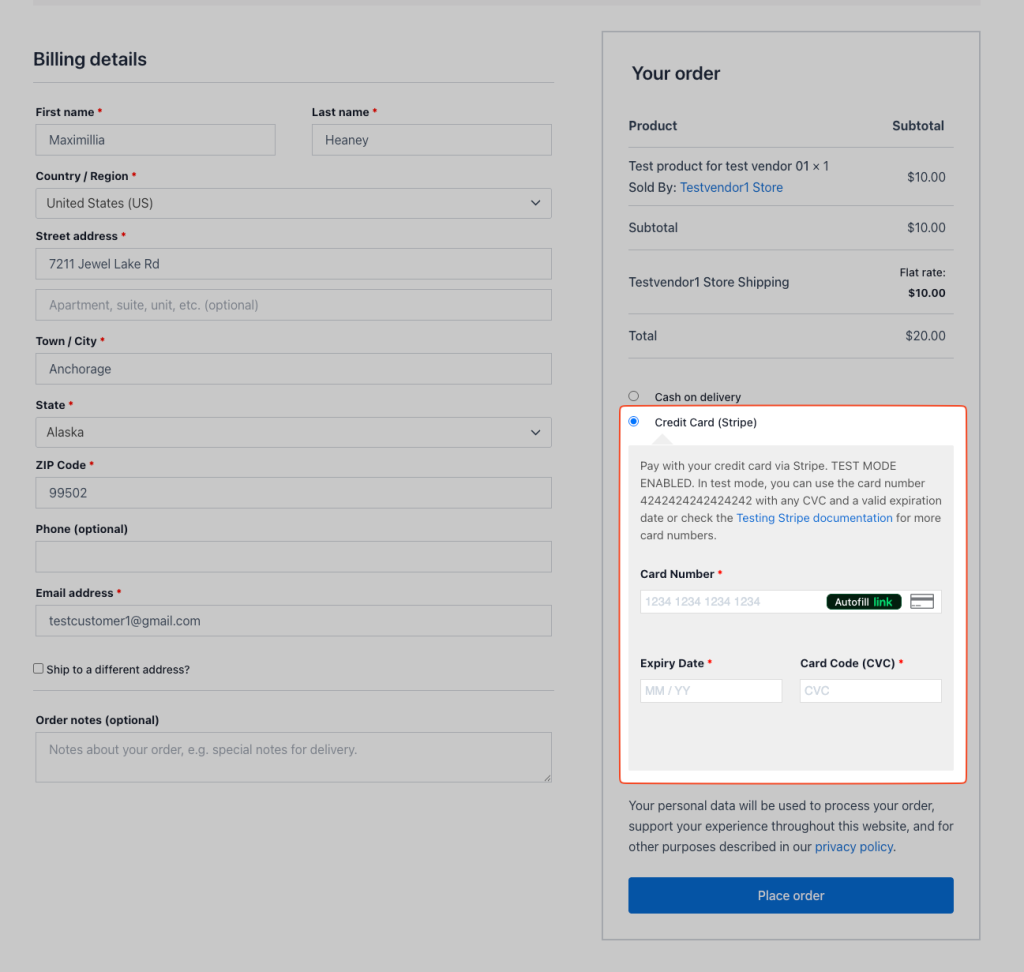
Once you have configured the payment gateway, at checkout, buyers will see:
The TEST MODE text will only show if you have test mode enabled. Once you are in live mode, that text will disappear.
What vendors will see
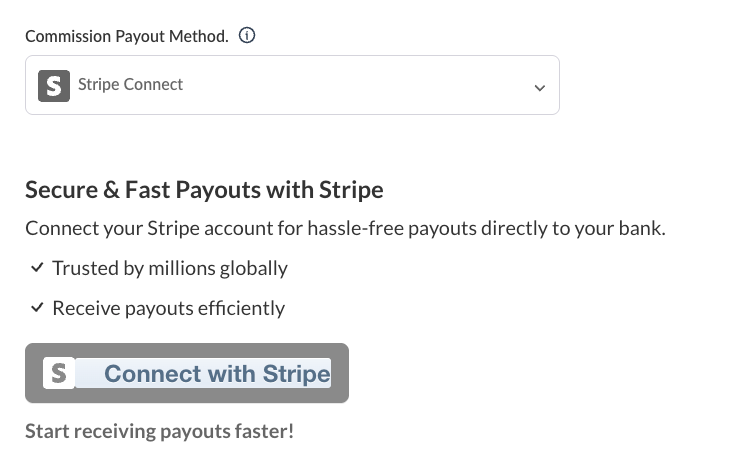
Vendors must connect their accounts with Stripe before being able to receive payments via Stripe. They may do so on their Vendor Dashboard > Settings > Payouts tab.
When the Vendor clicks on the Connect with Stripe button, Stripe will ask them for their login information, and if they don’t already have an account, it will ask them to create one. Once they do, they will be redirected back to your site and successfully connected to Stripe. Once connected, the Connect with Stripe button changes to a “Disconnect from Stripe” link if the vendor decides to deactivate Stripe Payments for their vendor account.
After a vendor has received an order that was paid with Stripe, their sales will show up under their Stripe dashboard on stripe.com. Sales will still show up on your site’s Vendor Dashboard, too. They will see the total purchase price and the amount received after commission.
Require a connected account
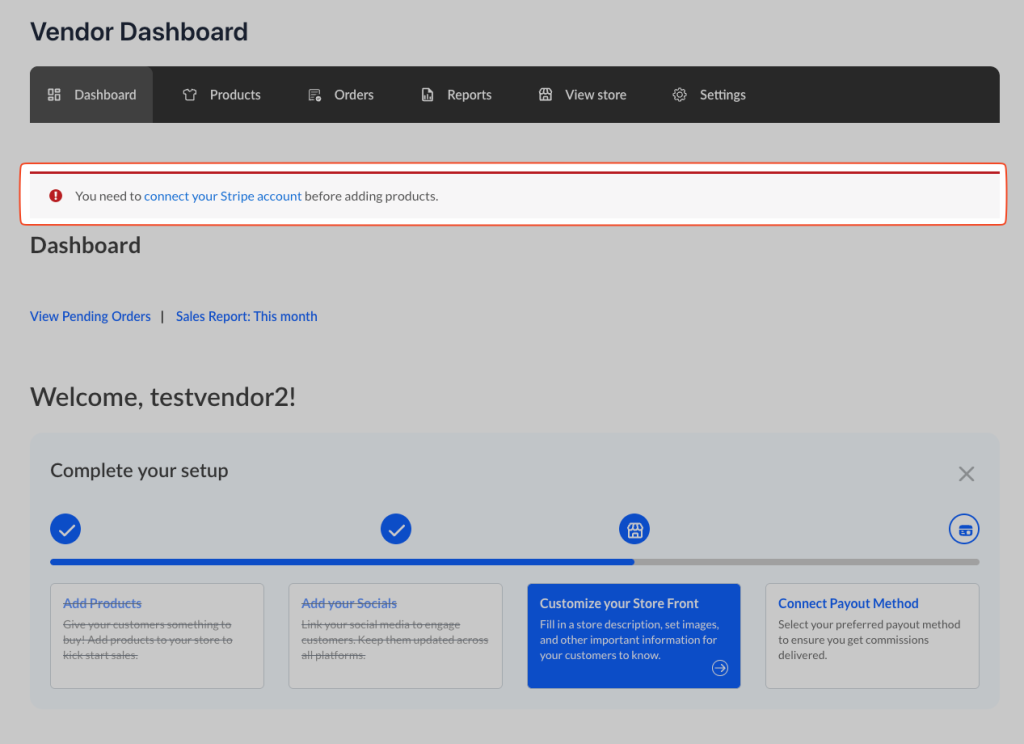
You can require that vendors connect their Stripe accounts before they can add or edit products. When a vendor logs in, they will see a notice on their screen that they will need to connect their account before they can add products.
This will force the vendors to connect their accounts before they can add products and process sales.
Configuration
From the plugin options screen under WooCommerce > Payments – Stripe Connect. You will click the manage button. From here, there are various options that must be configured in order for the plugin to function correctly.
The plugin requires setting API keys and Client IDs to be able to communicate with the Stripe Connect platform. You will need to configure your Stripe account to make sure that you can process payments from customers and payout commissions to your vendors.
Please Note
If this information is incomplete or incorrect then your gateway will not function and you will not be able to have vendors connect their accounts to your marketplace.
You need to complete the following to ensure your Stripe account is configured correctly.
- API Keys
- Client IDs
- Return URI
- Webhook Signing Secret
- Branding
Your Stripe account can be in one of two modes
- Live Mode – Processing payments from customers and sending commission payouts to vendors. This is the mode you use when you launch your marketplace.
- Test Mode – Testing that the integration and marketplace are functioning correctly. This is done before you launch your marketplace.
Stripe Dashboard Live & Test Mode
There are two modes that your Stripe Account can be in: Live and Test Mode. This is configured using the toggle in the top right of the interface. When in test mode, an orange notice with “Test Data” will show.
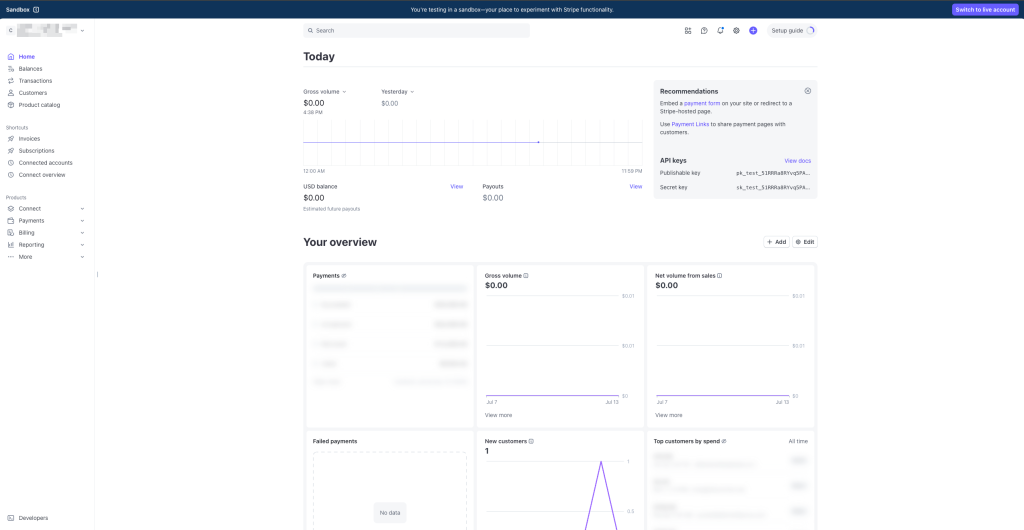
This will change your views between your live configuration and your test configuration. This setting is for your entire Stripe account, including your API keys and your Stripe Connect configuration.
API Keys
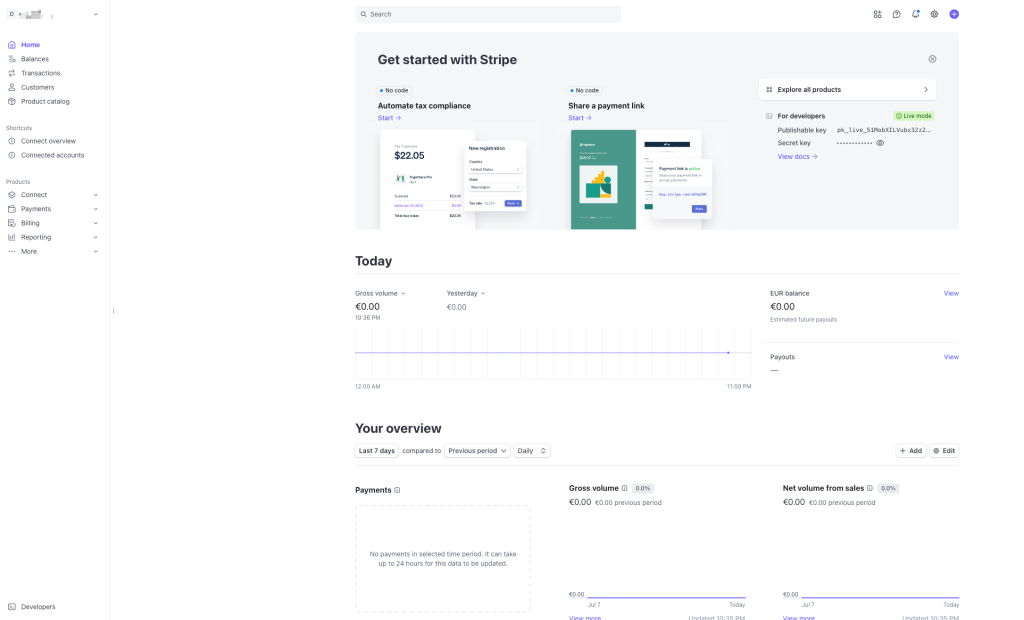
You will need to get your API keys for both your live and test environments. Log in to stripe.com (or create an account, if you haven’t created one) to gather your different keys.
Get Live API Keys from the Stripe Account
You will need to get your Live API keys from your Stripe account.
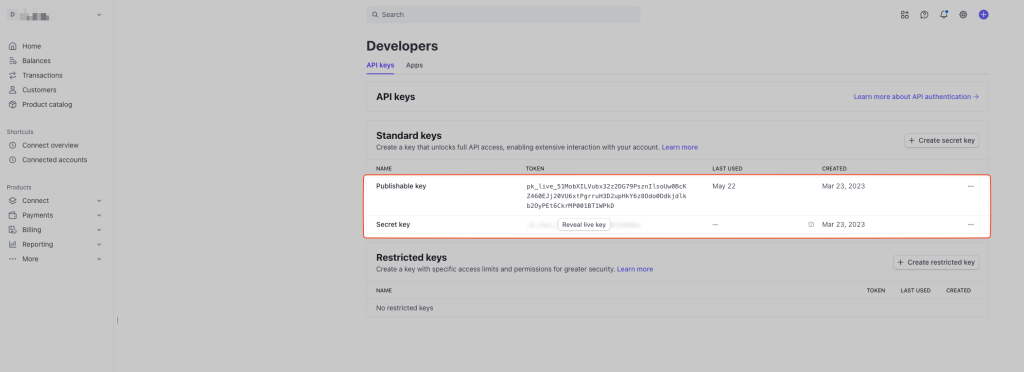
- Log in to Stripe
- Click on the Developers menu, bottom left of the Stripe dashboard
- Click API Keys on the menu on the left
- Click ‘Reveal Live key token’
- Copy the live key token
- Paste the Secret key in the plugin settings of WordPress
- Copy the Publishable key
- Paste the Publishable key into the plugin settings in WordPress admin.
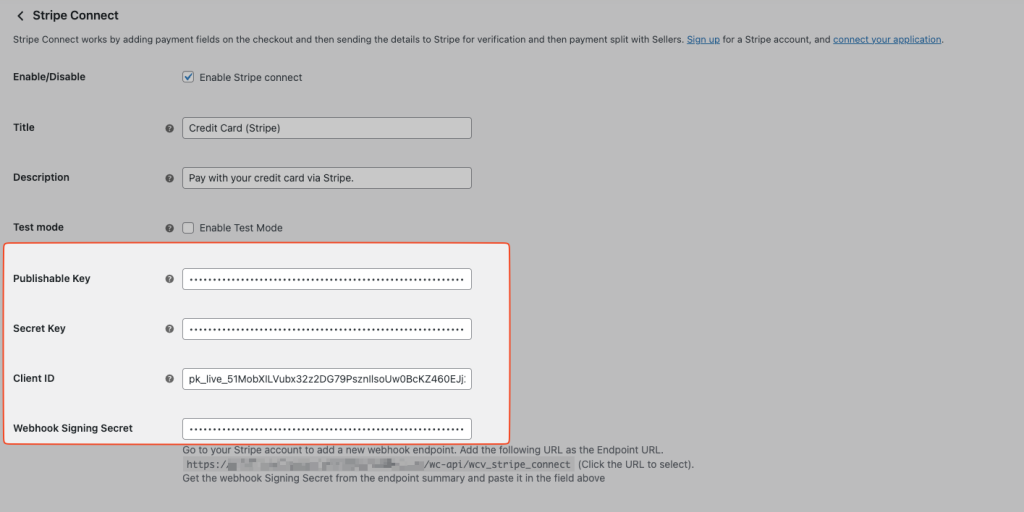
Plugin Configuration – Live API Keys
Paste the Secret and Publishable keys here
On your marketplace, go to: WordPress Dashboard > WooCommerce > Settings > Payment Gateways > Stripe Connect
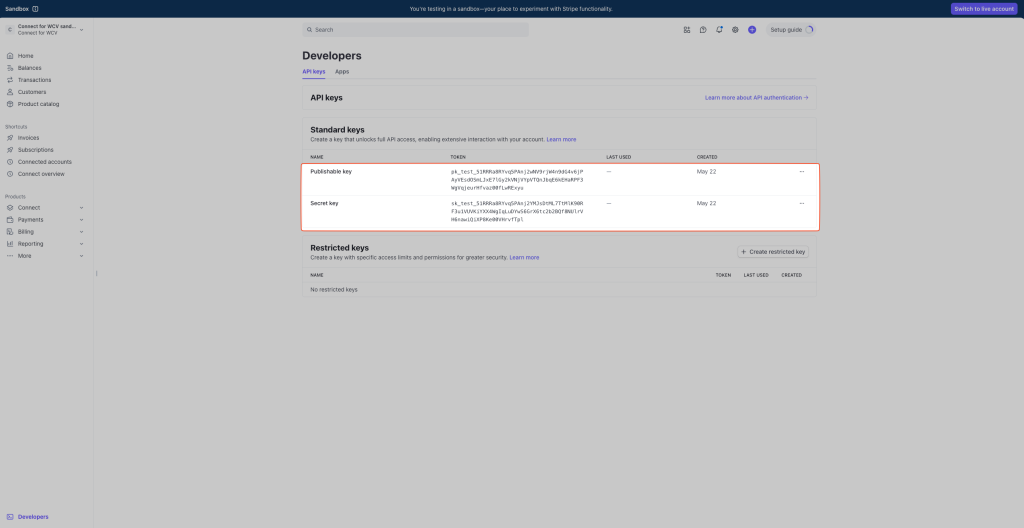
Get Test API Keys from the Stripe Account
You will need to get your Test API keys from your Stripe account.
- Log in to Stripe
- Click on the Developers menu bottom left of the Stripe dashboard.
- Click API Keys on the menu on the left
- Click ‘Reveal Test key token’
- Copy the test key token
- Paste the Secret key into the plugin settings WordPress admin
- Copy the Publishable key
- Paste the Publishable key into the plugin settings in the WordPress admin
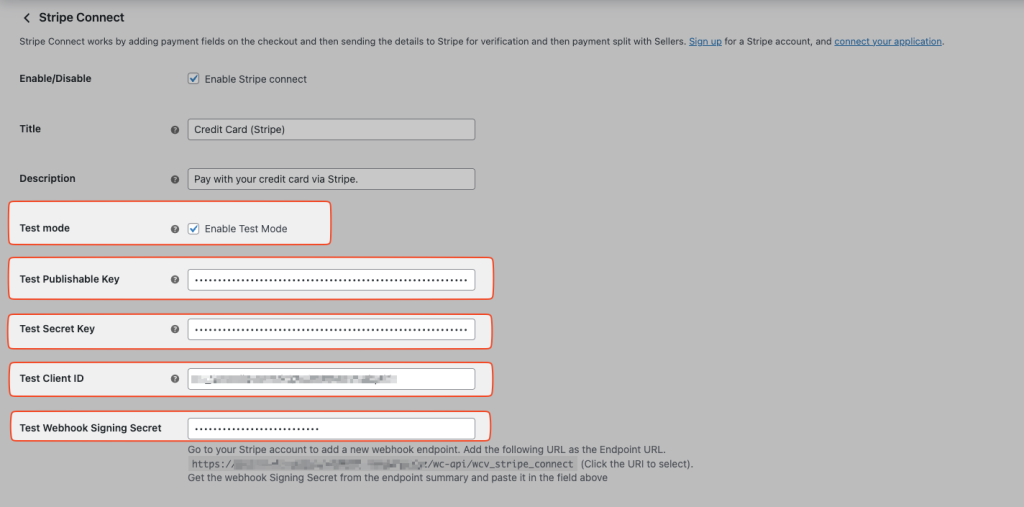
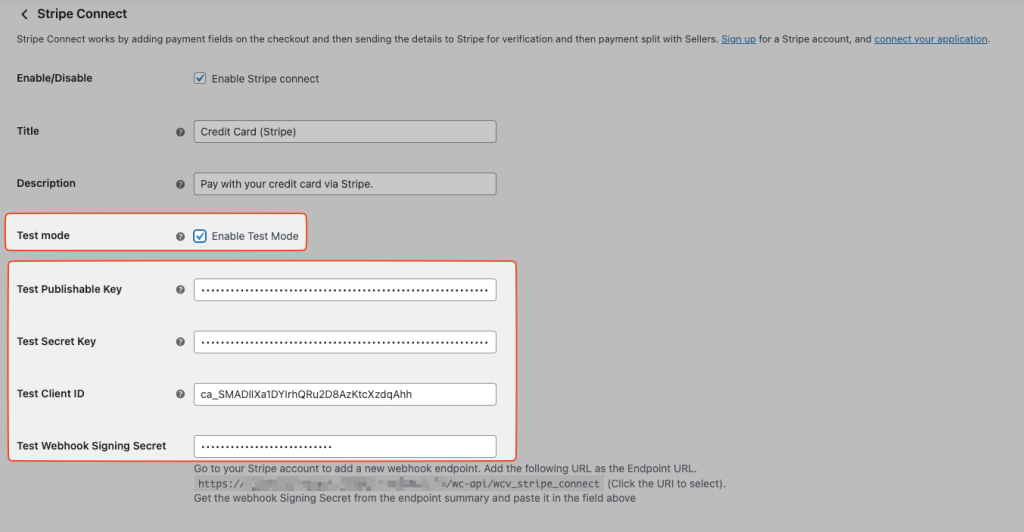
Plugin configuration Test Mode API Keys
On your marketplace, go to: wp-admin > WooCommerce > Settings > Payment Gateways > Stripe Connect
Paste the Secret and Publishable keys here
This will give you the information for the secret and publishable keys, but not your client ID.
Client ID
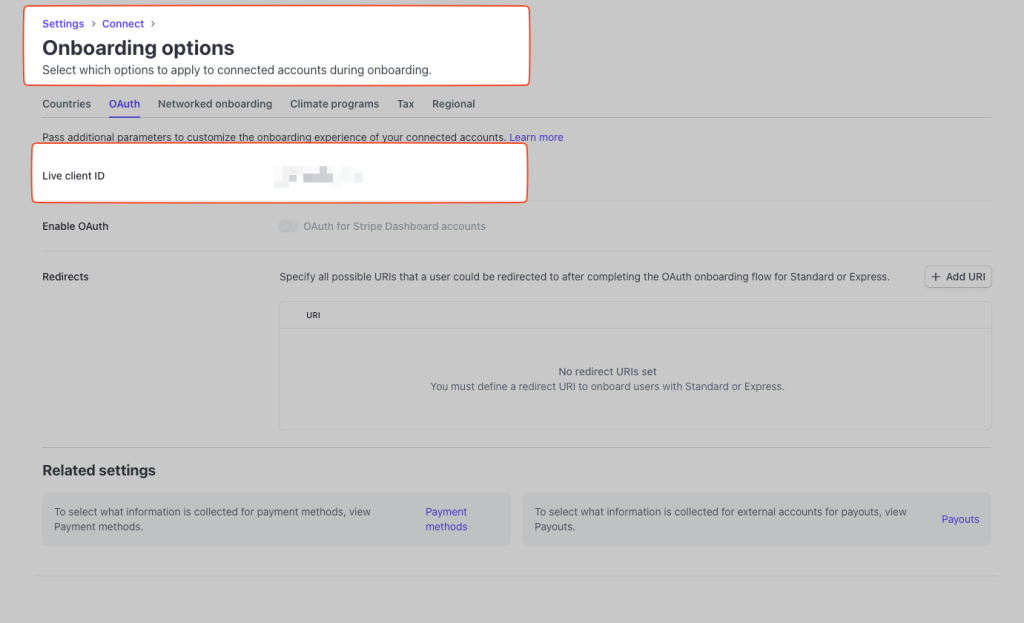
Once you have configured the live and test keys, you will need to configure the connect client ID. Click the Settings cog icon in the top right of the Stripe Dashboard. Then click Settings under Connect. If you have not configured Connect yet, you will need to click on the Connect menu item and click ‘get started’. Once you have created the application, you will need to get your Live and Test Client IDs.
Get Live Client ID from the Stripe account
You will need to get your Live Client ID from your Stripe account.
- Click Settings on the sub-menu to connect
- Then click Settings under Connect
- Ensure that the test mode toggle has not been enabled.
- Scroll down to the Integration section and copy the Live mode Client ID
- Paste the client ID into the plugin settings in WordPress
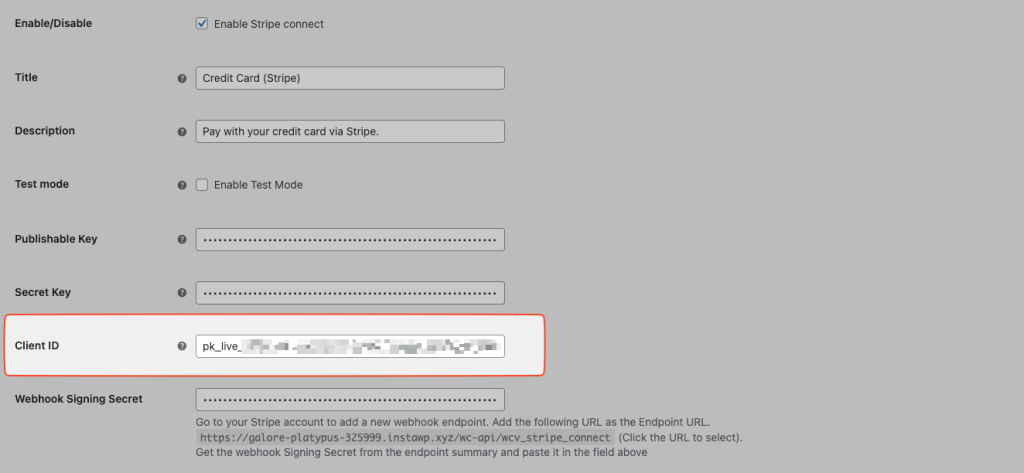
Plugin configuration for live Client ID
On your marketplace, go to: WordPress Dashboard > WooCommerce > Settings > Payment Gateways > Stripe Connect
Set Live Return URI in the Stripe account
The Return URI instructs Stripe where on your marketplace to return the connected account. You set your redirect page on the Stripe Connect settings page in your WordPress Admin. By default, this is set to the vendor dashboard page.
Please Note:
Please ensure that your redirect URI is set correctly based on the URL of the page you select. If this isn’t set correctly stripe connect will not function
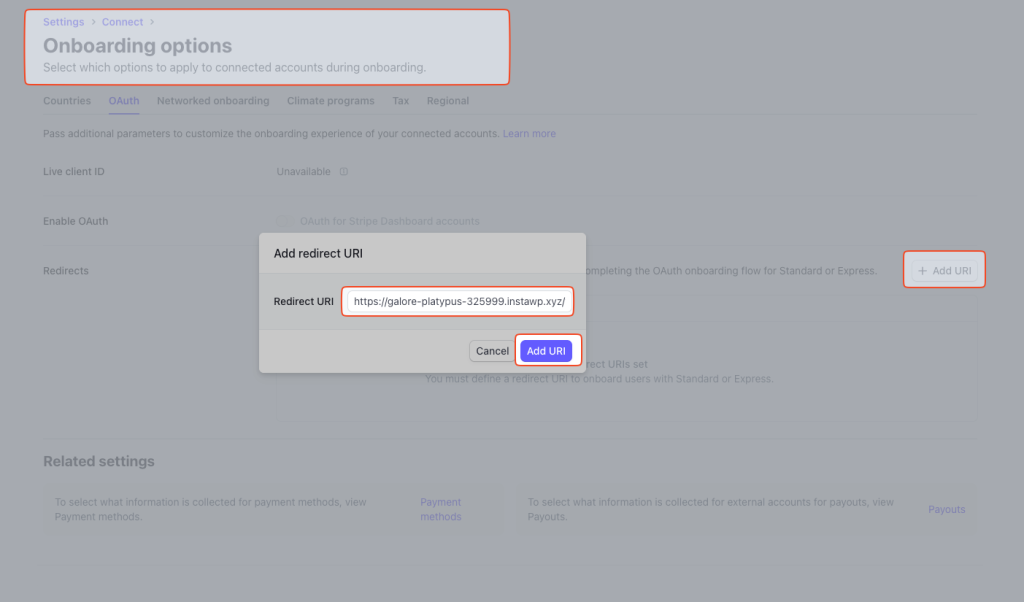
- On the same Stripe Connect Settings screen, you have redirect URIs
- Click on Add Redirect URI
- Enter the URL of your WooCommerce My-Account page (example: https://yourdomainname.com/my-account)
- Click Add URI
Get the Test Client ID from the Stripe account
You will need to get your Test Client ID from your Stripe account.
- Click Settings on the sub-menu to connect
- Then click Settings under Connect
- Ensure that the test mode toggle has been enabled.
- Scroll down to the Integration section and copy the Test mode client ID
- Paste the client ID into the plugin settings in WordPress when test mode is enabled.
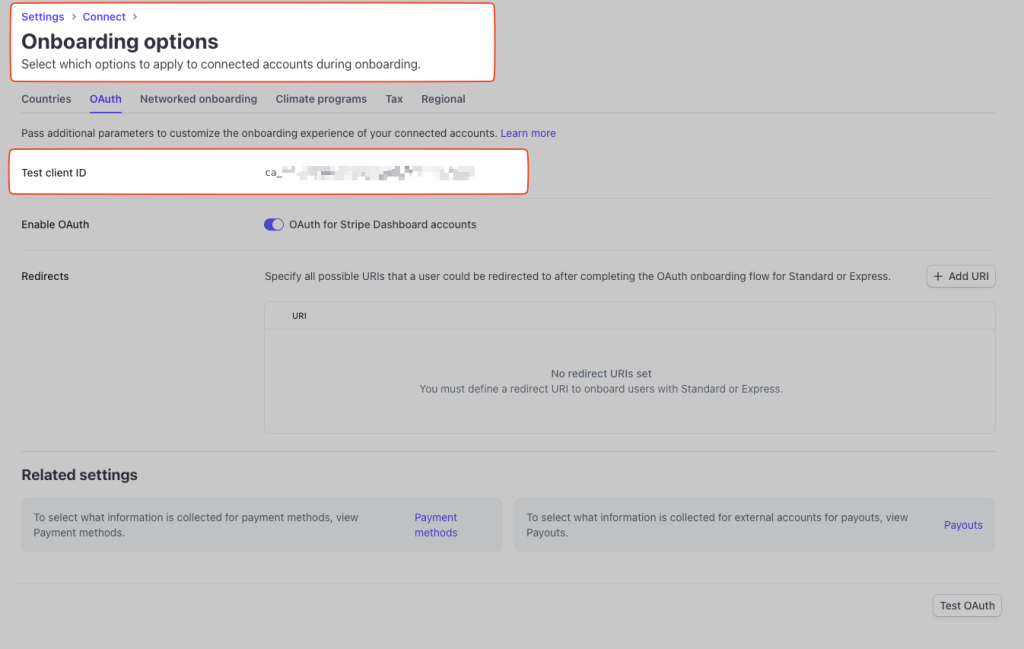
Plugin configuration for Test client ID
On your marketplace, go to: WordPress Dashboard > WooCommerce > Settings > Payment Gateways > Stripe Connect
Set Test Return URI in Stripe Account
The Return URI instructs Stripe where on your marketplace to return the connected account. You set your redirect page on the Stripe Connect settings page in your WordPress Admin. By default, this is set to the vendor dashboard page. This must be set for your test mode also.
Please note
Please ensure that your redirect URI is set correctly based on the URL of the page you select. If this isn’t set correctly stripe connect will not function. This should match exactly including the trailing slash on the end of the URL.
- On the same Stripe Connect setup screen, under Integration
- Click on Add URI
- Enter the URL of your WooCommerce My-Account page (https://yourdomainname.com/my-account/)
- Click Add URI
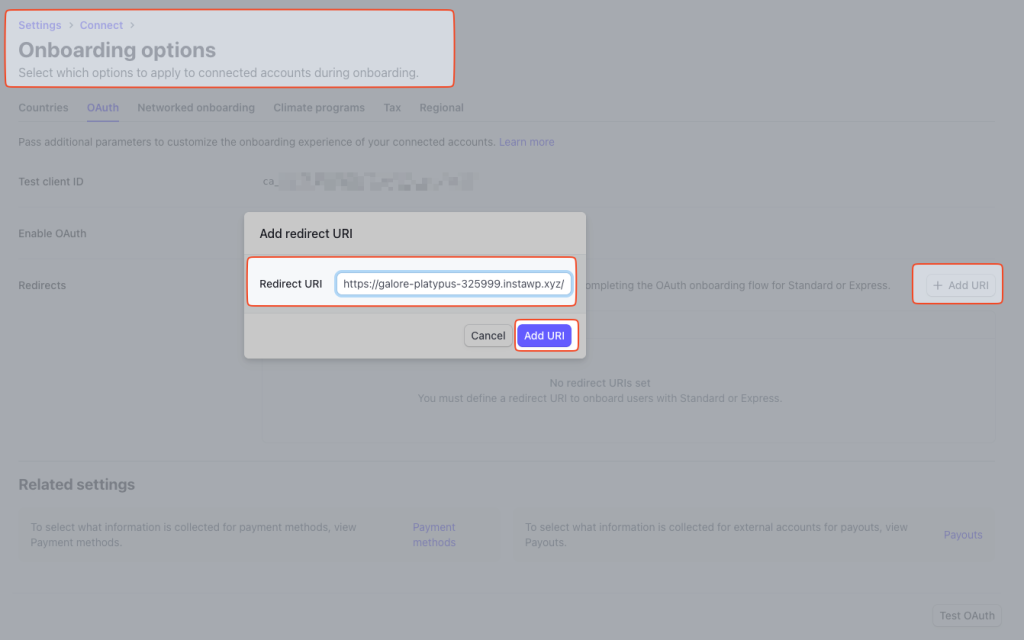
Please Note
Please ensure that your redirect URI is set correctly based on the URL of the page you select. If this isn’t set correctly stripe connect will not function. This should match exactly including the trailing slash on the end of the URL
Summary
Once you have configured your API keys and client IDs, and both your return URIs are configured, you will be ready for testing or processing payments.
Stripe Connect Button Theme
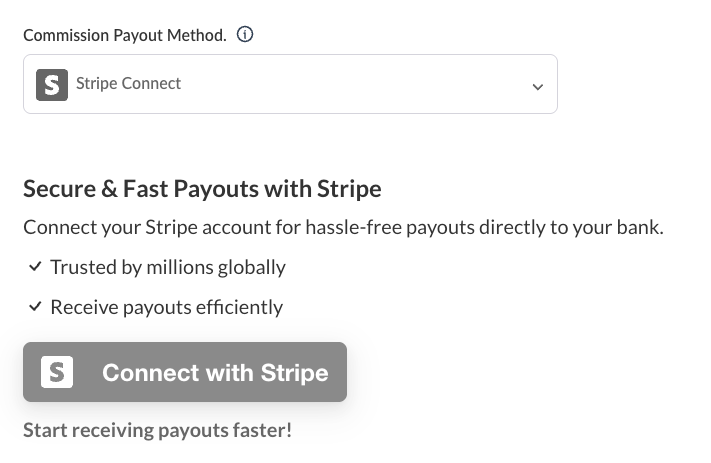
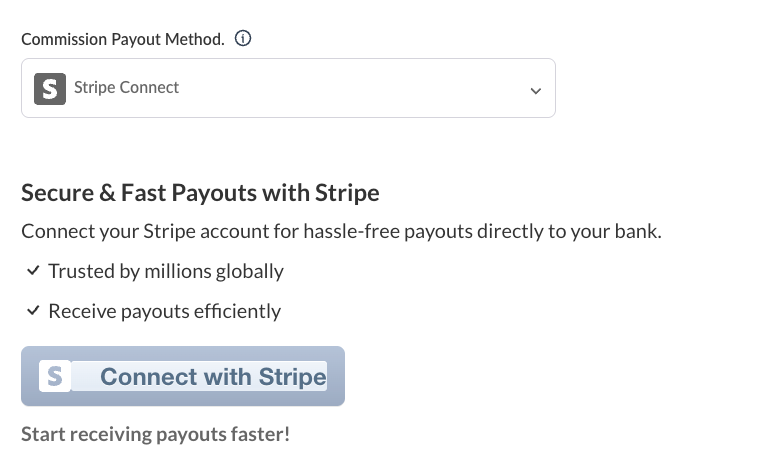
There is a new option in version 2.x and above that allows you to change the color of the stripe connect button that the vendors see. So instead of only the dark blue option you are used to seeing, you have a total of 4 different options.
Stripe Charge Support
Direct Charges
The plugin supports direct charges with standard Stripe accounts and is the default behaviour of the plugin in all versions. Direct charges are charged to the connected account directly. When using direct charges, the following must be taken into account
- The connected account is responsible for the cost of the Stripe fees, refunds, and chargebacks
- The payment itself appears as a charge in the connected account, not in your platform account
- Charges directly increase the connected account’s balance
- Your platform’s balance is only increased via application fees
Separate charges and transfers
Please Note
Stripe supports separate charges and transfers in the following regions: Australia, Canada, Europe, Japan, Malaysia, New Zealand, Singapore, and the U.S. Separate charges and transfers are supported if both your platform and the connected account are in the same region (for example, both in Australia).
We have introduced separate charges and transfers in version 2.0 of the plugin. Check this option to enable Separate Charges and Transfers, which allows more advanced payment features, including 3D Secure Card. This also ensures that the plugin is SCA-ready.
When using separate charges and transfers, the following must be taken into account
- Your platform account is responsible for the cost of the Stripe fees, refunds, and chargebacks, and handling these for the connected account
- The payment itself appears as a charge in your platform account, with a separate, manual allocation to the connected account, which decreases your platform’s balance and increases the connected account’s balance
- Funds from charges can be allocated to more than one connected account
- Platform fees are earned by allocating less than the entire charge amount to the connected account
For more information on the different charge types, please see the Stripe Documentation available here – https://stripe.com/docs/connect/charges#choosing-approach
Branding
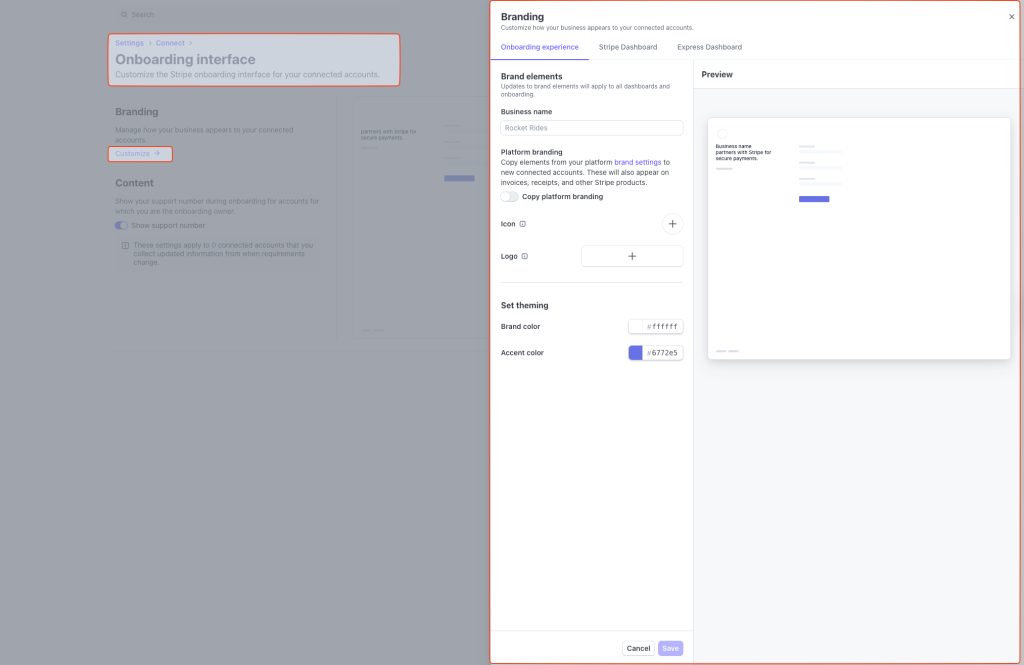
Stripe provides some settings so that you can configure the landing page when the vendors click connect. This allows you to change basic colours, add your marketplace name, and logo. This is optional and up to you.
Testing the Gateway
To test the Stripe Gateway at checkout, use credit card number “4242424242424242” with any valid expiration date, and any CVC code you like. The gateway must be in test mode for this to work.
3d Secure Testing
To test 3d Secure for US and EU Stripe accounts, you can use the following test credit card number: 4000 0027 6000 3184 with any valid expiration date, and any CVC code you like.
Troubleshooting
Vendor commissions will only be paid out of the commission amount is over $0.50. This is a limitation of Stripe Connect. This will be for both test and live modes.
Conclusion
That’s it! You’re done configuring your store’s Stripe.com account for use. If you change from Test to Live, be sure you do it on Stripe.com and in the WooCommerce Stripe Gateway Settings, as the settings must match on both sites.
Problems with your Stripe Account?
If you have any issues with your Stripe account please contact Stripe. We cannot assist you with configuring your Stripe Account.
