WooCommerce subscription products have become a popular way for e-commerce platforms to offer continuous value to customers while ensuring recurring revenue streams. Instead of making one-time purchases, customers sign up to receive products or services regularly. This model benefits both customers and businesses, providing convenience and steady earnings.
Thankfully, the WooCommerce marketplace solution, WC Vendors, allows marketplace operators and their vendors to easily create, sell, and manage subscription products.
In this comprehensive guide, we’ll teach you how to use WC Vendors to set up WooCommerce subscription products for your marketplace. This way, you can offer subscription box services to your customers and enjoy consistent income.
So let’s get right into it!
I. What Are WooCommerce Subscription Products?
WooCommerce subscription products are items or services for sale on WooCommerce stores that customers pay for on a regular basis, such as weekly, monthly, or yearly. Instead of buying a product just once, customers sign up to receive it continuously.
For example, an online marketplace or store could sell WooCommerce subscription products such as:
- Art supplies
- Beauty boxes
- Book clubs
- Clothing and fashion boxes
- Coffee or tea subscriptions
- Educational courses
- Fitness programs
- Gardening kits
- Grocery delivery
- Health and wellness products
- Home cleaning supplies
- Magazine or newspaper subscriptions
- Meal kits
- Pet supplies
- Snack boxes
- Software subscriptions
- Stationery and office supplies
- Streaming services
- Toy and game boxes
- Wine or craft beer clubs
This subscription model ensures that customers get the products or services they need regularly without having to reorder each time. In turn, the e-commerce platform enjoys recurring income due to regular customer payments.

II. Why Sell WooCommerce Subscription Products?
Selling WooCommerce subscription products has been extremely lucrative for many businesses. For instance, in 2020, subscription-based e-commerce sales in the United States exceeded 23 billion U.S. dollars.
In 2022, digital media and entertainment platforms enjoyed a whopping conversion rate of 43.3%. Meanwhile, education services enjoyed a conversion rate of 42.1 percent.
Furthermore, experts foresee an extremely bright future for the subscription model. For example, the worldwide income from meal kit deliveries is expected to keep growing, with the period from 2024 to 2028 predicted to see a total increase in revenue of 4.9 billion U.S. dollars. That’s an incredible 33.58% rise!
If you’re wondering about the specific benefits of selling WooCommerce subscription products, they are as follows:
- Steady income: Businesses get predictable, recurring revenue from repeat customers.
- Customer loyalty: Subscriptions help build long-term relationships with customers who keep coming back.
- Convenience: Customers appreciate the ease of receiving products or services regularly without having to think about reordering.
- Better planning: Businesses can better manage inventory and predict demand because they know how many customers they have.
- Customer insights: Subscriptions provide valuable data on customer preferences and habits. Thus, they can help businesses improve their offerings.
Overall, WooCommerce subscription products create a win-win situation for both businesses and customers.
III. How To Create Simple WooCommerce Subscription Products For Your Vendors To Sell: A 4-Step Guide
As the marketplace operator, creating your vendors’ WooCommerce subscription products is super easy. However, before you can start enjoying recurring income, make sure you’ve downloaded, installed, and activated the following tools:
- WordPress: This serves as the foundation of your website.
- WooCommerce: This powerful plugin transforms WordPress sites into online stores with robust e-commerce functionality.
- WC Vendors Pro: With this popular WooCommerce plugin, you can turn a regular online store into a multi-vendor marketplace.
- WooCommerce Subscriptions: This plugin allows you to create subscription products for your WooCommerce store. You need this tool for the next plugin to work.
- WC Vendors WooCommerce Subscriptions: This plugin allows you to create WooCommerce subscription products for your marketplace. In other words, it allows you to convert your multi-vendor platform into a subscription box service.
Lastly, you should have at least one payment method that supports subscriptions.
If you want to know how to set up a payment method, check out this WooCommerce guide.
If you want more information on how to convert a traditional WooCommerce store into a multi-vendor platform, check out our following comprehensive guides:
- How To Create An Online Marketplace: A Beginner’s Guide
- How To Build Your First Multi-Vendor Ecommerce Website (Full Guide)
With that in mind, let’s learn how you can create WooCommerce subscription products for your vendors to sell!
Step 1: Create a product
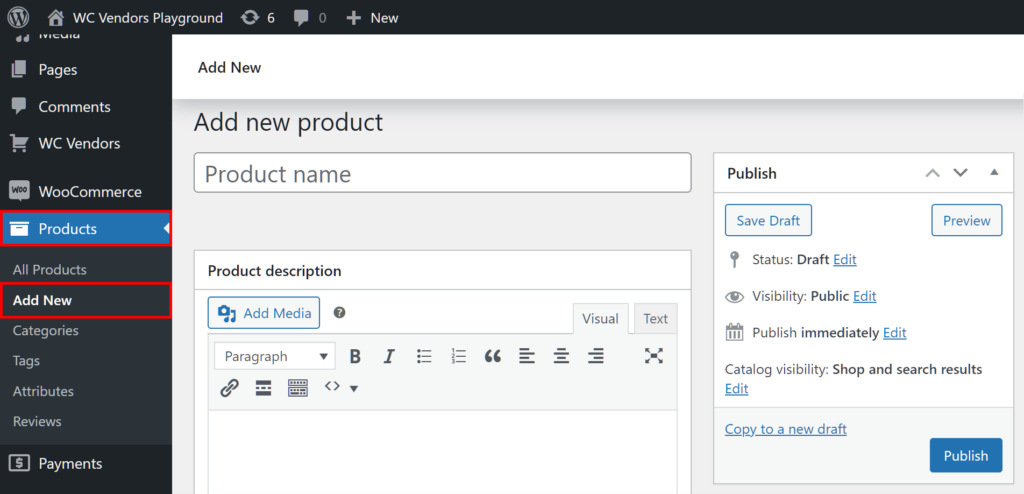
First, you’ll have to add a new product to your catalog. Therefore, go to your WordPress dashboard and click Products > Add New. This takes you to the Add new product page.
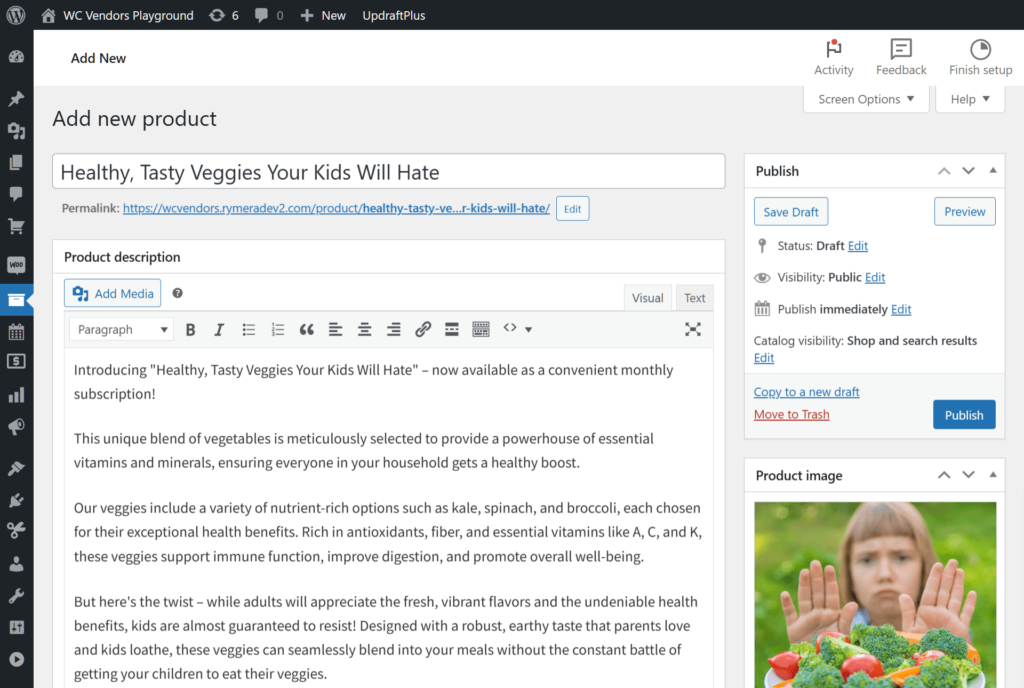
Provide your product with a Product name. For our example, we’ll create a subscription product called “Healthy, Tasty Veggies Your Kids Will Hate.”
We also recommend giving your product a Product description and Product short description. Make sure these state that your product is a subscription product.
Once you’re done with that, give your item a product image and, if possible, an image gallery. In addition, it’s a good idea to choose its category(ies) and tag(s).
Now, onto the next step!
Step 2: Create a simple subscription
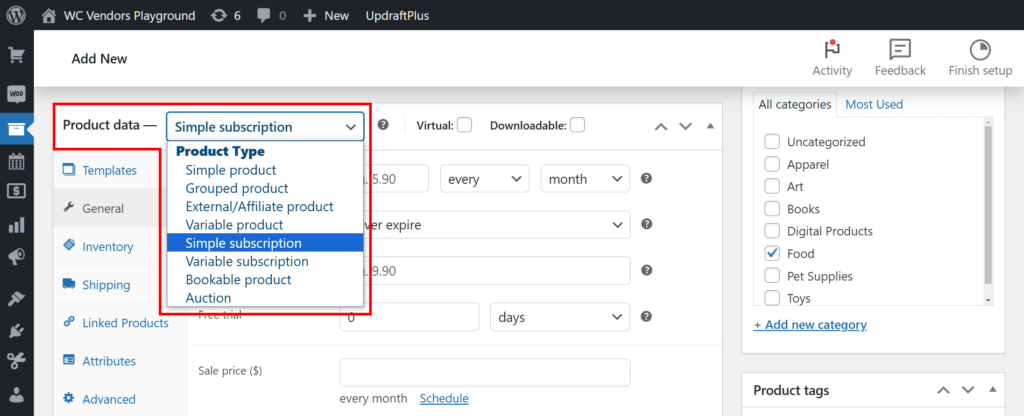
Scroll down to the Product data box. Then, click the dropdown menu next to the “Product data” title and select “Simple subscription.” This ensures the product you’re creating is a subscription product.
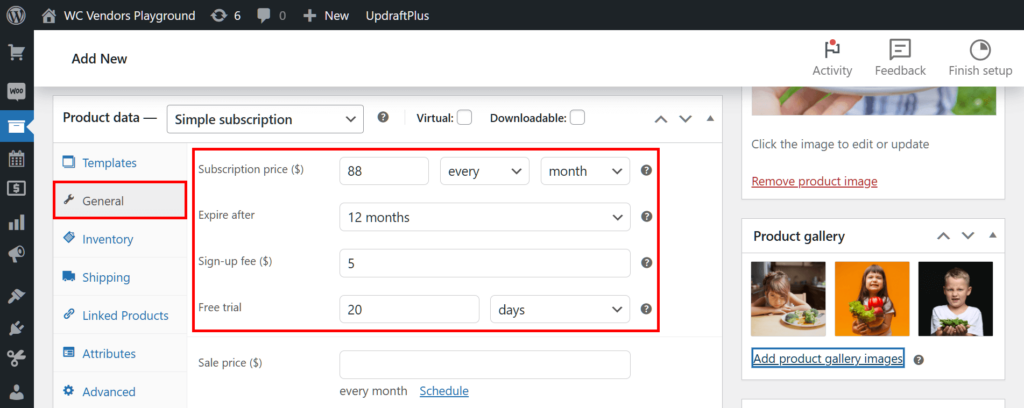
Next, click the General panel and enter crucial information about your subscription product.
Let’s discuss your options!
Subscription price ($)
Here, you enter how much your product costs, the billing interval, and the billing period.
For example, we’ll price our “Healthy, Tasty Veggies Your Kids Will Hate” at $88 every month. Alternatively, we can change the billing interval to daily, weekly, or yearly, remembering to modify the price as appropriate for each interval.
These are perhaps the most important details to consider in your preparation for generating steady revenue.
Expire after
This lets you point out how many months after purchase it takes before the subscription is no longer valid.
For instance, we can set the expiry to occur after 12 months. Otherwise, we can choose “Never expire” or any period between “1 month” and “24 months.”
Sign-up fee ($)
You can have customers pay an initial fee to enjoy your subscription.
For example, we can set a sign-up fee of $5.
Free trial
You can let customers try your WooCommerce subscription products for free, charging their first recurring payment only after the trial period ends.
For instance, we can set a 20-day trial period. Alternatively, this period can take weeks, months, or days. However, the system doesn’t allow you to exceed 90 days, 52 weeks, 24 months, or 5 years.
In addition, take note that if you have a sign-up fee, the customer will be charged at the start of the subscription regardless of the free trial period.
Furthermore, the free trial period is added to the start of the length of time you set for the Expire after option.
For full details and step-by-step instructions on how to offer free trial on your marketplace,
check out this ultimate guide:
How To Setup A Free Trial Period For WooCommerce Subscription Products
Step 3: Choose your vendor
Scroll to the Vendor box at the bottom of the page. Then, click the dropdown menu and enter the username of the vendor who’ll be selling your newly created subscription product.
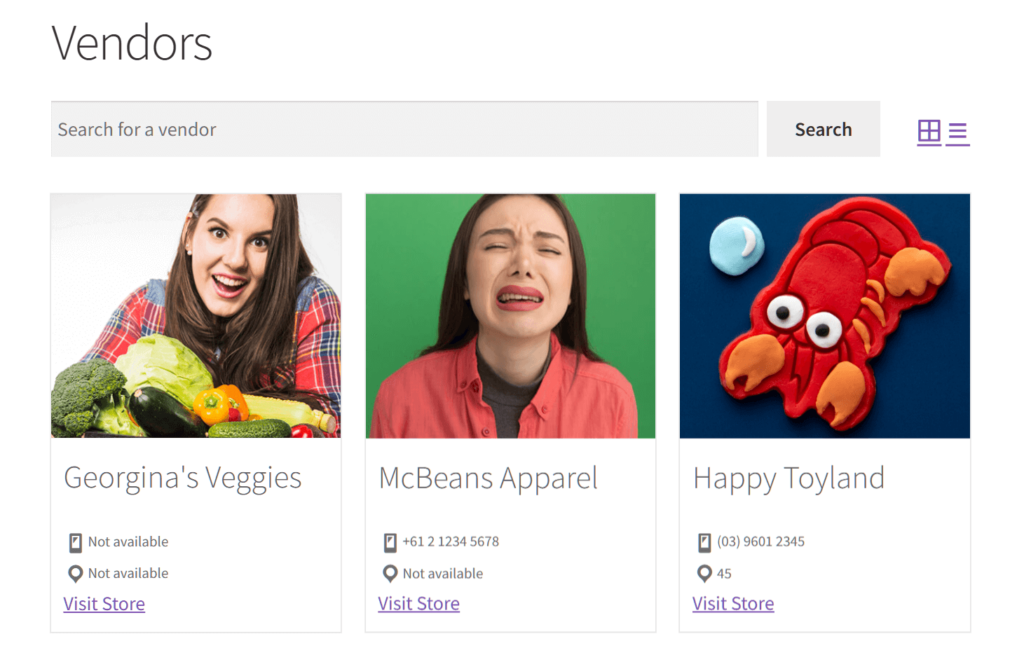
Alternatively, you can enter the name of the vendor’s store. In the case of our example, it’s “Georgina’s Veggies.”
Step 4: Publish your product
Now, go to the Publish box in the upper right corner of the page and click the Publish button. This makes your subscription product available in your vendor’s store.
And that’s it! Customers can now purchase your simple subscriptions, which means you’re ready to reap the rewards of stable earnings!
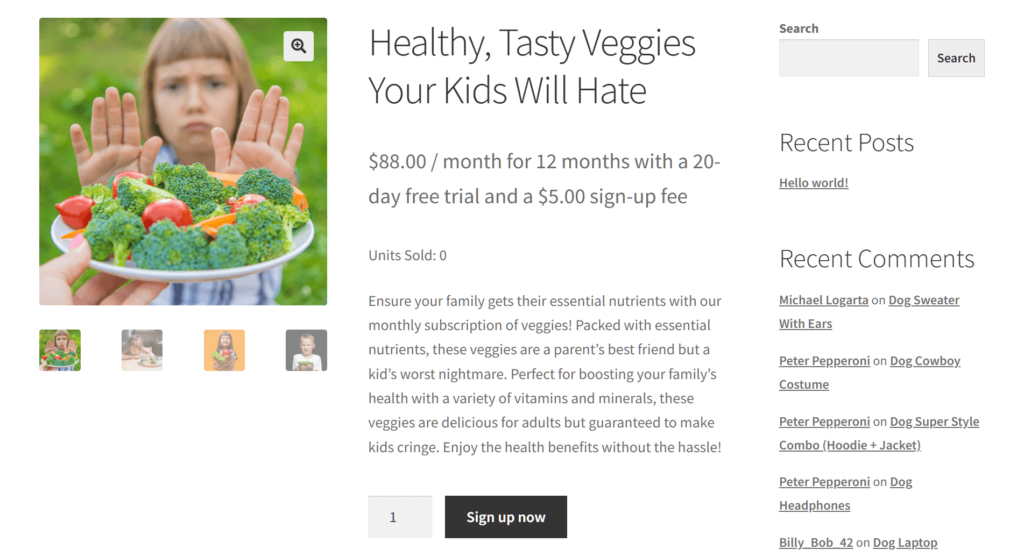
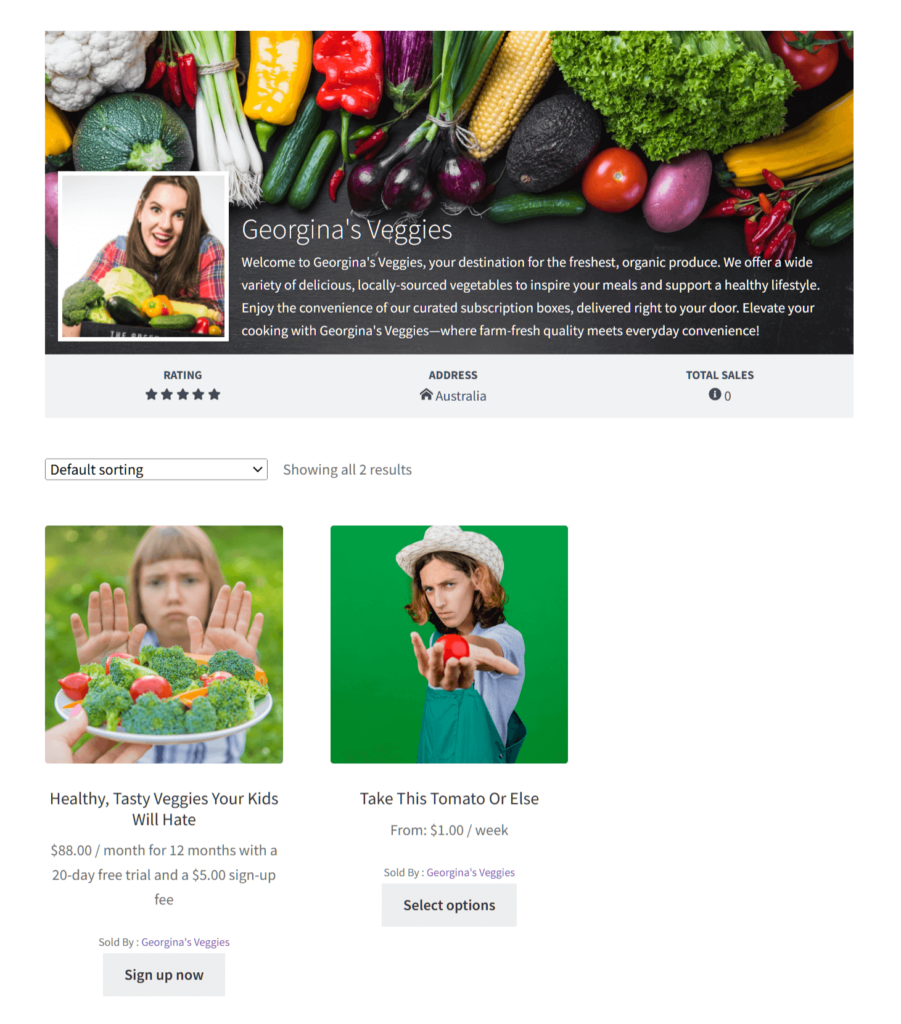
Below, you can see how the product appears to customers on the marketplace frontend.
As you can see above, the product listing for “Healthy, Tasty Veggies Your Kids Will Hate” makes it clear that the subscription costs $88 per month. In addition, it lasts 12 months, has a $5 sign-up fee, and offers a 20-day trial period.
To avail of the subscription, a customer must simply click the “Sign up now” button.
For more information on how to create and manage products, check out this WooCommerce documentation.
IV. How To Create Variable WooCommerce Subscription Products For Your Vendors To Sell: Another 4-Step Guide
What if you want customers to pick the subscription intervals? For example, what if you want to give them the ability to choose daily, weekly, monthly, or yearly subscriptions?
Instead of creating simple WooCommerce subscription products, you create variable WooCommerce subscription products.
Step 1: Create a product
This is similar to Step 1 of creating a simple subscription product.
Step 2: Create a variable subscription
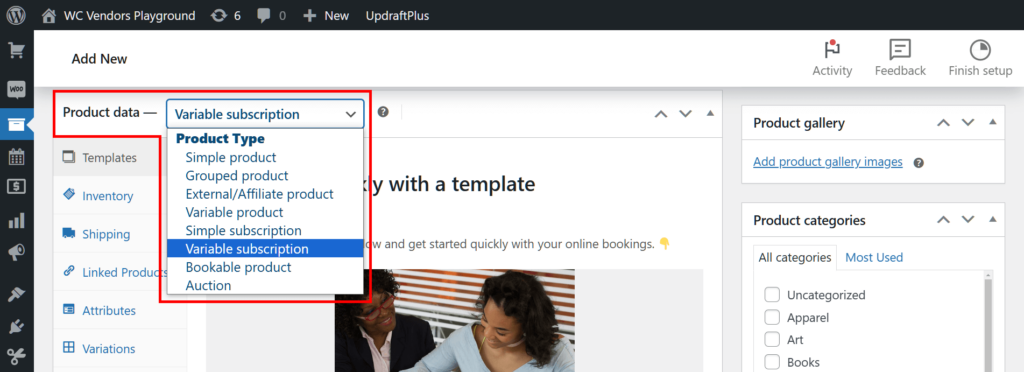
Scroll down to the Product data box. When you click the dropdown menu next to the “Product data” title, select “Variable subscription.”
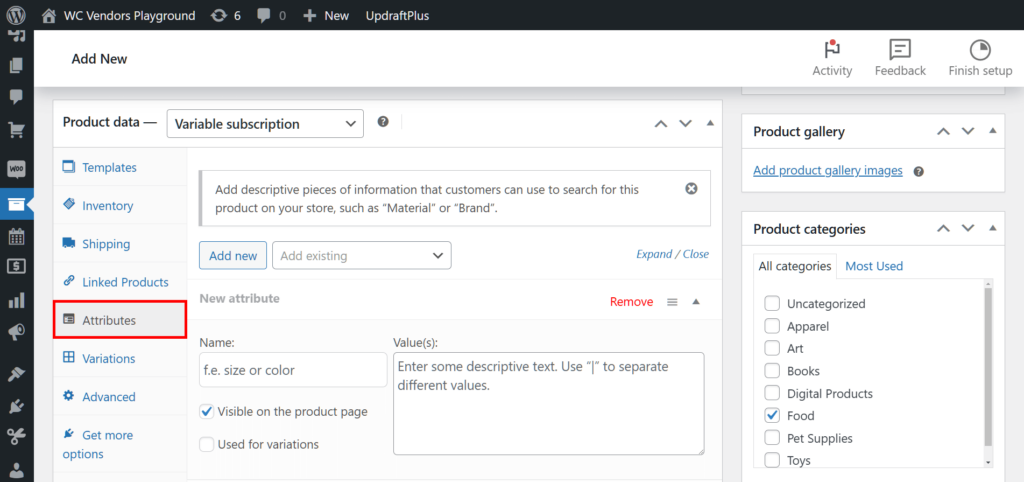
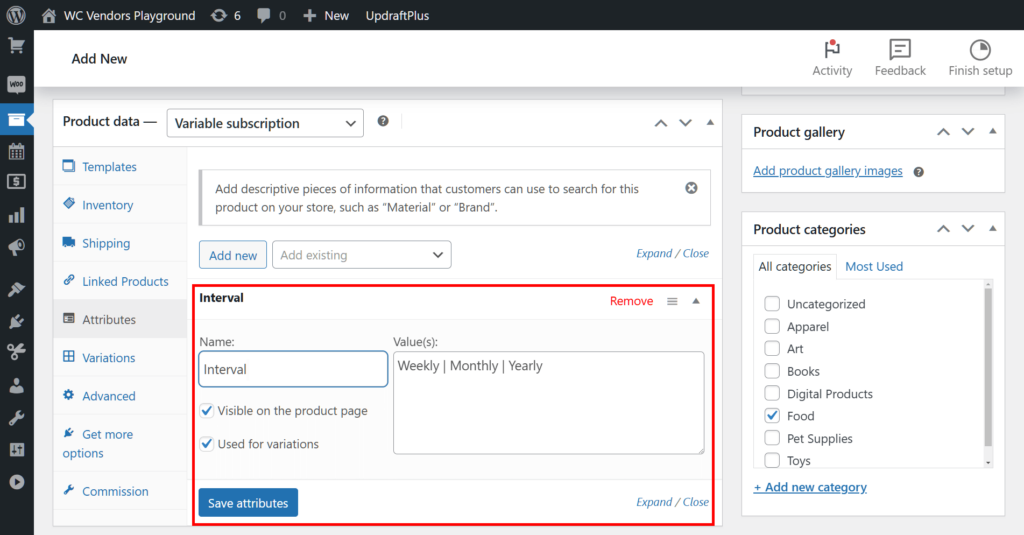
Next, click the Attributes panel.
The Attributes area is where you can create product attributes, which are descriptive pieces of information that customers can use to search for a product in your marketplace. For example, you can create attributes such as “size” or “material.”
Basically, attributes allow you to separate products into variants.
To create a new attribute, enter its name in the Name entry field. In our example, we want our product, “Take This Tomato Or Else,” to be available at specific subscription intervals. Thus, we’ll name the attribute “Interval.”
Next, we must fill the Value(s) text box with options a customer can choose from. Continuing with our example, we’ll enter weekly, monthly, and annual subscription intervals. Make sure to use “|” to separate the values.
So, in our case, we should write: “Weekly | Monthly | Yearly”
Finally, make sure the checkboxes for Visible on the product page and Used for variation options are ticked.
Once you’re done, click the Save attributes button.
Step 3: Finalize the product variations
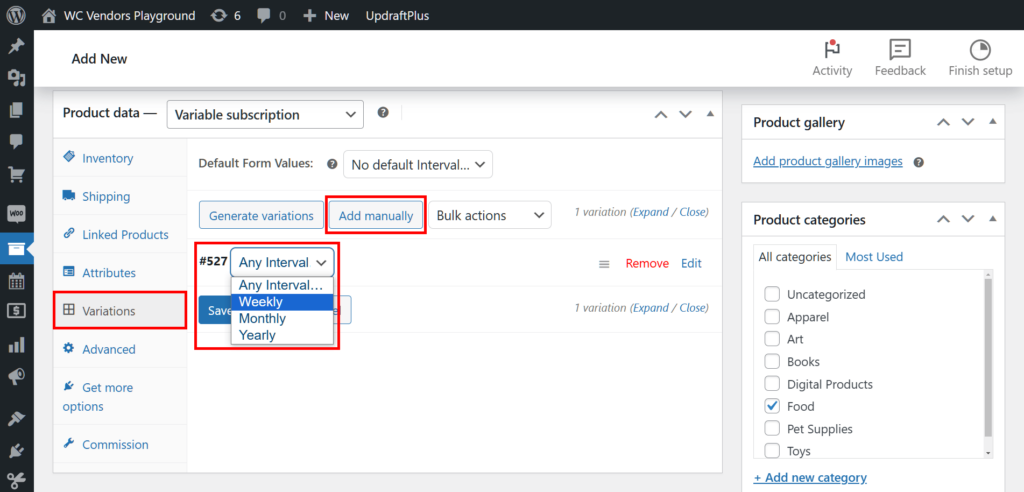
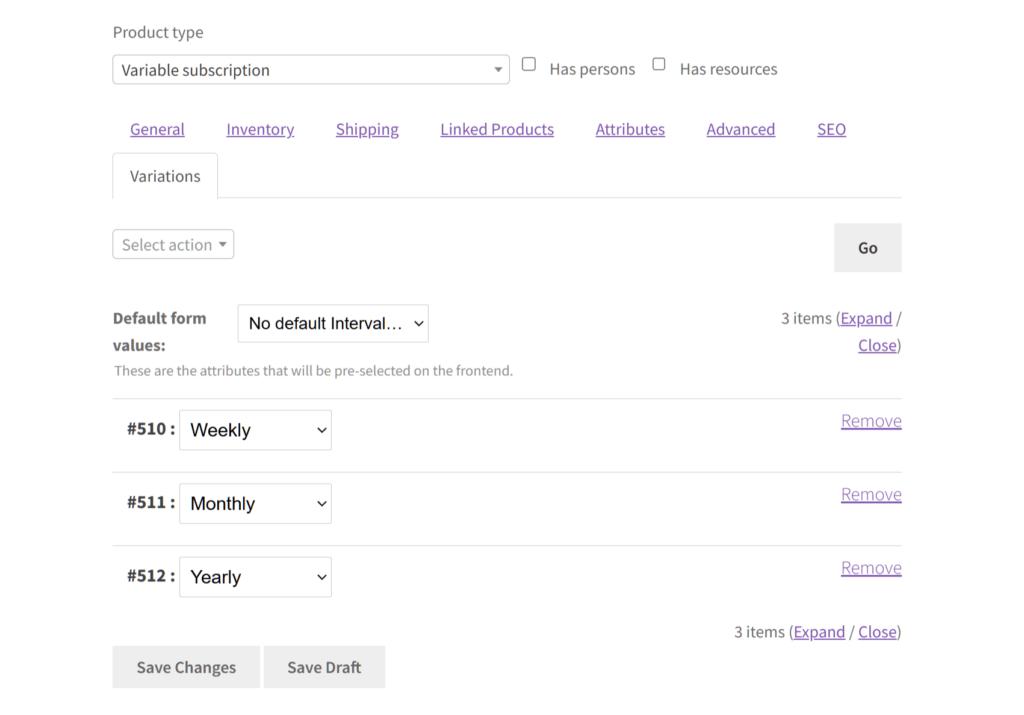
Go to the Variations panel. Then, click the Add manually button.
Once a dropdown menu appears, select one of your attribute’s values. In our case, we’ll select “Weekly.”
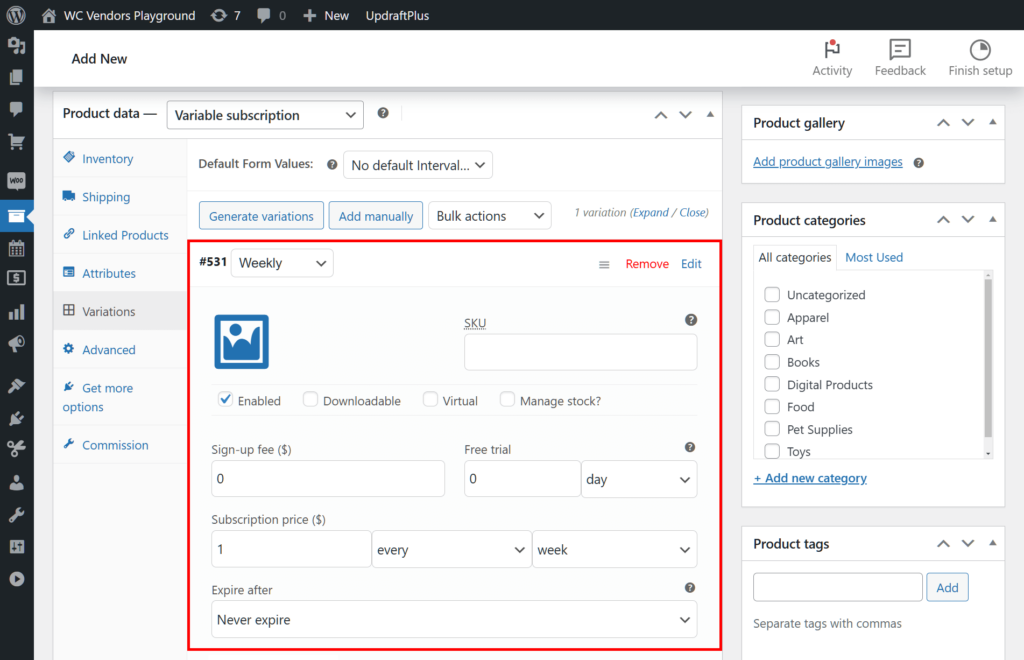
Now, select the attribute value’s Edit button. This lets you access many options allowing you to enter information about the product variation. Provide all relevant product information, including its image(s), description, etc.
In addition, you can now set the product’s Subscription price ($), Expire after period, Sign-up fee ($), and Free trial period. This is the same as Step 2 of setting up a simple subscription product.
Lastly, click the Save changes button.
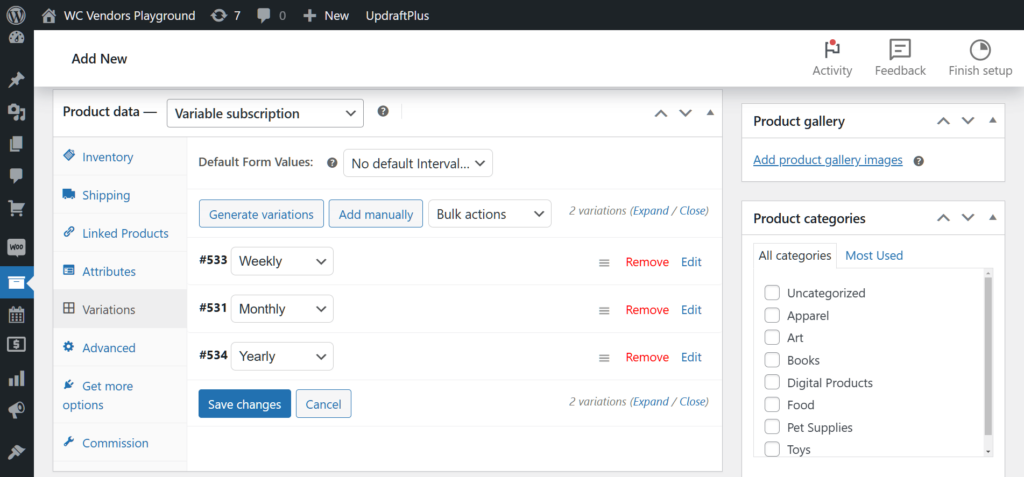
Repeat the process for every attribute you created in the previous step. This creates variations for your product.
In our example, we entered product information for the “Weekly,” “Monthly,” and “Yearly” variations of the “Take This Tomato Or Else” product. As a result, we now have three variations of our variable subscription, allowing customers to purchase it weekly, monthly, or yearly.
Step 4: Choose your vendor
This is similar to Step 3 of creating a simple subscription product.
Step 5: Publish your product
This is similar to Step 4 of creating a simple subscription product.
And you’re done! Customers can now purchase your variable subscription. Moreover, they can choose how often to pay for the subscription. Both can go a long way in helping you gain continuous income!
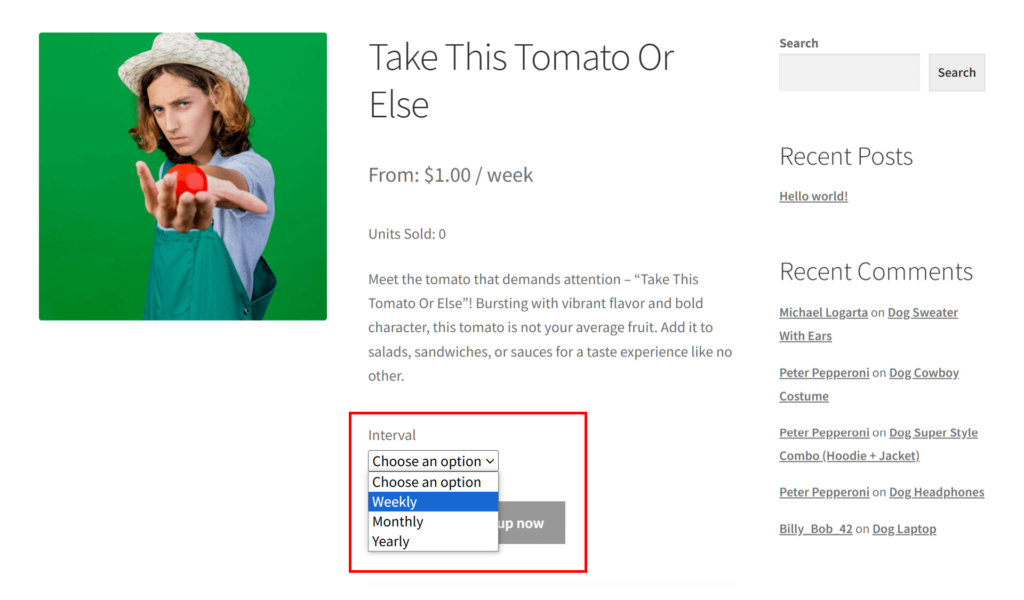
Below, you can see how the variable subscription appears to customers on the marketplace frontend.
As illustrated, customers are presented with a dropdown menu that lets them choose the subscription interval.
Once they’ve made their choice, all a customer must do to avail of the subscription is to click the “Sign up now” button.
For more information on product variations, read our comprehensive guide, “Product Variations: How To Diversify Your Marketplace Offerings.”
V. How Vendors Can Create WooCommerce Subscription Products
Of course, as the marketplace operator, you have many things on your plate. Thus, it helps to let your vendors create WooCommerce subscription products themselves and contribute to securing repeated revenue for your platform. Thankfully, WC Vendors lets vendors do this via their pro dashboard.
The steps are extremely similar to those described above. The only difference is vendors have to implement the steps via the aforementioned dashboard.
However, before we show you how vendors can create WooCommerce subscription products, you, as the marketplace vendor, should enable a few options.
Option 1: Allow vendors to create attributes
By default, vendors can’t use the dashboard to create attributes. In other words, you’ll have to create attributes for them. This can be a lot of work.
Thankfully, you can enable an option that allows vendors to create attributes via the dashboard.
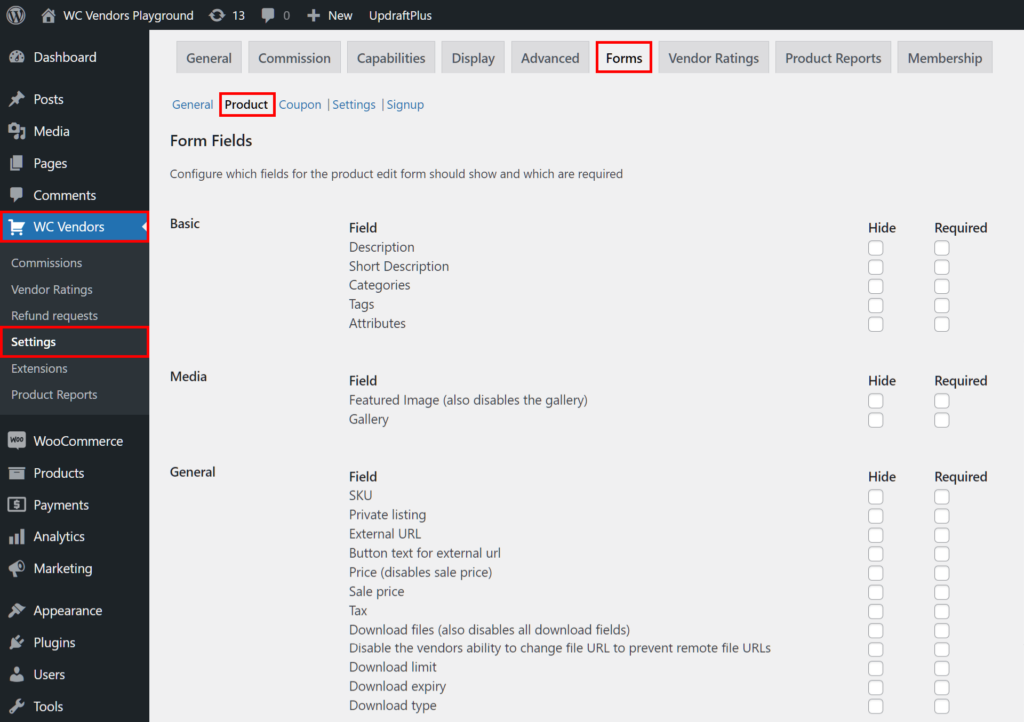
First, head to your WordPress dashboard. Then, click WC Vendors > Settings > Forms > Product.
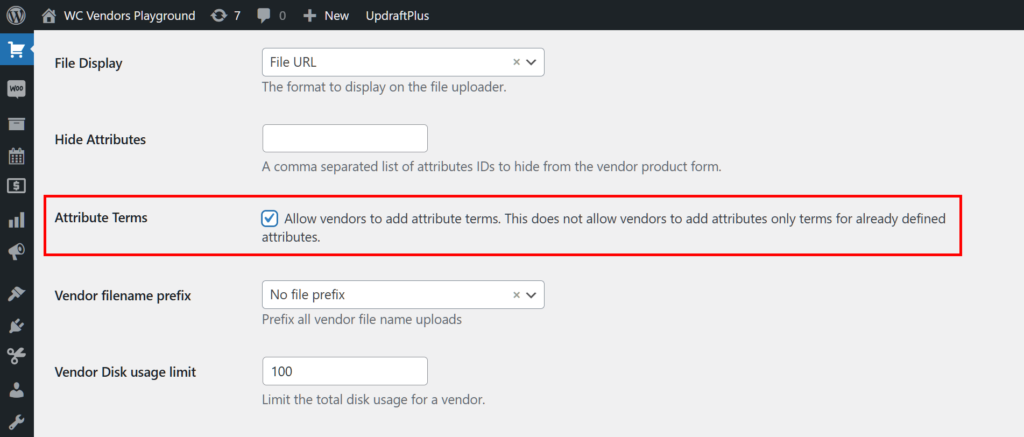
Now, scroll down to the Attribute Terms option and enable it by ticking its checkbox.
Once that’s done, click the Save Changes button at the bottom of the page. Now, vendors can use the pro dashboard to create attributes such as “Weekly,” “Monthly,” and “Yearly” themselves. In other words, they can help generate regular earnings for your marketplace!
Option 2: Allow vendors to cancel subscriptions
By default, only customers and the marketplace operator can cancel subscriptions. However, if you wish, you can also give vendors this ability.
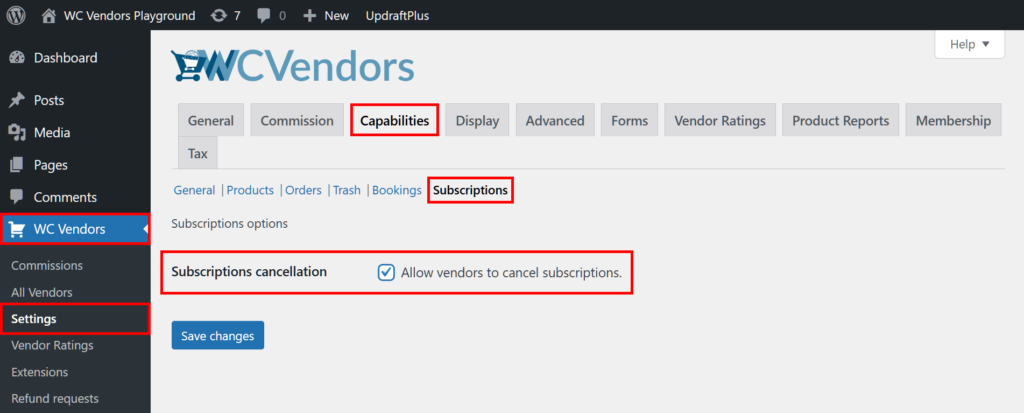
First, return to your WordPress dashboard and click WC Vendors > Settings > Capabilities > Subscriptions. Next, enable the Subscriptions cancellation option by ticking its checkbox.
Finally, click the Save Changes button. And you’re done! Vendors can now cancel subscriptions themselves.
Using the Pro Dashboard to create WooCommerce subscription products
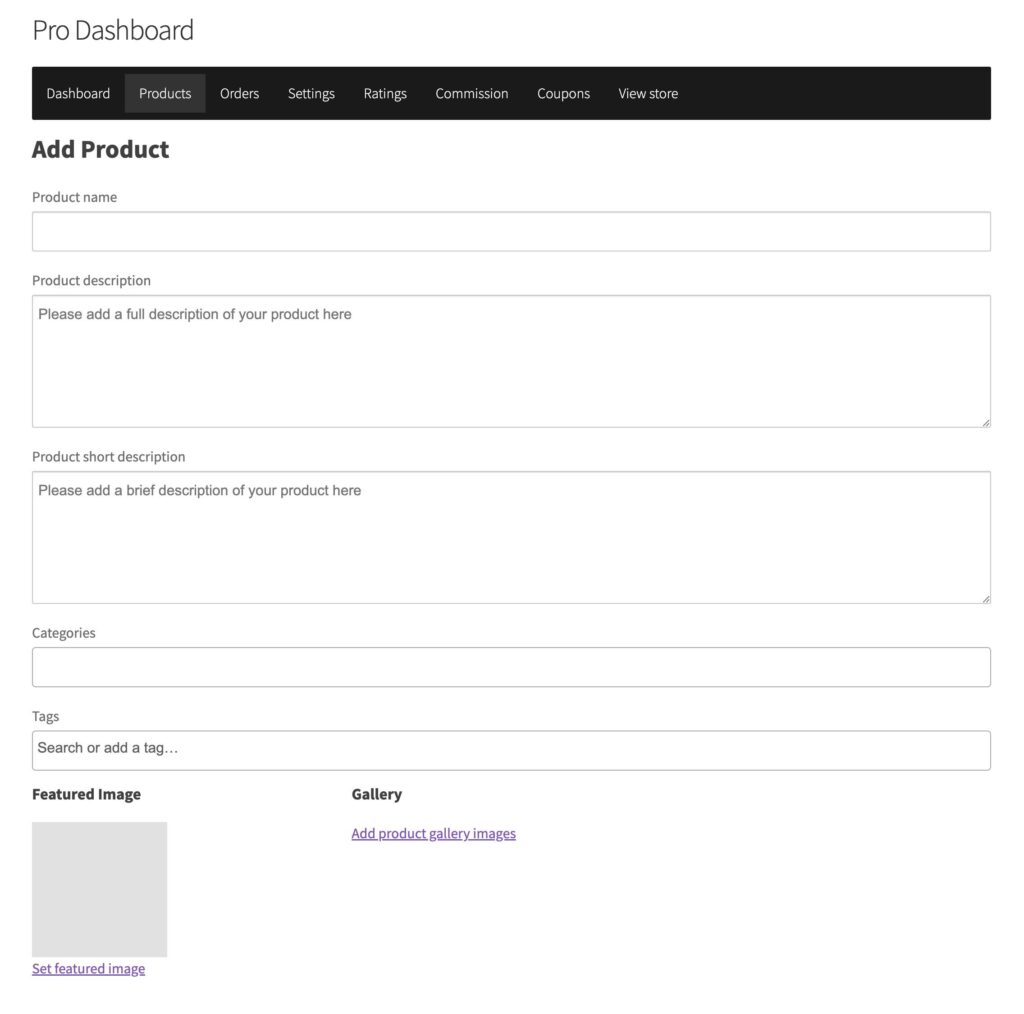
First, the vendor must access their pro dashboard and click the Products panel. Next, they must click the Add Product button.
This takes them to the Add Product page, which is extremely similar to the Add new product page that you, as the marketplace operator, can use to create WooCommerce subscription products.
The vendor must enter information about the product. This means that if they’re creating a simple subscription product, they must also select “Simple subscription” from a dropdown. Similarly, if they’re creating a variable subscription product, they must pick “Variable subscription,” then click the Attributes and Variations panels to complete the same steps you did.
That’s all there is to it! With your vendors’ help, your marketplace can soon enjoy recurring revenue.
VI. Managing WooCommerce Subscription Products
Let’s say customers have already purchased your WooCommerce subscription products. How do you manage them?
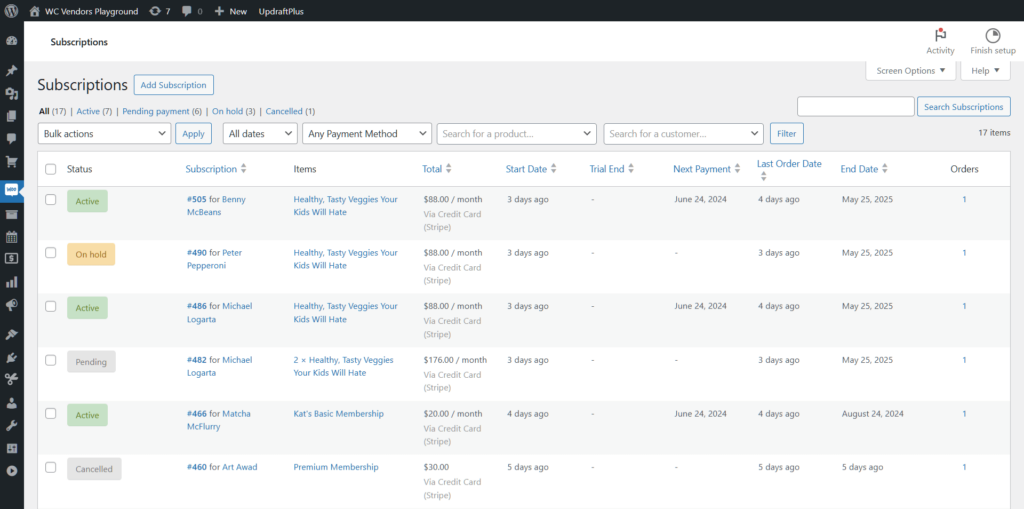
As the marketplace operator, you can manage WooCommerce subscription products via the marketplace backend. Simply go to your WordPress dashboard and click WooCommerce > Subscriptions. This takes you to the Subscriptions page, which lists all your subscription products, both past and present.
All WooCommerce subscription products that have been paid for are listed as “Active.” You can reactivate or cancel expired subscriptions, delete canceled subscriptions, or suspend pending subscriptions.
As for your vendors, they can manage subscription products via the pro dashboard. All they must do is click the Subscriptions panel, which takes them to a page similar to the one described above. And just like that page, vendors can use this space to observe, renew, or cancel subscription products.
Congratulations! You and your vendors are now ready to create, manage, and sell both simple and variable WooCommerce subscription products!
Conclusion
WooCommerce subscription products provide a valuable opportunity for businesses to build lasting customer relationships and enjoy predictable, recurring revenue streams. By implementing a subscription model, your marketplace can offer a wide range of products and services, ensuring you meet your customers’ ongoing needs.
To recap, as the marketplace owner, you can use WC Vendors to create simple WooCommerce subscription products for your vendors. All you must do is implement the following steps:
In addition, you can create variable subscription products by observing the following steps:
- Create a product
- Create a variable subscription
- Finalize the product variations
- Choose your vendor
- Publish your product
Don’t forget that your vendors can also create WooCommerce subscription products.
Furthermore, both you and your vendors can manage your marketplace’s WooCommerce subscription products.
Do you have any questions about WooCommerce subscription products? Let us know in the comments!
