So, you want to create your own online marketplace. And why not? Today, virtual shopping centers generate mind-bogglingly enormous profits daily. However, it’s important to understand that, if you aspire to operate the next Amazon or Etsy, one of your very first steps should be to build your very own multi-vendor ecommerce website.
Crafting such a platform sounds like an impossible task especially for someone with little to no experience developing websites. Thankfully, modern tools such as WC Vendors make the creation of a digital marketplace so easy that anyone and their grandmother can do it. And you don’t even have to know any complex coding to get things started!
Today, we’ll walk you through how to build a multi-vendor ecommerce website using WC Vendors and its powerful yet user-friendly tools. This way, you can start and manage your own online marketplace and ensure the success of your venture.
So let’s get right into it!
The Multi-Vendor Marketplace Business Model
Eager to create a multi-vendor ecommerce website? Then you’ll need a powerful and versatile marketplace solution. This is where WC Vendors comes in.
However, before you can understand what WC Vendors can do for you, let’s first explore the concept of the online multi-vendor marketplace.
What is a multi-vendor ecommerce website?
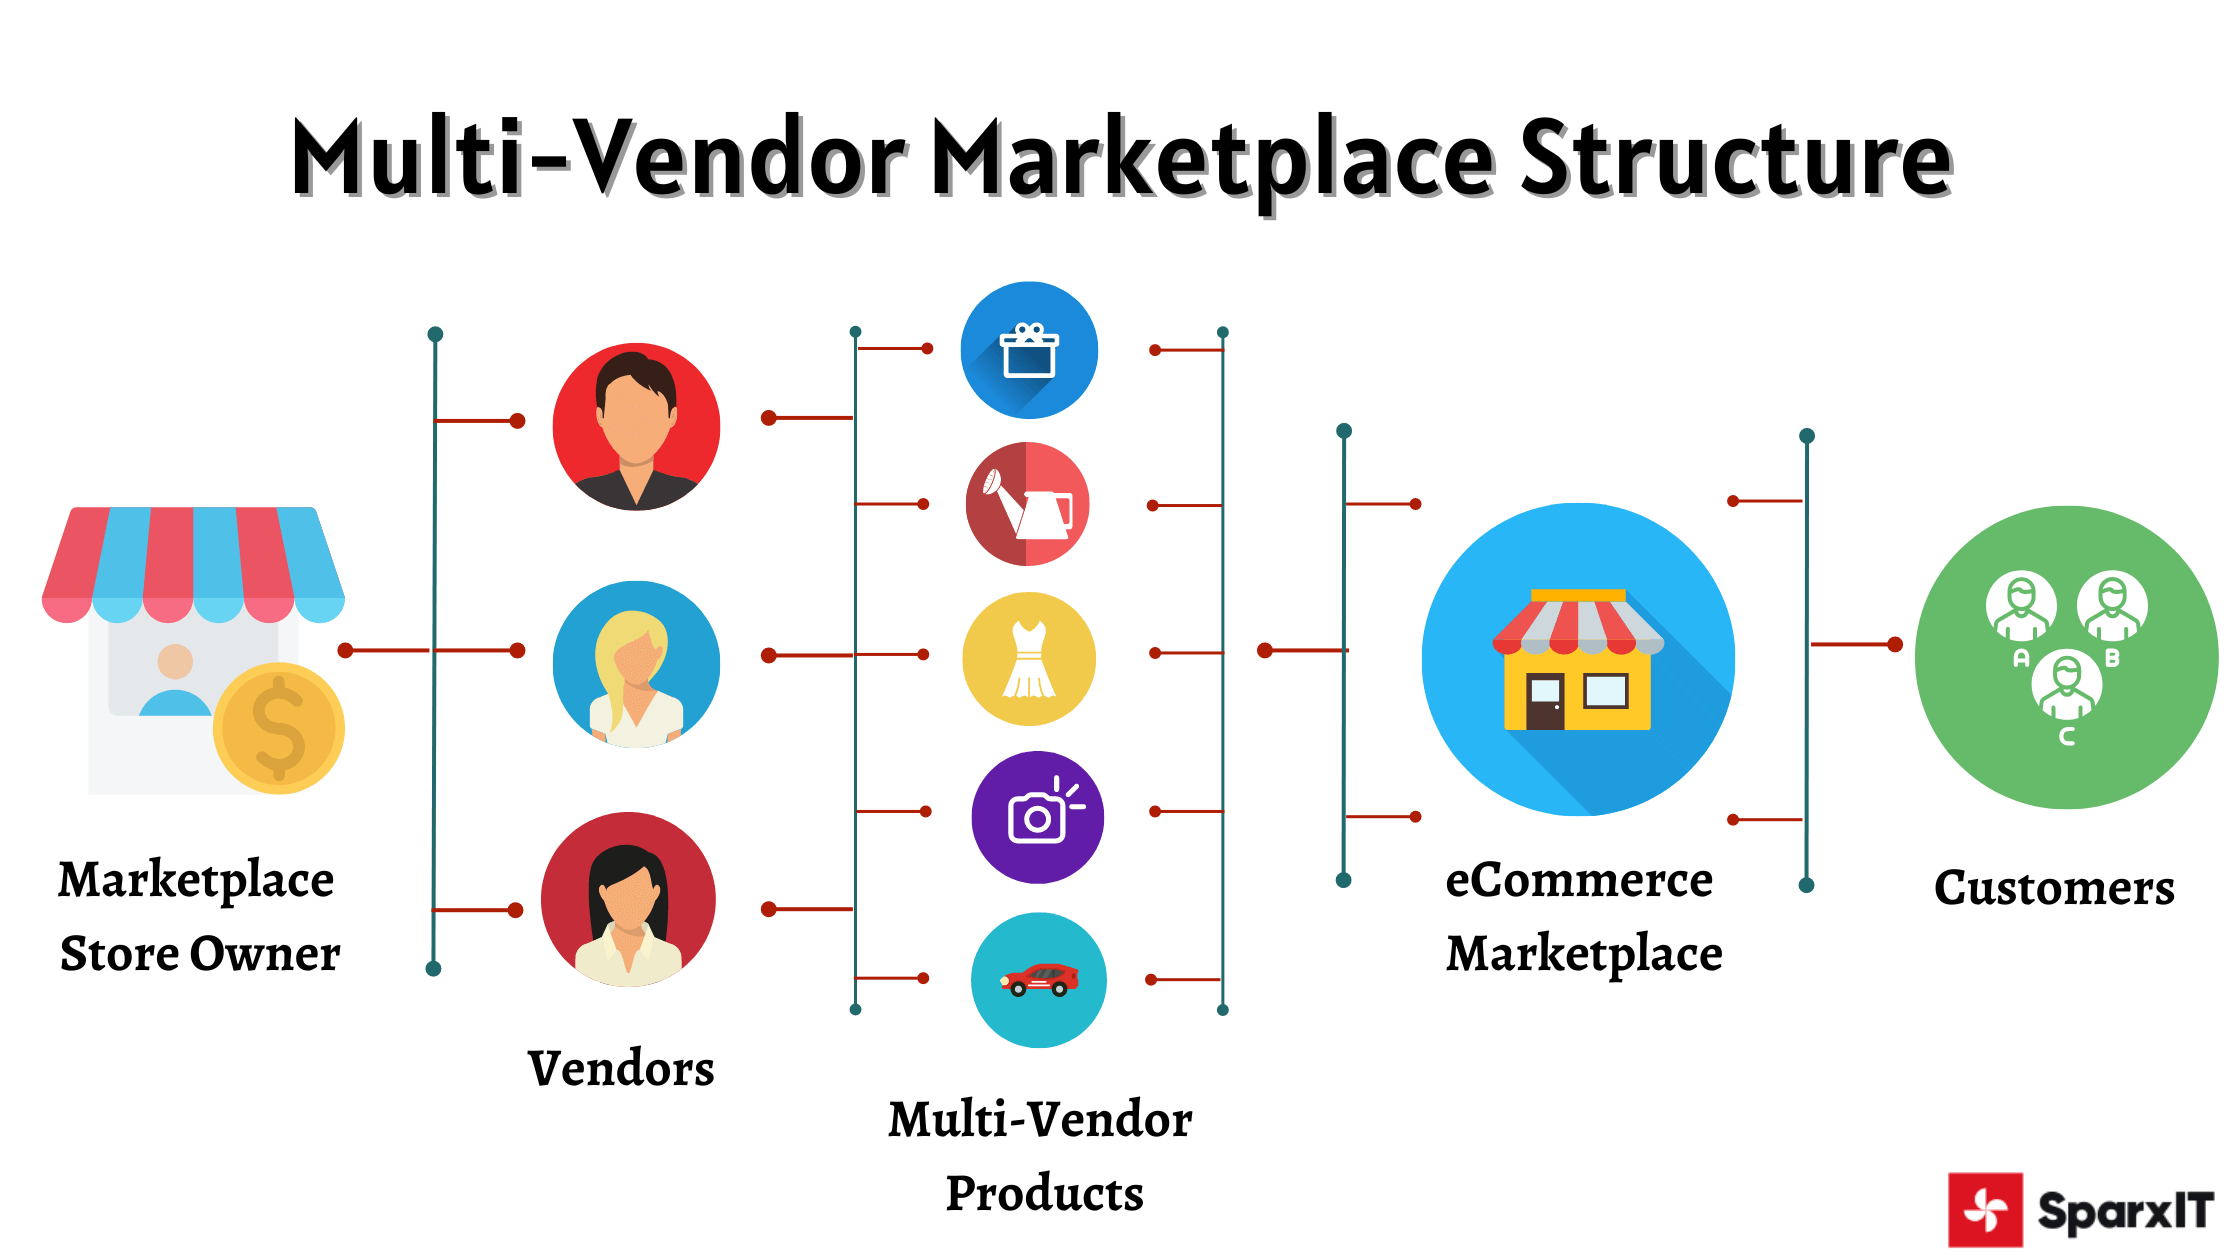
A multi-vendor ecommerce website (a.k.a. mutli-vendor marketplace or multi-seller marketplace) is an online platform where multiple vendors sell their products or services to a diverse customer base, creating a virtual marketplace that anyone with an internet connection can access.
Through commissions, the marketplace takes a cut of every sale that each vendor makes. Basically, this is the chief way this platform earns revenue. In other words, the more products that your vendors sell, the greater your revenue.
Your marketplace can provide a wide range of products, creating a convenient one-stop shopping destination for consumers.
Some of today’s most profitable e-commerce businesses, including tech behemoths like Amazon and eBay, are online multi-vendor marketplaces.
According to Statista, 2019 saw 45% of all U.S. spending via online shopping done on Amazon. Then, in 2022, the company earned a worldwide revenue of 220 billion U.S. dollars from its online stores alone.
Meanwhile, as of 2023, eBay boasts a whopping 135 million users globally. And in 2022, the ecommerce giant gained a net revenue of 9.7 billion U.S. dollars.
Such figures prove that the marketplace business model is indeed exceedingly lucrative. So it’s no surprise so many aspiring businesspersons want in on the action!
To create a multi-vendor ecommerce website, you need to transform an online store into one. If you already have an online store that’s powered by WooCommerce, then the best way to achieve this is by using a popular marketplace solution known as WC Vendors.
A powerful and highly customizable WooCommerce plugin, WC Vendors gives an ordinary online store multi-vendor marketplace functionality. Furthermore, it boasts a user-friendly interface that simplifies the complexities of managing such a platform.
Whether you’re an entrepreneurial enthusiast or an established business owner, WC Vendors equips you with the tools to bring your marketplace vision to life. Let’s explore some of the core features and capabilities that make this platform stand out:
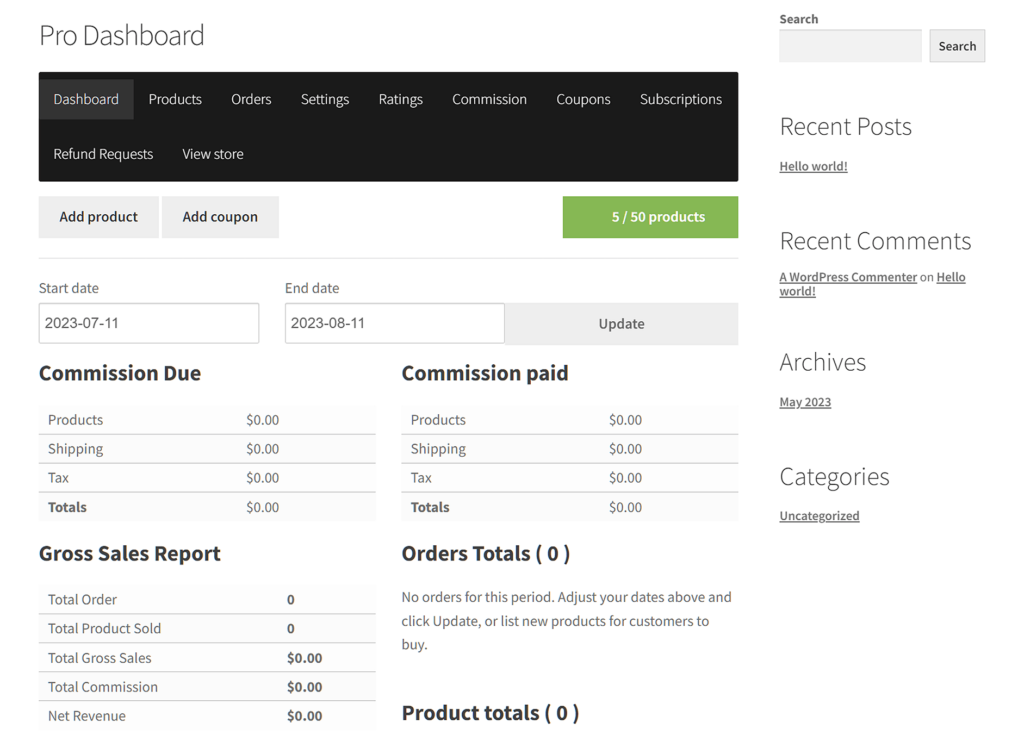
Vendor profiles and dashboard: Give vendors a personalized space to showcase their brand identity, manage products, and track sales. The intuitive Vendor/Pro Dashboard empowers vendors with real-time insights into their performance, fostering transparency and accountability.
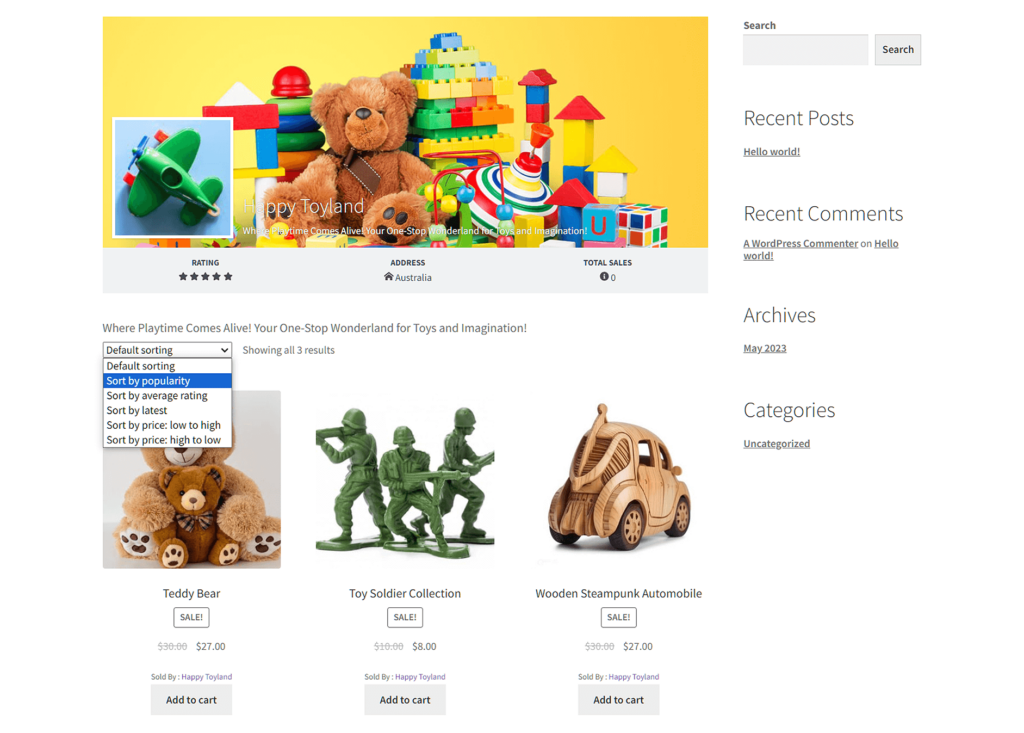
Product management: WC Vendors streamlines the product listing process, enabling vendors to effortlessly add, edit, and manage their offerings. Each product listing becomes a window into their unique store within your multi-vendor ecommerce website.
Commission management: Define and automate commission structures, rewarding vendors fairly for their contributions. This built-in system ensures a transparent and equitable distribution of earnings.
Rating and reviews: Foster buyer trust and encourage vendor excellence through a robust rating and review system. Genuine feedback elevates the shopping experience and helps vendors refine their offerings.
Using WC Vendors
Today, we’ll teach you how to build a fully functional multi-vendor ecommerce website that takes advantage of WC Vendors’ robust and flexible features.
Before we start, we’d like to mention two important things.
Firstly, you should know that WC Vendors comes in two varieties: WC Vendors Marketplace and WC Vendors Pro.
WC Vendors Marketplace is completely free and gives you all the tools you need to create and manage a fully functional multi-vendor ecommerce website. However, to enjoy the tool’s most advanced and powerful features, you’ll have to upgrade it to or purchase WC Vendors Pro.
Secondly, you’ll need to download, install, and activate WC Vendors. For instructions on how to get the plugin up and running, please refer to its Getting Started guide. This documentation also covers a lot of what we’ll discuss in this article.
Moreover, take note that during the WC Vendors installation and setup process, the plugin automatically configures the most ideal settings for your marketplace.
For the following tutorial, we’re going to assume you’ve already activated WC Vendors.
Building A Multi-Vendor Ecommerce Website The Convenient Way
Building a multi-vendor ecommerce website may seem intimidating. However, it isn’t as tough as it seems.
After you’ve installed and activated WC Vendors, using the Setup Wizard as discussed in the Getting Started guide automatically creates the marketplace for you. The only thing you have left to do is to configure your marketplace’s settings so that it looks and behaves exactly the way you want it to. And in most cases, this configuration is as simple as ticking a checkbox.
In short, all that building a multi-vendor ecommerce website involves is playing around with WC Vendors’ settings until you have a platform that suits your specific needs.
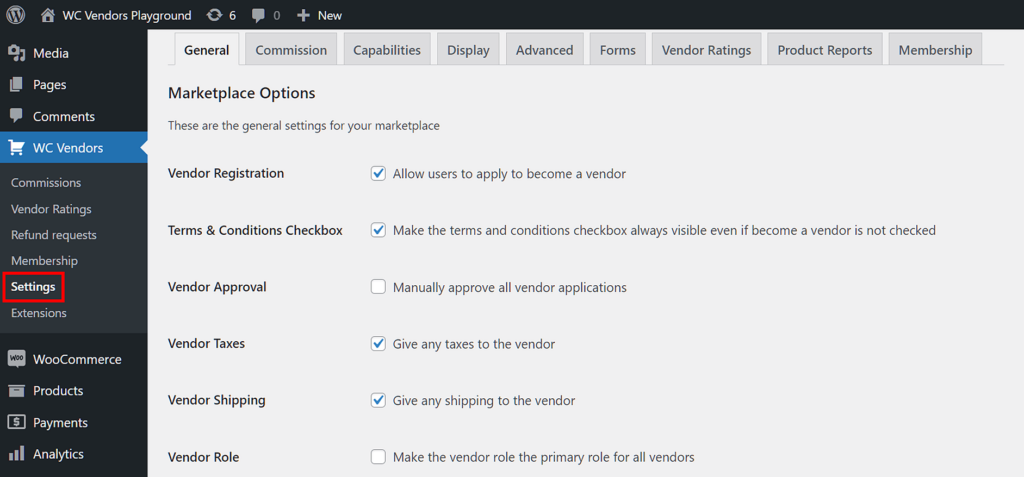
Thankfully, most of these settings are in a single, easy-to-find location. Simply go to your WordPress dashboard, then click WC Vendors > Settings.
As you can see, many of the available options come with simple descriptions, allowing you to figure out their purpose yourself.
In the following sections, we’ll use WC Vendors’ myriad options to activate the functions required for a working marketplace. Also, while we’ll be recommending settings that beginners will find most helpful, we encourage you to experiment and select options that are ideal for your multi-vendor ecommerce website.
1. General: Determining how vendors join your marketplace
For your marketplace to make money, it needs vendors with products to sell.
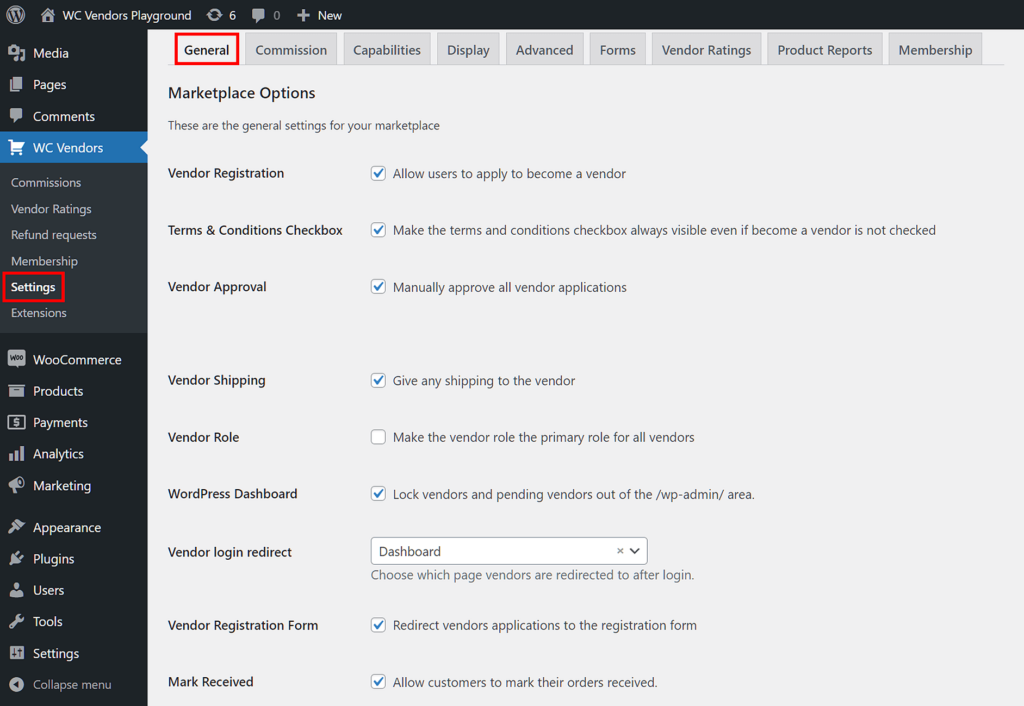
Once you’ve attracted potential vendors to your platform, you must let them apply to your marketplace as vendors. To do this, select the General tab, where you’ll find the options related to vendor registration.
For example, you can tick the Vendor Registration option, which allows users to apply to your marketplace as vendors.
Take note: For the registration box to appear on your website, go to your WordPress dashboard and click WooCommerce > Settings > Accounts & Privacy. Then, scroll down to Account Creation and tick “Allow customers to create an account on the ‘My account’ page.”
Tick Vendor Registration Form to redirect users to the vendor registration form. To complete their application, they must fill up this form with information – an effective way to gather relevant data about aspiring vendors.
Then there’s Vendor Approval, which lets you determine what happens to a user once they’ve completed the registration form. If you leave this option’s checkbox unticked, users are automatically added to your platform as vendors. In other words, they’re given the “Vendor” user role, which enjoys benefits such as access to the Vendor/Pro Dashboard and the ability to sell products.
Otherwise, the user is given the “Pending Vendor” role, which has none of the aforementioned benefits. You’ll have to manually approve or reject them by going to Users > All Users, hovering your mouse cursor over their username, then choosing either “Approve” or “Deny.”
Enabling this option grants you the opportunity to scrutinize the data that the user provides via the registration form. As a result, you get ample time to determine whether or not they’re a good fit for your marketplace.
Recommended settings
We suggest retaining WC Vendors’ default settings, making particularly sure that Vendor Registration Form is enabled and that “Dashboard” is selected from the Vendor Login Redirect dropdown menu
However, it’s also a good idea to enable Vendor Approval and Vendor Role.
Check out the documentation for the General options here.
2. Commissions: Choosing how your marketplace earns revenue
Let’s say you’ve already recruited vendors to your platform and that they’re ready to sell products. How does the marketplace earn revenue from their sales?
The primary method of generating revenue from your marketplace is through commissions.
A commission is the fee you collect from vendors for each sale they make on the platform. Basically, when a vendor sells a product, you take a cut of the sale amount before paying the vendor. For instance, if a vendor sells a product worth $100, you can deduct $20 from this amount, then give the remaining $80 to the vendor.
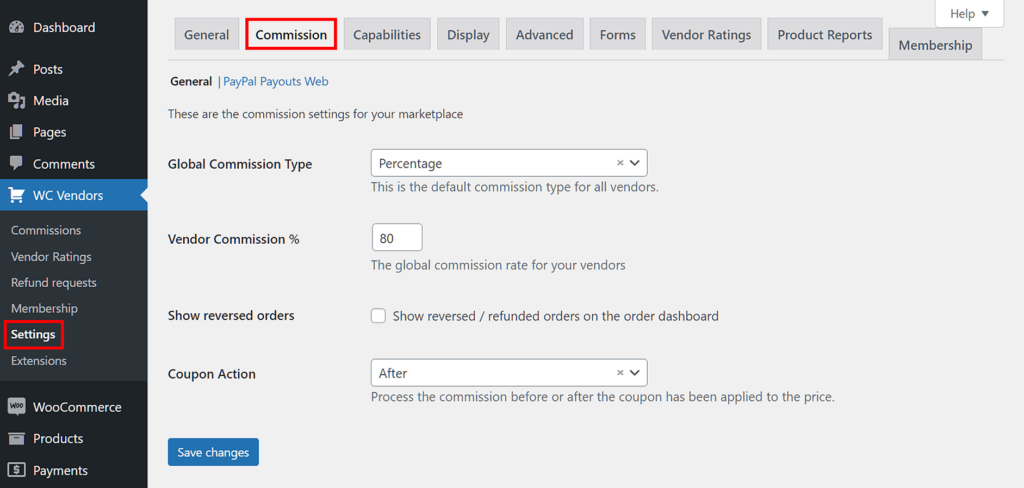
To access your commission options, click the Commission tab.
We’ve already prepared a detailed guide on how to implement a commission structure for your marketplace, which you can find in our article “How To Charge Vendors In Your Marketplace: A WooCommerce Commissions Guide.”

Another way for your marketplace to make money is through membership subscriptions, which we thoroughly discuss in our article “How To Charge Vendors In Your Marketplace: A Membership Subscriptions Guide.”

Recommended settings
The simplest thing a beginner can do is to choose “Percentage” from the Global Commission Type dropdown menu. While the Vendor Commission % is up to you, a commission rate between 70% and 80% should be attractive to vendors while assuring the marketplace good profits.
Check out the Commissions documentation here.
3. Capabilities: Granting vendors the abilities they need to succeed
The Capabilities tab lets you configure what abilities your vendors can use via the Vendor/Pro Dashboard.
Your options are further categorized into several sub-tabs, some of which we’ll discuss below.
General
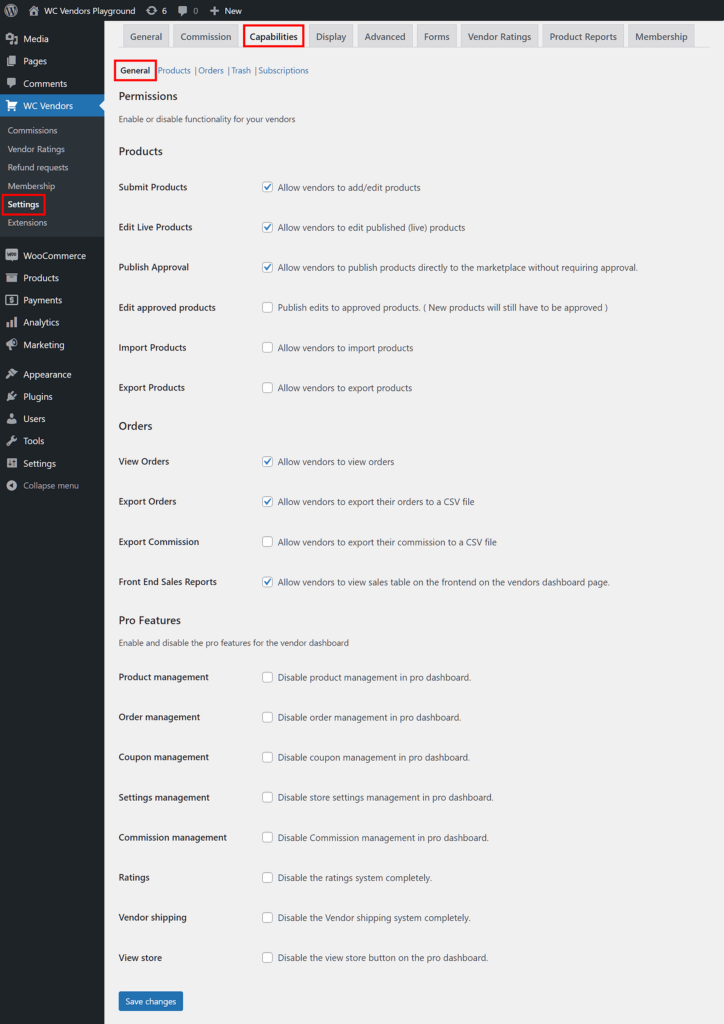
The General sub-tab lets you determine how vendors can manage their products and customers’ orders.
For example, by ticking the appropriate Products checkboxes, you can allow vendors to:
- Add products to their store
- Publish products on their store without requiring your approval
- Edit products already published in their store
Meanwhile, the Orders checkboxes can let vendors:
- View their customers’ orders
- Export their orders to a CSV file
- View a sales table on the front end of their Vendor/Pro Dashboard page
In addition, WC Vendors Pro users get additional Pro Features that let you disable:
- Product management on the Pro Dashboard
- Commissions management on the Pro Dashboard
- The rating system
- Vendor shipping
Products
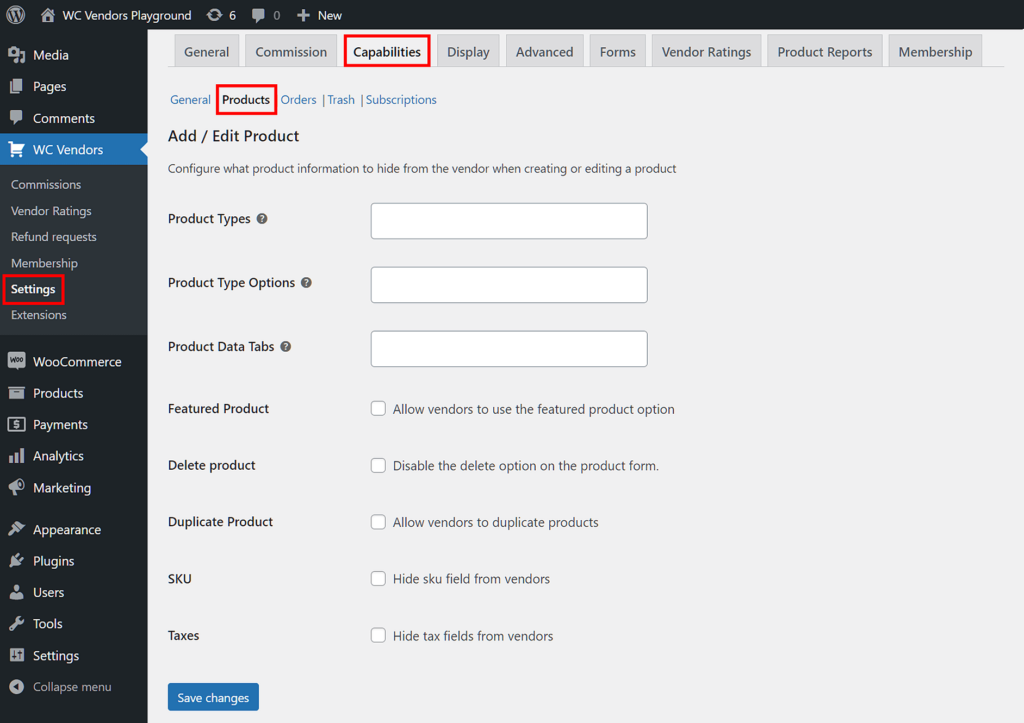
The Products sub-tab lets you configure what products and product information to hide from vendors when they’re creating or editing a product.
For instance, Product Types comes with a dropdown menu that lets you select what product types to hide from vendors.
On the other hand, Delete Product lets you decide whether or not vendors can delete products on the product form. Then there’s Duplicate Product, which enables or disables a vendor’s ability to duplicate products.
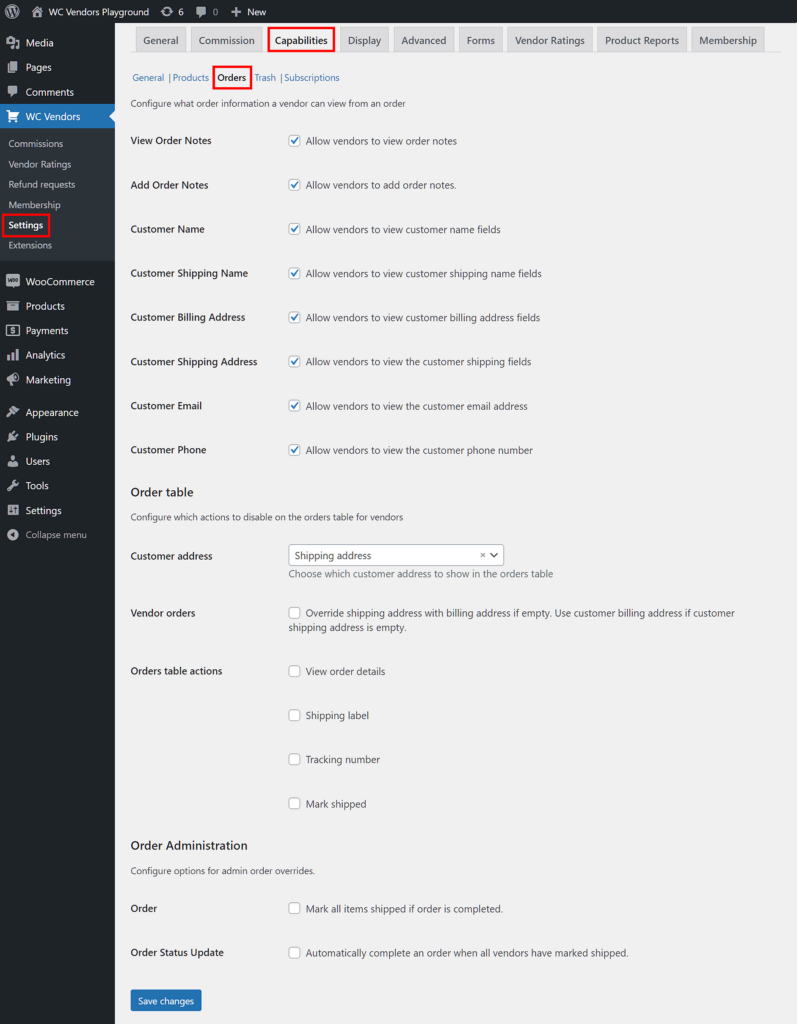
Orders
The Orders settings grant you control over the customer and order information a vendor can view.
For example, you can allow vendors to:
- View order notes
- Add order notes
- View the customer’s name, email, and phone number
- View the customer’s billing and shipping address
Furthermore, Order Table lets you set which actions to enable or disable on the orders table for vendors. For instance, you can choose whether the orders table shows the customer’s billing address or shipping address to vendors. In addition, you can have the orders table show vendors customer information such as their order details, shipping label, and tracking number.
Recommended settings
Retain the default General, Products, Orders, Trash, and Subscriptions configurations.
Check out the Capabilities documentation here.
4. Display: Controlling the information the dashboard reveals to vendors
The Display tab lets you configure various aspects of the display on the front end, such as how your vendors’ stores appear to customers. Additionally, it grants you control over the information that the Vendor/Pro Dashboard presents to vendors regarding activities involving their store and customers.
Display boasts many sub-tabs. Let’s explore some of them!
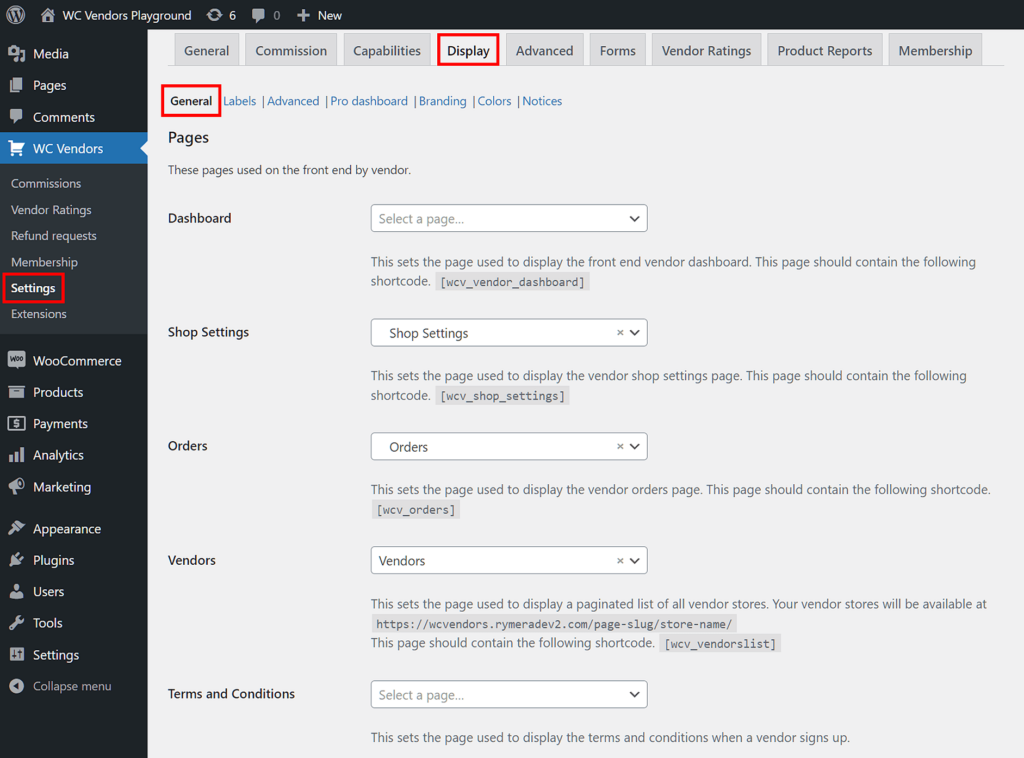
General
The General sub-tab options let you decide how your vendors view pages on the front end.
Pages lets you choose where marketplace-related pages appear on your multi-vendor ecommerce website. For example, the Dashboard dropdown menu lets you select which page displays the Vendor/Pro Dashboard on the front end of your marketplace.
Store Settings provide you with modification options for the appearance of individual vendor stores. For instance, Shop Header allows vendor shops to have headers, while Shop Description determines whether or not the vendor store page features a shop description.
Then you’ve got the Vendors List Settings. Essentially, this lets you choose whether your team of vendors is displayed on your website as a grid or list. Moreover, it lets you determine how vendor avatars appear.
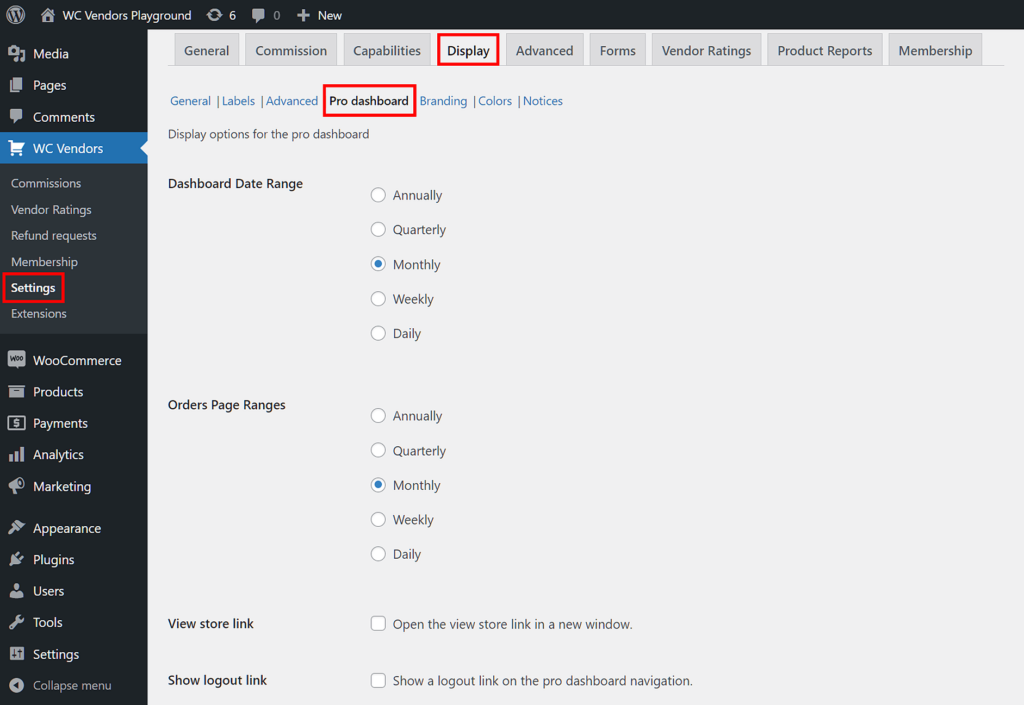
Pro Dashboard
Available to WC Vendors Pro users, the Pro Dashboard settings grant you fine control over the data displayed on the Pro Dashboard.
For example, Products per page lets you set the maximum number of products each page displays.
Show file usage limit shows vendors their file number limit and how many they’ve already uploaded.
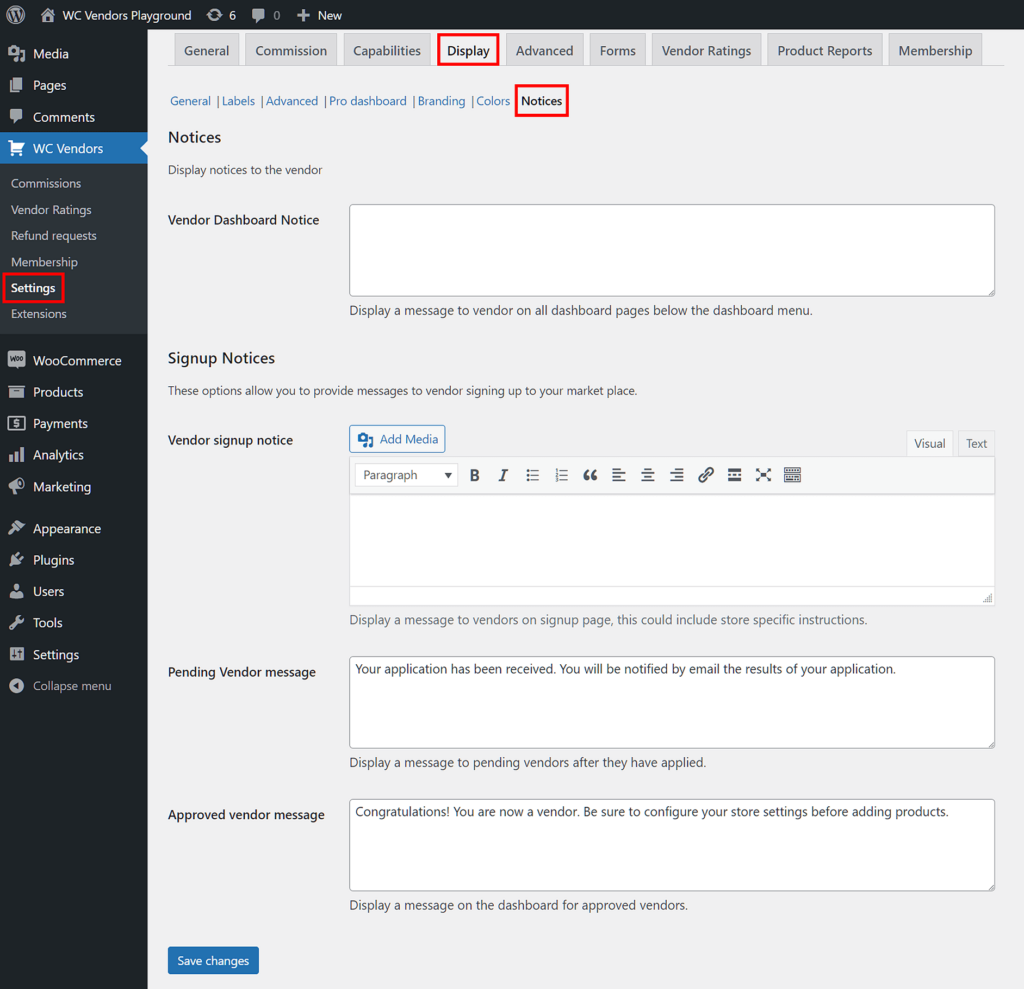
Notices
The Notices sub-tab boasts options that let you configure the messages your vendors receive from you.
Vendor Dashboard Notice lets you write a message that every vendor sees on their Vendor/Pro Dashboard page. On the other hand, Signup Notices allows you to write various types of messages to users applying to join your multi-vendor ecommerce website.
Recommended settings
Under General, choose either “Vendor Dashboard” or “Pro Dashboard” (if you have WC Vendors Pro) from the Dashboard dropdown menu.
Other than that, you don’t have to change the settings for General, Labels, Advanced, and Pro Dashboard.
However, it’s to your best benefit to personalize your Branding, Colors, and Notices.
Check out the Display documentation here.
5. Forms: Configuring the functionality of various forms
A multi-vendor ecommerce website uses various forms to gather or present vital data. And with the WC Vendors Forms tab, you can control the data that these forms share.
Like the other tabs, Forms boasts several sub-tabs that award you a considerable degree of control over your forms. We’ll discuss a few of these below.
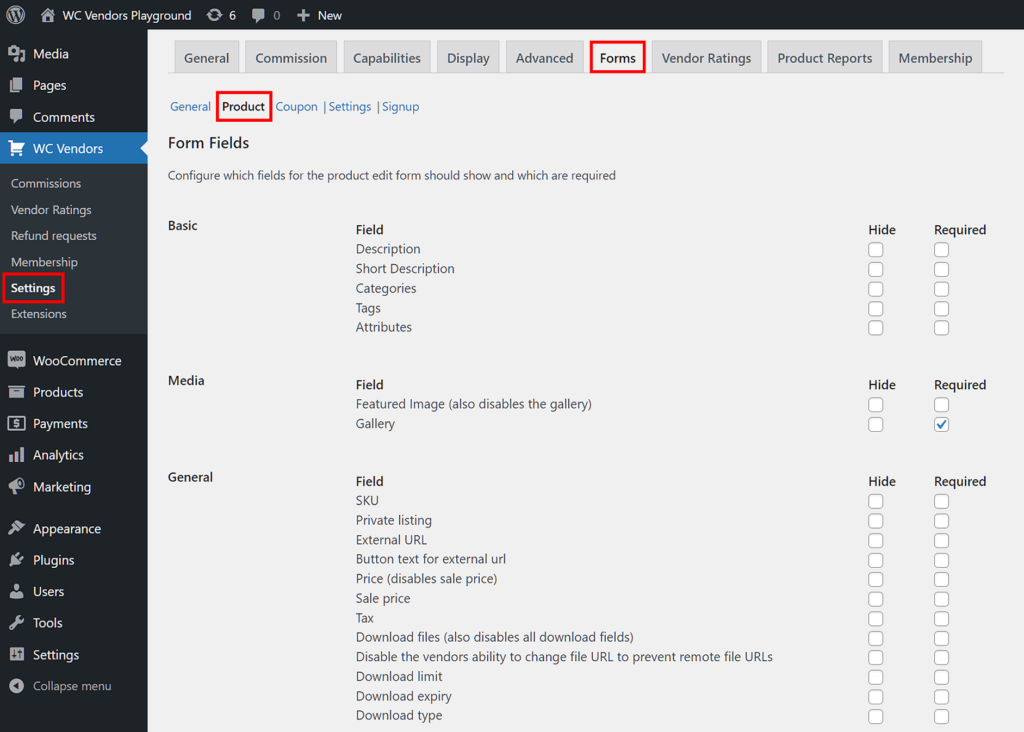
Product
The product form collects information about the items a vendor wishes to sell. If you want to customize what information this form should demand from vendors, modify the Product sub-tab options.
Form Fields configures which data fields appear on the product edit form. In addition, it determines which of said fields are required. If, for example, you want the product form to require vendors to submit a short description of every one of their products, tick the Short Description option’s “Required” checkbox. If you don’t want the Short Description option to be available at all, tick the “Hide” checkbox.
Product Form allows vendors to configure specific aspects of the product edit form. For instance, if you want to give vendors the ability to upload media to their product descriptions, tick the checkbox for Allow media. You can even decide how many images they can upload to their galleries and the maximum and minimum dimensions of every image.
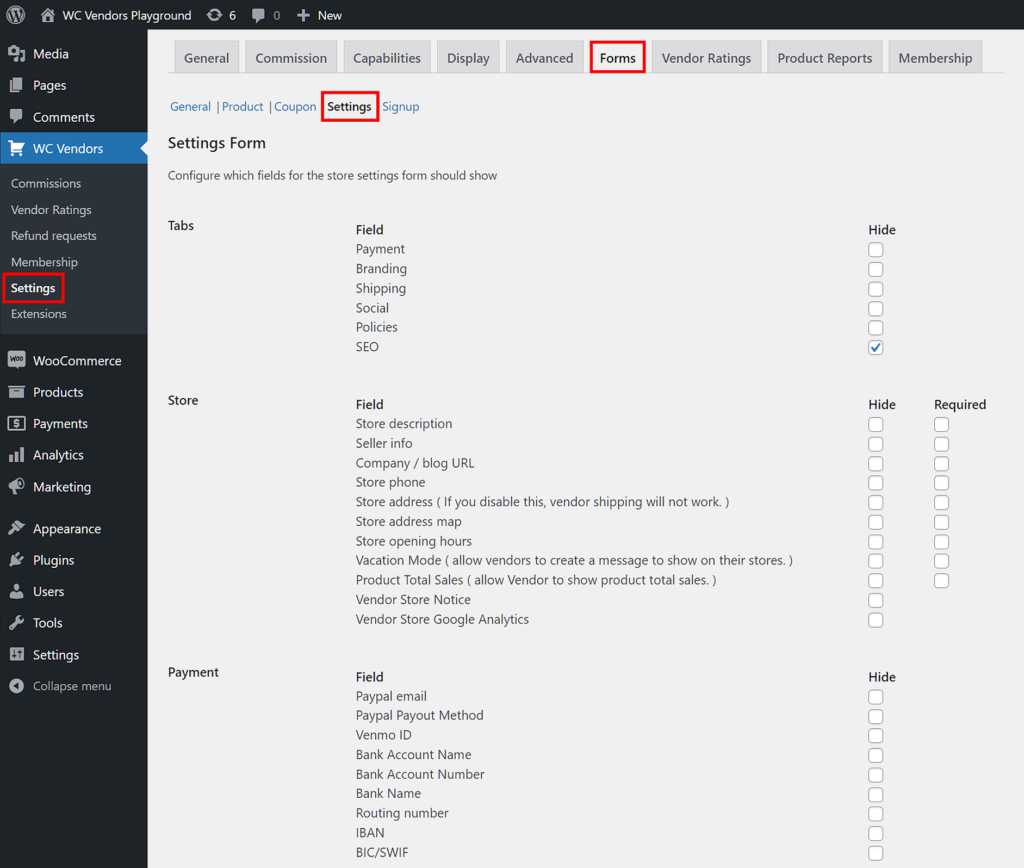
Settings
The Vendor/Pro Dashboard allows vendors to configure the settings for their store. Do you want to control what settings they’re allowed to modify? Then play around with the Settings Form options!
For instance, if you’d like every vendor to be able to provide the link to their blog, leave the Company/blog URL option’s “Hide” checkbox alone.
On the other hand, if you want to deny your vendors all the Social options, simply tick the “Hide” checkboxes for Twitter, Instagram, Facebook, and the like.
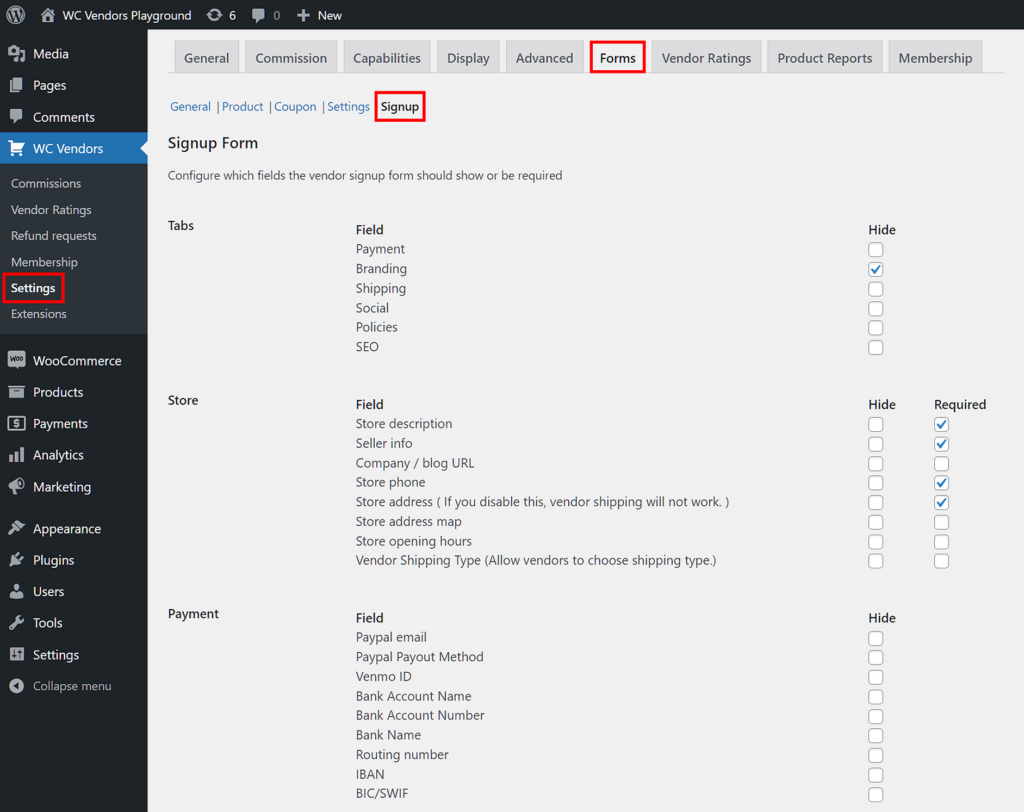
Signup
The signup form is essentially the vendor registration form that users must fill up to apply to your multi-vendor ecommerce site as vendors. Customizing this form allows you to select what information to gather from aspiring vendors during the application process.
Tick the checkboxes of the details that you consider most crucial. For example, you can tick the “Required” checkboxes for Store phone, Store opening hours, Paypal email, Store icon, Facebook, and SEO Title if these pieces of information are relevant to your business needs.
Recommended settings
For beginners, it’s a good idea not to change any of WC Vendors’ default settings for General, Product, Coupon, Settings, and Signup.
Check out the Forms documentation here.
6. Vendor Ratings: Setting up your feedback system
Transparency is indispensable in any business. By letting customers review vendors and examine other shopper’s feedback, you establish credibility and trust. This, in turn, can boost the reputation of your multi-vendor ecommerce website.
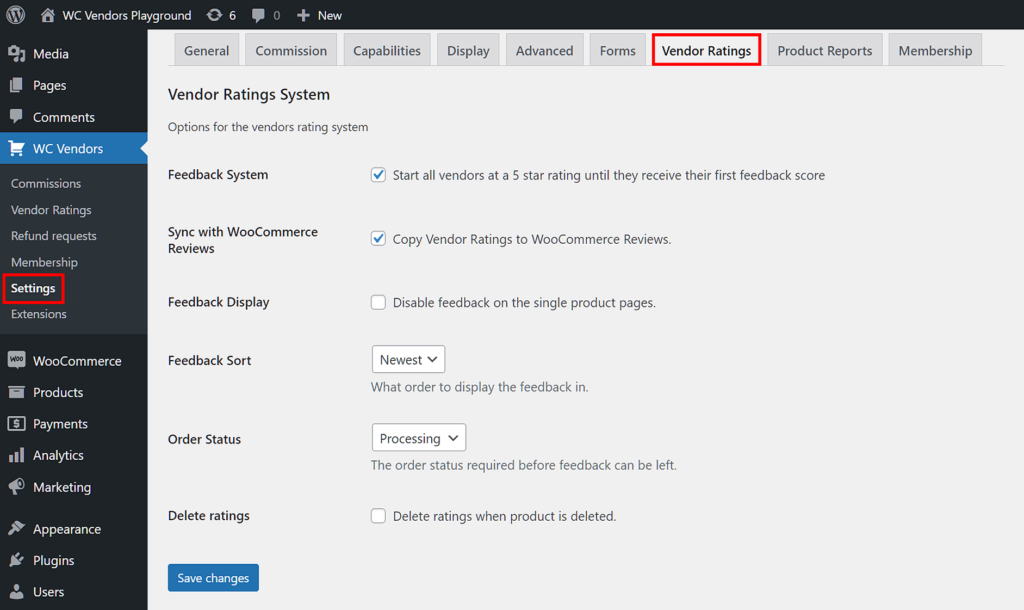
The Vendor Ratings tab boasts multiple options that let you customize your platform’s feedback system.
With the Feedback System option enabled, every vendor starts with a rating of 5 stars. This means that every new vendor won’t have a zero-star rating that can give customers a terrible first impression of said vendor and the marketplace as a whole.
Take note that this rating goes up and down depending on the scores they eventually receive from customers.
Order Status comes with a dropdown menu that lets you choose whether a customer can leave feedback while their order is being processed or only after said order has been completed.
When enabled, Delete ratings removes a product’s ratings from your marketplace once said product has been deleted.
Recommended settings
Retain WC Vendors’ default settings, making particularly sure that the Feedback System is enabled.
Check out the Vendor Ratings documentation here.
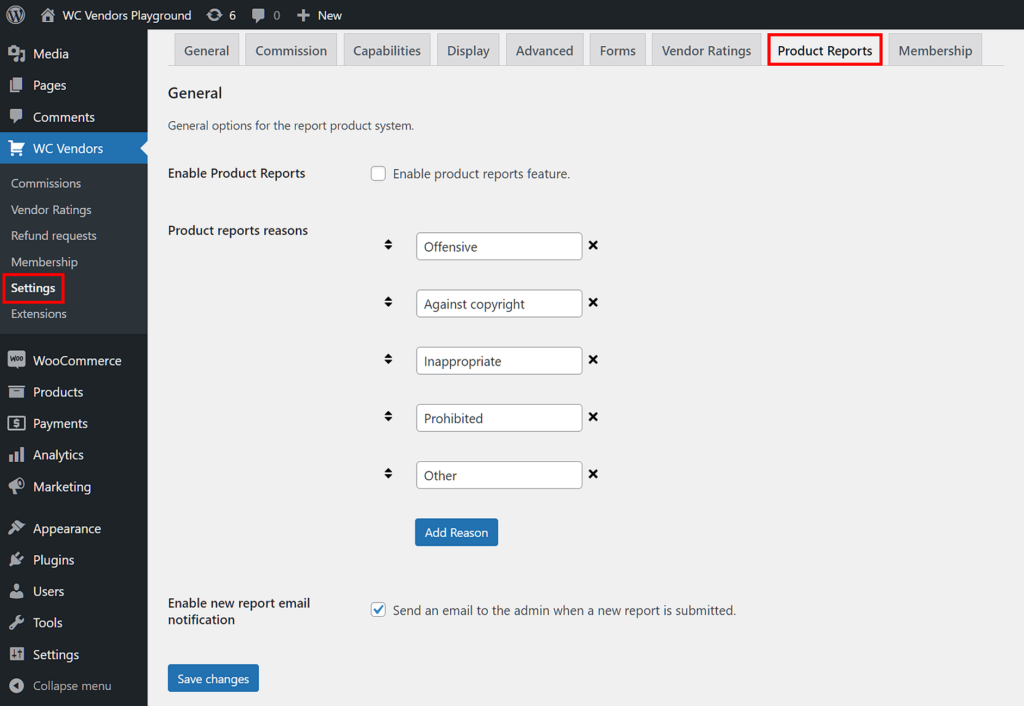
7. Product Reports: Letting vendors and customers report products
Product Reports lets customers and vendors report products that they deem inappropriate. For example, if one vendor observes that another vendor is selling products that don’t comply with the rules of your multi-vendor ecommerce website, they can create a report.
To enable this system, simply click the Enable Product Reports checkbox.
Then, by using the Product Reports Reasons option, you can let any vendor or customer select the explanation for their report. Simply click the Add Reason button, then write a reason in the newly created entry field. WC Vendors provides four default reasons, but you can add your own.
Recommended settings
Keep WC Vendors’ default settings as they are.
Check out the Product Reports documentation here.
Putting It All Together
Have you completed the Getting Started guide and used the settings we recommended? Then you should have a fully functional marketplace that’s ready to cater to your target consumers.
However, take note that there’s more to creating a marketplace than building a multi-vendor ecommerce website.
The Steps You Need To Take To Create A Multi-Vendor Marketplace
Building a multi-vendor ecommerce website is one thing, but to become an online marketplace operator, you must first understand the steps you need to take before establishing such a platform.
For this reason, we highly recommend checking out our article, “How To Create A Multi-Vendor Marketplace (A Step-By-Step Overview).” This discusses the strategies you need to employ for the creation of a marketplace to become possible. Familiarizing yourself with said strategies will give you the direction required to craft a multi-vendor ecommerce website that’s most ideal for your needs.

We also recommend reading the following guides:
- How To Run An Online Marketplace: A Beginner’s WooCommerce Marketplace Guide
- Promoting Your New Marketplace: How To Get Vendors
- 8 Best Marketplace Tips: How To Boost Your E-Commerce Traffic
- 7 Best Ways To Supercharge Your Multi-Vendor Marketplace Promotion
- How To Monetize Your Multi-Vendor Marketplace: Strategies For Success
These are just some of the articles that can help you achieve success on your journey. If you’d like more valuable guides on how to establish and manage a multi-vendor ecommerce website, make sure to follow our blog!
Essential Paths
In addition, you should familiarize yourself with where to find crucial marketplace information on the back end of your website. Below, we’ve listed the locations of said information (with each path starting from the WordPress dashboard).
Vendors: Find a list of your vendors by clicking Users > All Users. This will redirect you to a page that lists all your users, from administrators to vendors to customers. To simplify your search, click the sub-tabs Vendors and Pending Vendors.
Products: You can locate a list of all your vendors’ products by clicking Products > All Products. To narrow your search down to a specific vendor, input their username in the Search Vendor entry field, then press Filter.
Commissions: Click WC Vendors > Commissions to find your list of vendor commissions.
Vendor Memberships and Subscriptions: For a list of your vendor membership subscriptions, click WC Vendors > Membership. For a list of subscriptions, click WooCommerce > Subscriptions.
Vendor Ratings: You can find the ratings for your vendors by clicking WC Vendors > Vendor Ratings.
Refund Requests: If your customers issue refunds, you can find their requests by clicking WC Vendors > Refund Requests.
Conclusion
Building a multi-vendor ecommerce website from scratch may seem like the most challenging thing in the world. Thankfully, this couldn’t be further from the truth. After all, WC Vendors supplies all aspiring marketplace owners with user-friendly marketplace-creation tools, ensuring you can operate your own one-stop shopping destination in no time.
In a majority of cases, configuring your marketplace settings simply involves ticking checkboxes and choosing options from dropdown menus. Not to mention many options come with descriptions that simplify your decision-making, and most tools are found in a single location.
To summarize, to create a functional multi-vendor ecommerce website, you need to follow the WC Vendors Getting Started guide, then configure the settings for the following sections:
Also, we highly recommend reading our other guides and familiarizing yourself with the paths to necessary marketplace data.
Do you have any questions about how to build a multi-vendor ecommerce website? Let us know in the comments!
