Understanding how manual vendor approval works is crucial for a thriving online marketplace.
When we talk about manual vendor approval, we mean carefully reviewing applicants before they officially become vendors on your platform. This process ensures a range of benefits, from enhancing quality control to earning that extra level of trust from your customers.
In this article, we’ll dive into the perks of manual vendor approval and walk you through the steps using WC Vendors. In addition, we’ll share some savvy strategies to size up potential vendors. So, get ready for a deep dive into how to bring the best vendors on board your online marketplace!
Manual Vendor Approval VS. Automatic Vendor Approval: What’s The Difference?
Vendor approval is the process by which an entity or individual who wishes to sell goods or services on an online marketplace is granted the authorization to do so.
In manual vendor approval, the marketplace owner or manager reviews applicants before allowing them to join the marketplace as vendors. Typically, this process involves evaluating every applicant’s qualifications, credentials, or suitability to ensure that they meet the platform’s requirements or standards.
On the flip side, automatic vendor approval refers to a system where vendors are approved without requiring manual intervention or human review. In short, the system automatically permits applicants to sell their products on the platform.

Advantages Of Manual Vendor Approval
It may be tempting to go the easy route and simply automate the vendor approval process. However, this can lead to various issues. For example, you could end up onboarding sellers who are a poor fit for your platform, or worse, grant scammers access to your marketplace.
In contrast, manual vendor approval can produce many significant advantages, including:
- Quality Control: By approving vendors manually, you ensure that only reputable and reliable sellers are allowed on your platform. This way, you can maintain the quality of the products or services that your marketplace offers.
- Compliance: Manual vendor approval allows you to enforce compliance with your platform’s policies. This ensures that sellers adhere to specific regulations before they can sell.
- Curation: You can curate the selection of vendors, choosing those that align best with your platform’s image, values, or target audience. In other words, you get to avoid recruiting vendors who would be unsuitable for your platform.
- Security: Manual vendor approval adds an extra layer of security to your platform. After all, when you verify the legitimacy of vendors, you reduce the risk of scams and other fraudulent activities.
- Customer Trust: A curated selection of approved vendors can enhance customer trust. This is because customers feel confident in purchasing from a platform with vetted sellers.
- Support: Manual vendor approval enables better support for vendors by ensuring that they understand the platform’s rules and expectations. This can lead to better relationships between the platform and sellers, which can produce all sorts of benefits for everyone involved.
In short, if you want to admit only the most suitable vendors into your multi-vendor platform, we highly recommend engaging in manual vendor approval.

How To Manually Approve Vendors Into Your Online Marketplace (In 3 Easy Steps)
So, we’ve discussed the reasons why it’s a good idea for you to manually approve vendors into your online marketplace. Now, it’s time to learn how to use WC Vendors to implement manual vendor approval on your platform.
First things first, make sure that you have an online store that’s powered by:
Of course, you also need to acquire, install, and activate the latest version of WC Vendors. Then, you need to use it to transform your online store into a multi-vendor marketplace. If you’d like more information on how to accomplish this, check out the following guide:
With all that in mind, let’s get started with the tutorial!
Step 1: Allow users to apply to your platform as vendors
First, you have to make sure that users can apply to your marketplace as vendors.
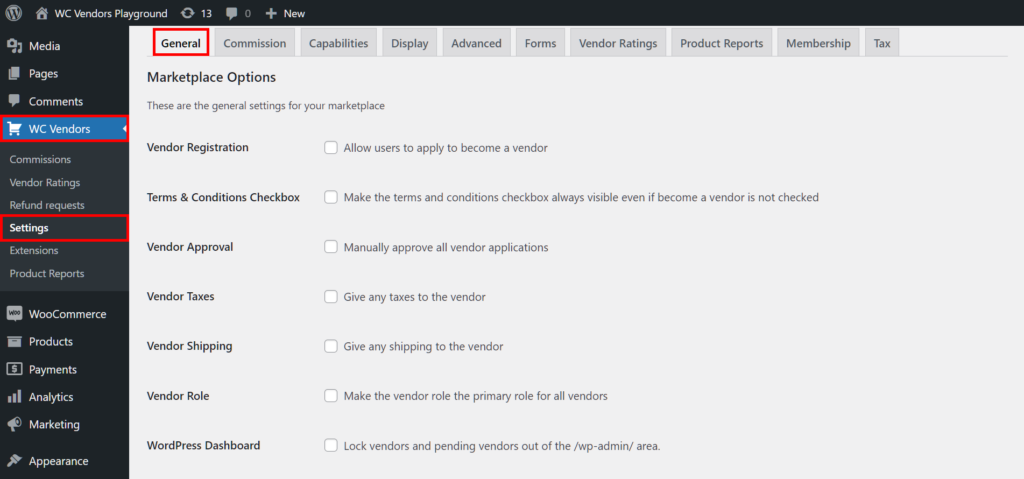
To do this, you must modify specific settings in WC Vendors’ General section. Thus, head to your WordPress dashboard, click WC Vendors > Settings, then select the General tab
Next, activate the Vendor Registration option by ticking its checkbox as shown below. This allows users to apply to your platform as vendors.
In addition, tick the Vendor Registration Form checkbox to require applicants to fill up a vendor registration. This is a convenient and effective way to collect an applicant’s data, which you can then examine to determine if they’re an appropriate choice for your marketplace.
Take note: For the registration box to appear on your website, go to your WordPress dashboard and click WooCommerce > Settings > Accounts & Privacy. Then, scroll down to Account Creation and tick “Allow customers to create an account on the ‘My account’ page.”
Step 2: Enable the Vendor Approval option
Now, you should grant yourself the ability to manually approve applicants who wish to join your platform as vendors.
Simply enable the Vendor Approval option by ticking its checkbox.
Now, anyone who applies to your marketplace as a vendor gets assigned the “Pending Vendor” user role (more on this in the next step).
Don’t forget to click the Save Changes button at the bottom of the page once you’re done modifying the General settings!
Step 3: Approve or reject “Pending Vendors”
A “Pending Vendor” doesn’t have access to your platform’s vendor tools. In other words, they can’t sell on your marketplace yet.
However, the information that they provided via the registration form remains in your database. Therefore, you can analyze their personal and business details to determine if they’re someone you’d like to work with.
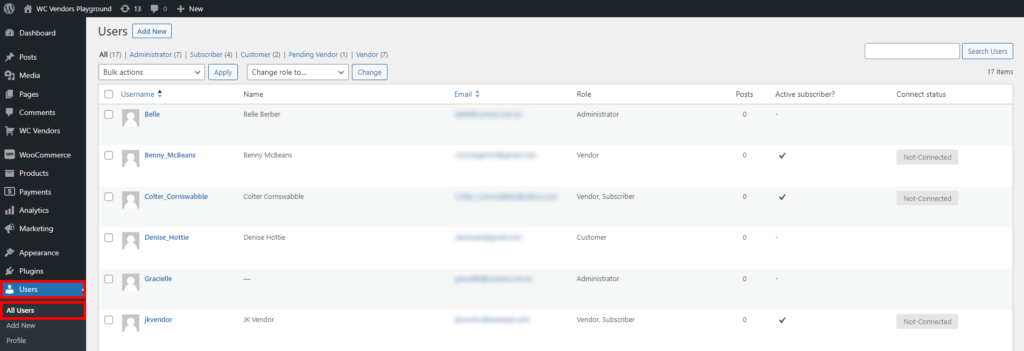
So, how do you go about doing all that? First, go to Users > All Users for a complete list of your website’s users.
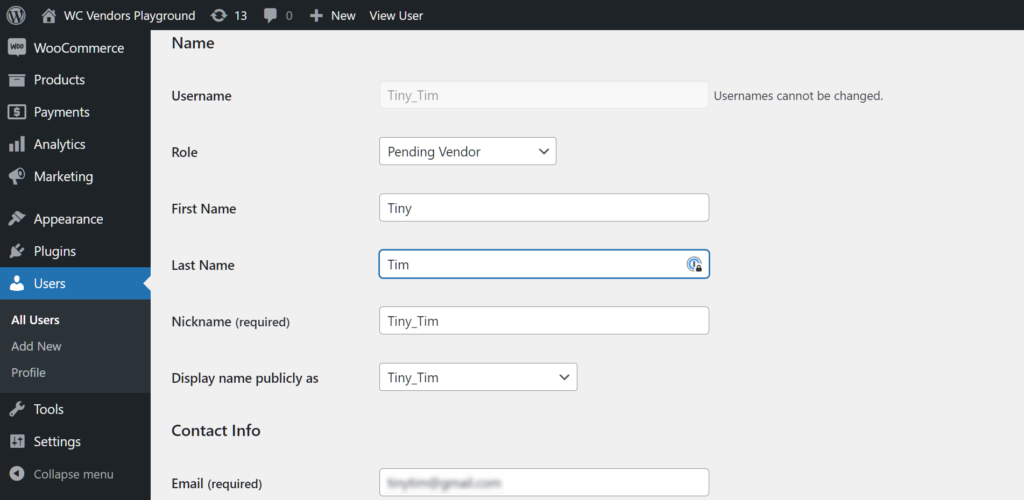
Then, click the specific “Pending Vendor’s” username. This will redirect you to their Edit User page which contains all their provided data.
But what should you do after you’ve examined an applicant’s information?
If you want to permit them to start selling their products on your marketplace, you have to convert them from a “Pending Vendor” to a “Vendor.” To do this, go back to Users > All Users, hover your mouse cursor over their username, then choose “Approve.”
Otherwise, you can pick “Deny” to reject them.
In contrast, leaving the Vendor Approval option disabled automatically assigns the “Vendor” user role to all applicants. This means they immediately become active vendors, allowing them to start selling their goods or services via your platform at any time. This can cause problems if the system approves a vendor whose values are incompatible with yours.
Vendor Approval Strategies For Best Results
As discussed, manual vendor approval lets you scrutinize applicants to see if they truly belong on your online marketplace.
When examining an applicant, consider the following tips to ensure they align well with the platform:
- Verification of Identity: Request official identification or documentation to verify the applicant’s identity. This ensures transparency and trust among customers.
- Review of Experience and Credentials: Assess their background, experience, or expertise relevant to the products or services they intend to sell. Previous success or expertise can indicate a higher likelihood of success on your platform.
- Quality of Products or Services: Request samples or detailed information about their offerings. This helps evaluate the quality, uniqueness, or suitability of their products or services for your marketplace.
- Compliance with Policies: Ensure that they understand and comply with your platform’s policies, including rules on product quality, pricing, shipping, and customer service.
- References or Reviews: Check for references or reviews from previous marketplaces, customers, or business partners. Positive feedback can indicate reliability and trustworthiness.
- Communication and Responsiveness: Evaluate their communication style and responsiveness during the application process. This can reflect their professionalism and commitment to the marketplace.
- Fit with Marketplace Values: Assess how well their offerings align with your marketplace’s mission, values, and target audience. Consistency in brand values can enhance the overall image of the platform.
- Legal and Financial Standing: Ensure that the applicant meets any legal or financial requirements necessary for conducting business on your platform.
By considering these aspects, you can comprehensively assess applicants and ensure that they are a proper fit for your marketplace, contributing positively to its growth and reputation.

Conclusion
Do you want only the best vendors to become part of your online marketplace? Then manual vendor approval is a must.
To recap, you can use WC Vendors to give yourself the ability the manually approve vendors. Simply observe the following steps:
- Allow users to apply to your platform as vendors
- Enable the Vendor Approval option
- Approve or reject “Pending Vendors”
In addition, to ensure the best results, you should familiarize yourself with:
- The difference between manual and automatic vendor approval
- The advantages of manual vendor approval
- Vendor approval strategies
Would you like to know more about manual vendor approval? Reach out to us and let us know; we’d be happy to hear from you!


