Keeping your multi-vendor marketplace in perfect working condition can be a complicated, time-consuming endeavor. Thankfully, as long as you have the right tools for website debugging, you can enjoy headache-free maintenance that produces the best results.
The fact is that many plugins can effectively debug WordPress and WooCommerce sites. And if you have your staging environment configured, you can make this debugging even easier.
Today, we’ll talk about three of the best plugins you can use for website debugging. These are the tools we regularly use in our local development environment and when we’re offering professional support for WC Vendors Pro and our additional premium add-ons. We highly recommend using them for your own marketplace maintenance needs!
3 Best Plugins For Easy Website Debugging
So, you’re looking for the best tools for website debugging. Well, you’re in luck, because the three we’ve listed are easy to use and consistently reliable!
1. User Switching
As a marketplace operator, there might come instances when a swift switch to another user becomes necessary. For instance, a vendor might reach out to you with a reported issue, perhaps related to their dashboard or a specific view that you’re not privy to. So, how do you see things from their perspective to solve a problem only they can observe?
Simple: You temporarily step into the customer’s shoes to troubleshoot their problems.
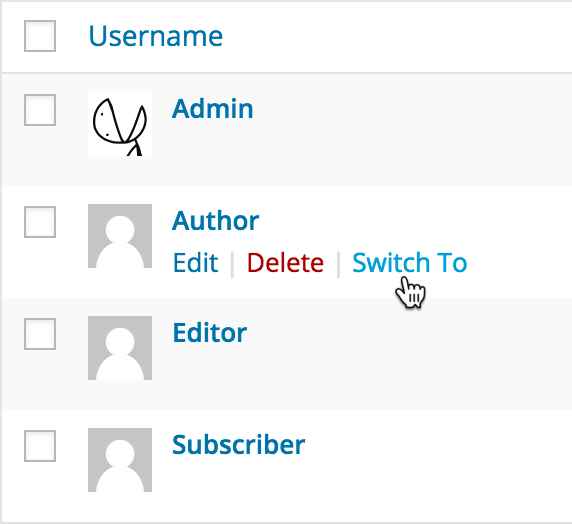
With a plugin known as User Switching, the process is remarkably straightforward. Upon logging into your WordPress admin dashboard, head to the Users section to locate the user whose perspective you want to view. Then, simply click on the “switch to” link. This transfers you into a session mirroring the user’s perspective, granting insight into exactly what they’re experiencing.
The ability to effortlessly transition between users without the need to alter passwords or make adjustments to an account configuration can lead to substantial time savings. We’ve been relying on this plugin since we started offering support services, and we can’t recommend it enough.
2. Query Monitor
Query Monitor is among the most valuable WordPress tools for website debugging. Basically, it pinpoints the issues causing slowdowns on your platform, both within the WordPress administration as well as your customer-facing site.
As stated on the Query Monitor page:
Query Monitor is the developer tools panel for WordPress. It enables debugging of database queries, PHP errors, hooks and actions, block editor blocks, enqueued scripts and stylesheets, HTTP API calls, and more.
Query Monitor can highlight a range of concerns, including slow queries, easily overlooked internal errors, and bottlenecks within your system. We have a ton of experience using it to debug our proprietary plugins and identify problems caused by other plugins. For this reason, we can confidently recommend Query Monitor to anyone wishing to debug complex sites.
Once you’ve installed Query Monitor, a new item will appear in the admin menu bar. This offers comprehensive statistics on all activities during each page load. As a result, you gain access to metrics such as:
- Slow queries
- Fatal errors
- Loaded templates
- Plugin order
- … and so much more!
Query Monitor has proven invaluable in identifying poorly written plugins and bugs within our code – issues that might have gone unnoticed on customer sites. Today, it’s one of the best tools for diagnosing internal performance concerns. Unlike the P3 Profile plugin (which we strongly discourage using), Query Monitor excels at detecting measurable problems.
Upon completing your debugging process, we recommend disabling or completely removing the plugin, keeping it exclusively on your staging site. Bear in mind that the plugin can introduce a marginal increase in page load times. Therefore, exercise caution when deploying it on your production website.
3. WP Mail Logging
Email delivery issues are a common challenge encountered by WordPress sites. As you introduce additional plugins that require email functionality, it can become difficult to determine the causes behind outgoing mail problems.
Here’s where WP Mail Logging comes in. By logging all outbound emails, it allows you to see when an email has been triggered. However, it’s important to clarify that this doesn’t necessarily mean that the email has been successfully sent. Rather, it indicates that WordPress and the plugin being debugged have triggered the email.
Frequently, users reach out, expressing concerns about emails not being sent. In most cases, these challenges don’t stem from our products but rather from mail conflicts or broader mail configuration issues.
Thankfully, WP Mail Logging streamlines the process of tracking which emails are in fact dispatched. Upon plugin installation, simply navigate to Tools > Mail Log within the WordPress admin. This lets you see if the email is being triggered by your site.
From here, you can determine whether the email isn’t being delivered or getting flagged as spam. If other WordPress-generated emails are arriving as expected, then it could be a plugin conflict or a problem with your mail server.
Furthermore, you can use the plugin to check the email’s appearance, proving valuable for troubleshooting display issues.
Once you’ve pinpointed the email’s underlying issue, WP Mail Logging allows you to resubmit emails as needed. So if you ever experience email anomalies, be sure to install this plugin.
To maintain the efficacy of the mail log, we advise configuring your settings to regularly cleanse logs. A weekly interval, like seven days, tends to be appropriate for sites of moderate size.
Conclusion
Today, we discussed three plugins for website debugging that will prove essential to marketplace maintenance:
We suggest installing and familiarizing yourself with these plugins. This way, should you ever encounter any issues with your WordPress site, you have a quick, easy, and reliable fix on hand.
Do you have any questions about the tools you can use for website debugging? Let us know in the comments!


